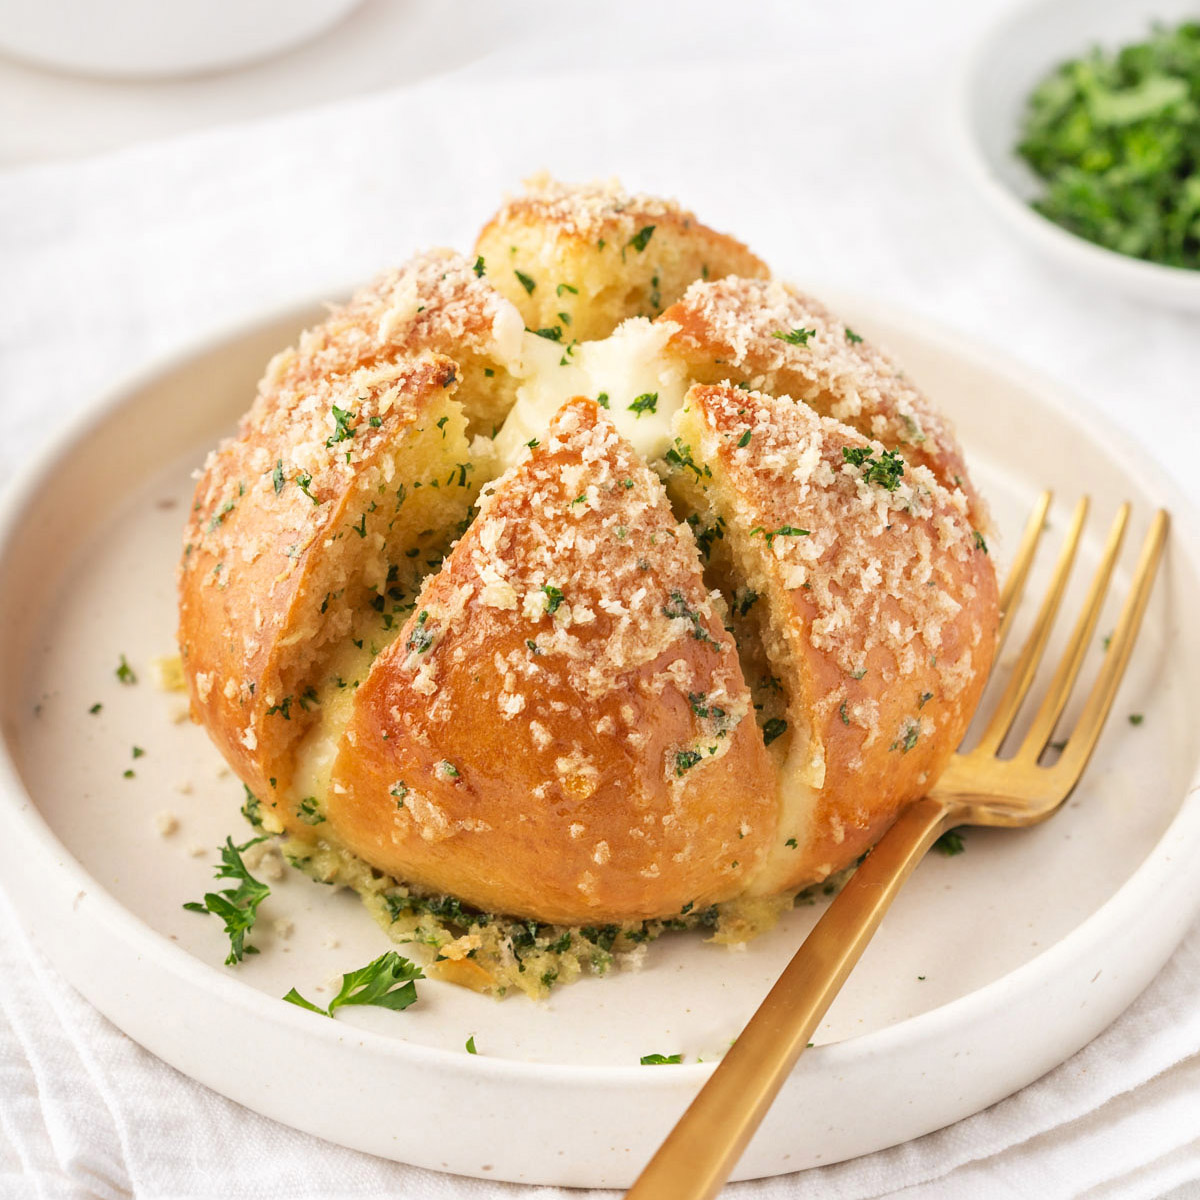
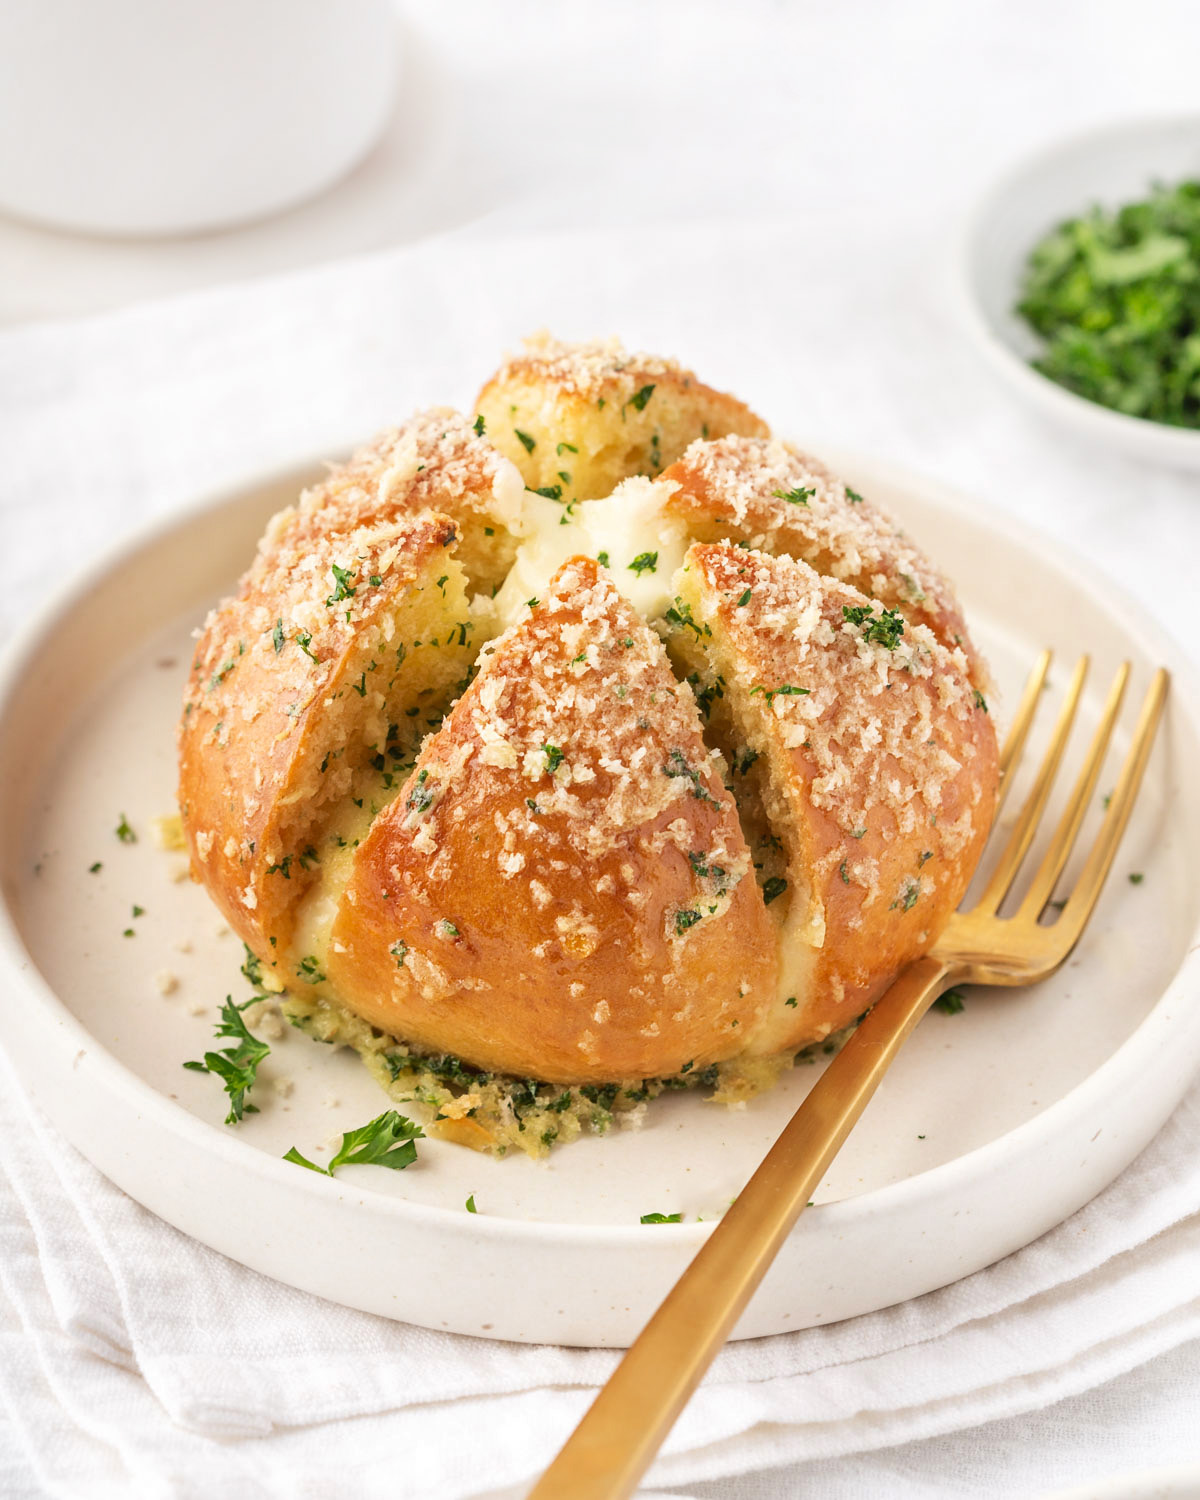
Step aside basic garlic bread, and make room for the new superstar Korean cream cheese Garlic bread. These Korean bread rolls stuffed with sweetened cream cheese and then dipped in a honey garlic butter custard are the best thing since sliced bread. The moment I laid eyes on these crispy yet buttery, savory, and sweet
Step aside basic garlic bread, and make room for the new superstar Korean cream cheese Garlic bread. These Korean bread rolls stuffed with sweetened cream cheese and then dipped in a honey garlic butter custard are the best thing since sliced bread.
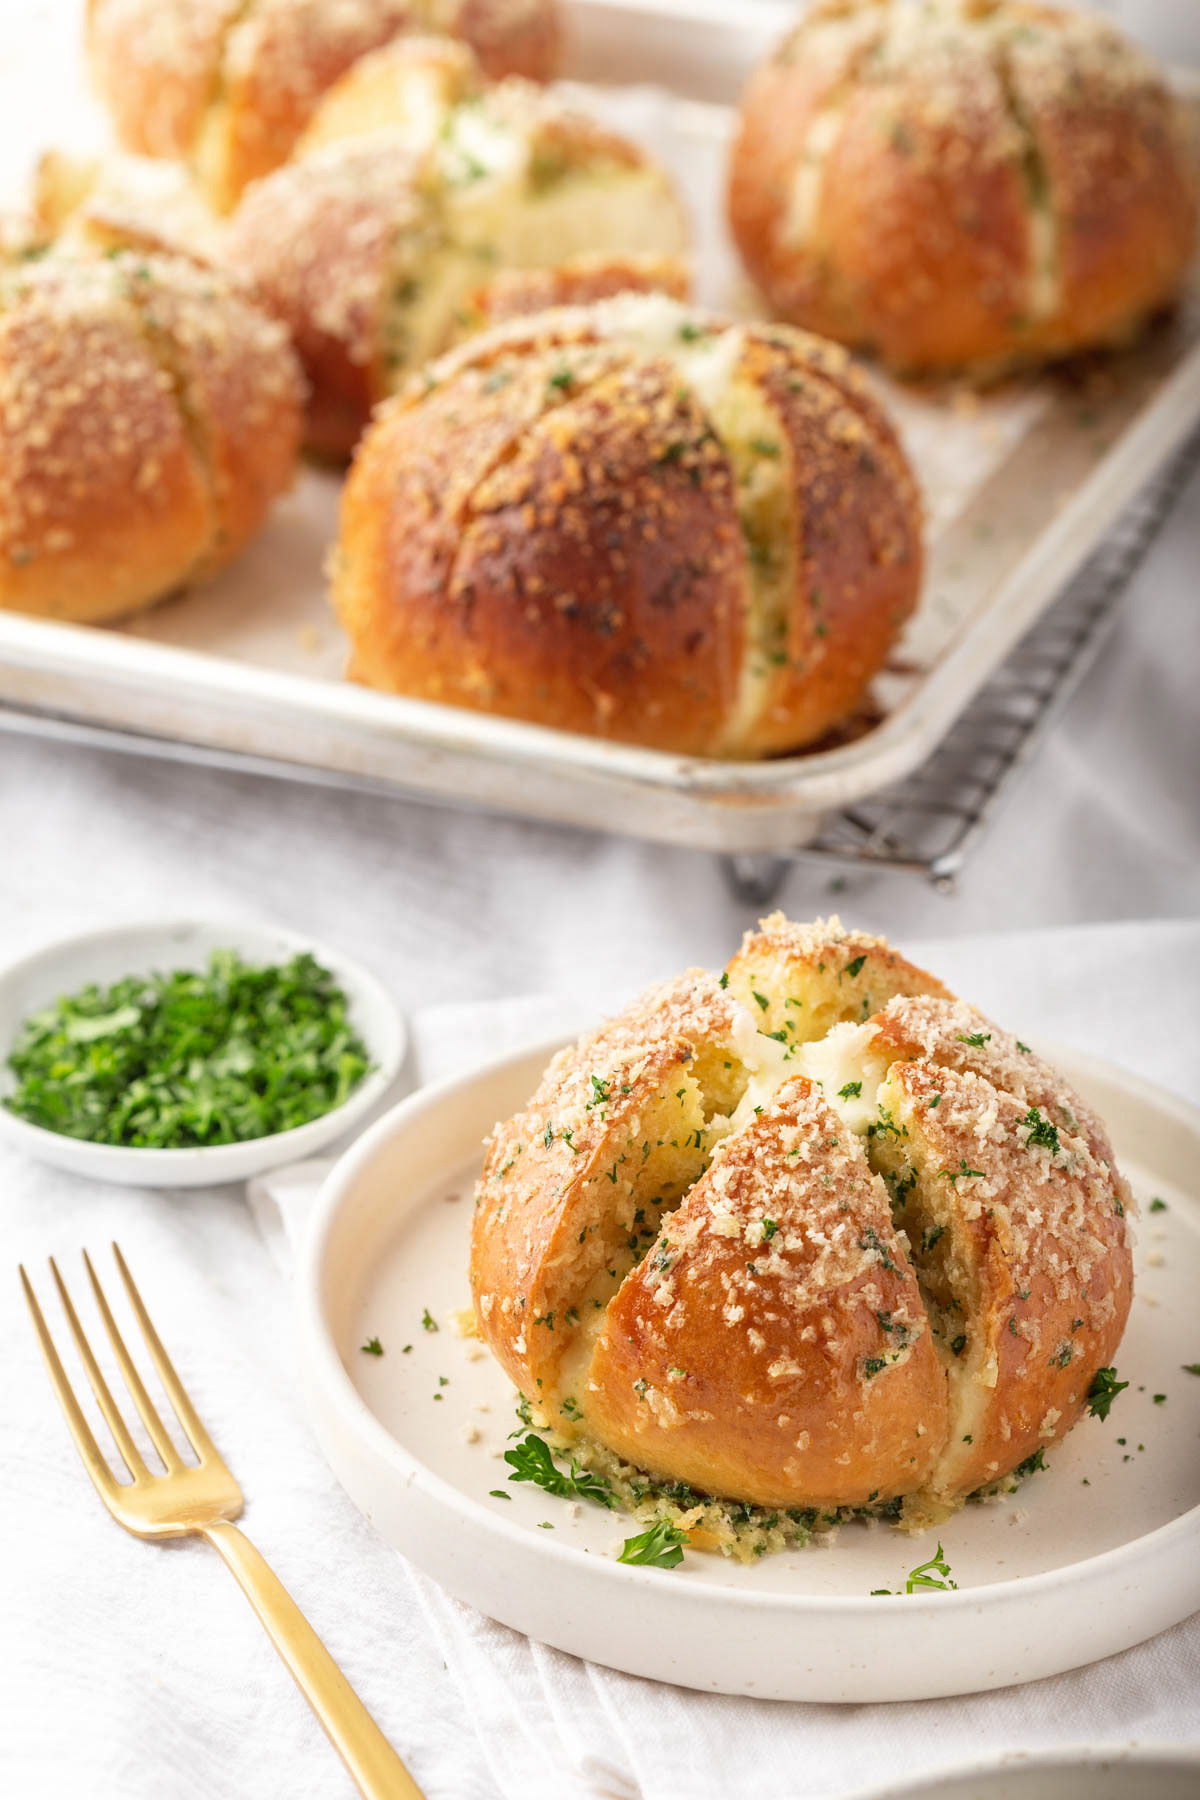
The moment I laid eyes on these crispy yet buttery, savory, and sweet Korean bread rolls it was love at first sight. How can you look away when it has all of the best things life has to offer? BUTTER, GARLIC, BREAD, SUGAR, and CREAM CHEESE. These Korean garlic bread rolls are super fun and satisfying to make and even more fun to eat. Pair this Korean cream cheese garlic bread with a refreshing cup of strawberry Yakult tea refresher and you’ll have a BOMB snack.
Korean cream cheese garlic bread is a popular Korean street food. It was said to have originated in Gangneung City in Gangwon Province. Korean garlic bread is made with a soft bread roll sliced into segments, filled with a sweetened cream cheese filling, and lastly dunked in a buttery garlic and parsley custard. This Korean bread is double-baked for that light crunch at the top of the bread and softness in the core.
Korean cream cheese garlic bread differs from typical garlic bread in that it contains a sweetened cream cheese filling as well as a more custard garlic butter sauce. Layering that extra touch of sweetness to that buttery savory custard will balance out quite nicely and your tastebuds will thank you.
Ingredients
There are no complicated Asian ingredients for this Korean cream cheese garlic bread recipe. Most of these ingredients are normal pantry staples and the others can be found at your local grocery store.
Bread Rolls
Milk: milk creates a bread that is richer and more velvety in texture. The milk makes a softer crust that will brown more quickly
Granulated Sugar: the granulated white sugar feeds the yeast in the bread.
InstantDryYeast: I like to useinstant dry yeastbecause it cuts back on time. However, active dry yeast works as well you simply have to activate the yeast in the warmed milk for 10 minutes before adding it to the bread flour.
Bread Flour: Bread flour has a higher protein content than all-purpose, usually 11-13%. This is necessary for bread because bread needs higher amounts of protein to produce lots of gluten. The more you knead the dough, the more the dough develops and gives it the perfect soft chew texture. I like using King Arthur’s Bread Flour.
Salt: Salt flavors the bread. BE CAREFUL not to add salt immediately to the yeast or it will instantly kill the yeast. Make sure to incorporate the yeast in with the other ingredients first before adding in the salt.
Large Eggs: the eggs help make finer and richer bread, provide more volume, and bind all the ingredients in the dough together.
Unsalted butter: the butter adds to a higher rise, more moisture in the crumb, and a longer shelf life.
Cream Cheese and Butter Filling
CreamCheese: Use full-fat brick cream cheese for optimal results.
Sugar: the sugar sweetens the cream cheese and tenderizes the texture.
Heavy Cream: the heavy cream thins out the whipped cream cheese, so the texture will not be too dense but not too runny either.
Garlic: Fresh garlic is the best for this. The fresher the garlic the more pungent the flavor will come through.
Unsalted Butter: You can’t have garlic bread without butter. Butter is the main attraction.
Large Eggs: the eggs thicken the garlic butter to form a custard that binds the garlic butter to the inside of the Korean bread rolls.
Condensed Milk: the condensed milk thickens the garlic butter and adds a subtle hint of sweetness. You can also substitute condensed milk with regular milk.
Honey: the honey also contributes to the texture and sweetness of the garlic butter custard.
Parsley: the parsley brightens up the garlic butter.
Panko Bread Crumbs: the panko bread crumbs are entirely optional but I love the extra crispy crunch they add to the bread roll. I use Kikkoman Panko Bread Crumbs they have been the best-tasting and most reliable brand I’ve used thus far.
How to Make This Recipe
Here are the steps on how to make this Korean cream cheese garlic bread recipe. Making Korean garlic bread takes 4 major steps: 1. bake the bread rolls, 2. whip the cream cheese filling, and 3. make the honey garlic butter custard, 4. Assemble and bake.
Bake the Bread Rolls
*you can always skip this step by buying soft white bread rolls instead, but I find that making homemade bread rolls always tastes better
Make the dough. In the stand mixer bowl with the paddle attachment, mix together the bread flour, salt, eggs, sugar, instant yeast, and milk. Mix until just combined.
Switch to your dough hook. Then add softened butter and mix on medium speed (4-6 speed). Mix until incorporated.
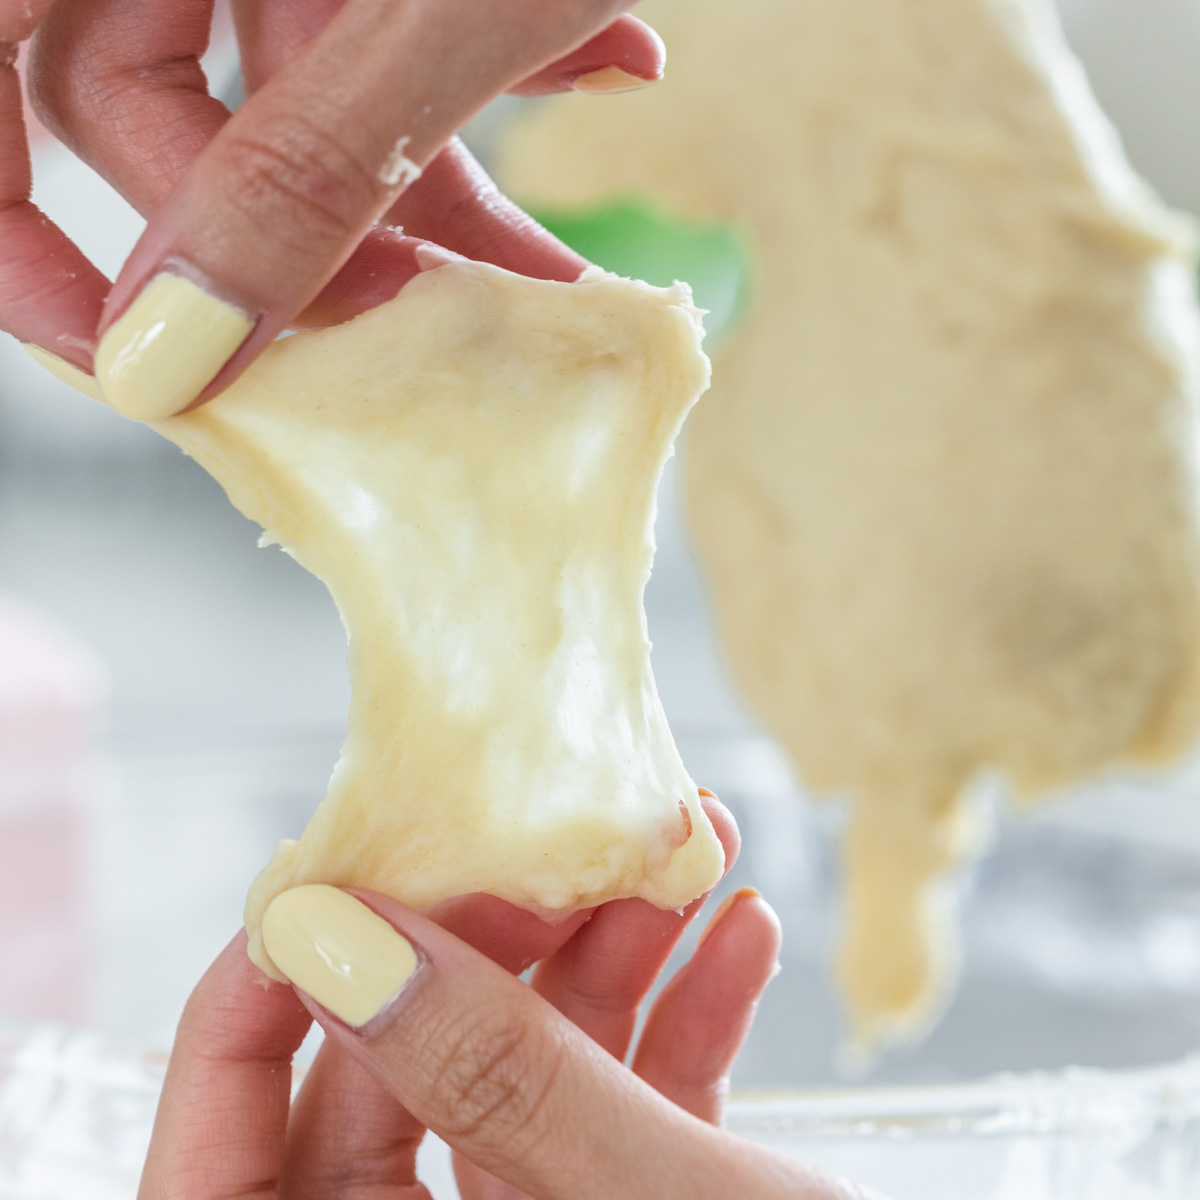
Increase speed to high (8 speed) and knead for about 15-20 minutes. The dough should be smooth, elastic, and not too sticky. You will know the dough is done if it passes the window-pane test: pinch a small piece of dough from the ball and stretch it. It should not break easily, and light should be able to shine through it revealing your fingers.
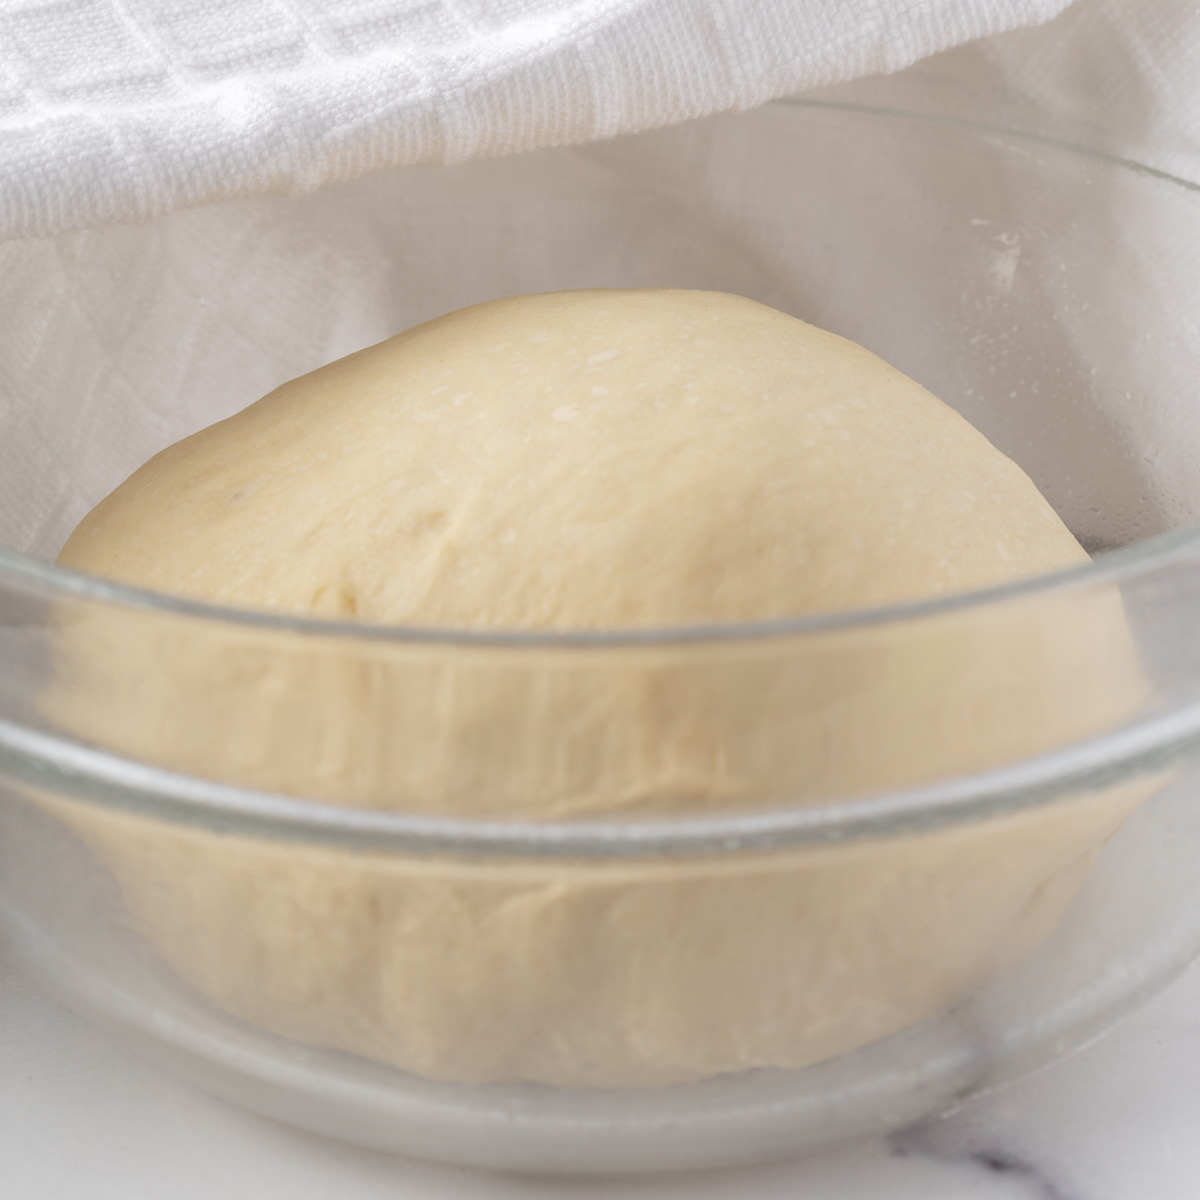
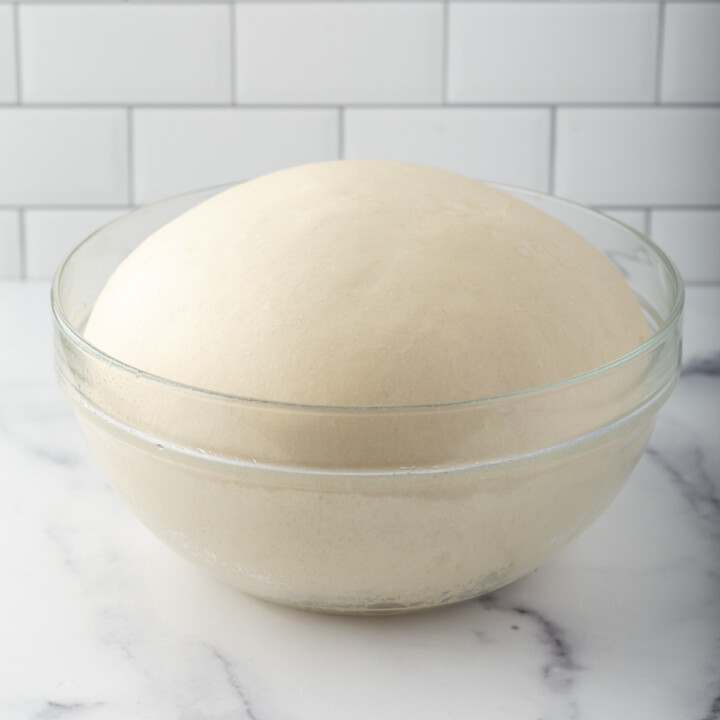
Proof the dough. Roll and tuck the dough under itself to form a smooth ball. Place in a lightly greased bowl, cover with plastic wrap and place the dough in a warm place (oven at 100F) for about 1 hour or double in size.
Remove the dough and knead. Once doubled in size, check to see if the dough is proofed by poking the dough, the dough should not bounce back. Deflate the dough and knead on a lightly floured surface for about 3-4 minutes to relax the dough.
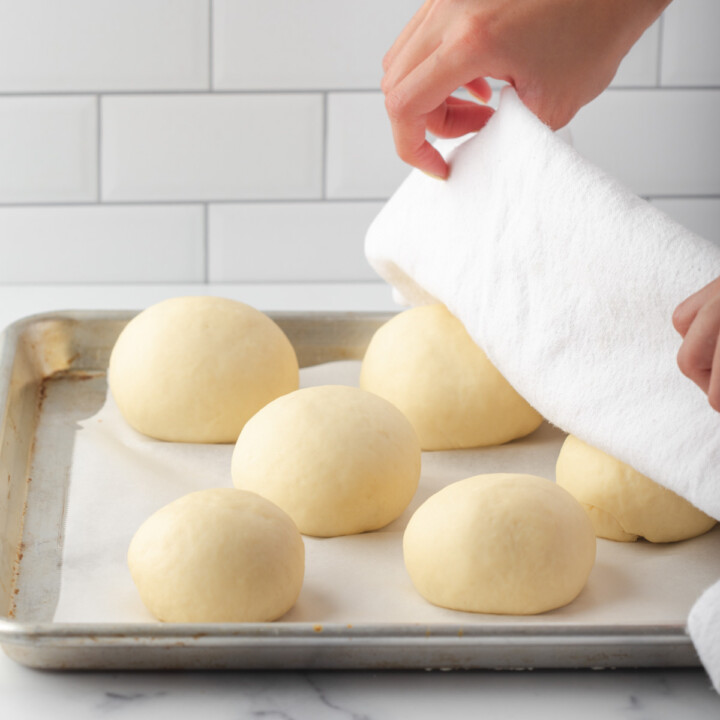
Divide the dough and shape it into balls. Divide the dough into 8 equal pieces. Tightly tuck the dough balls under themselves to form smooth buns.
Proof the dough again. On a parchment-lined baking sheet, cover loosely with plastic wrap or a towel and let them rise for 30 minutes.
Brush with egg wash and bake. Bake at 350°F for 18-20 minutes or until golden brown.
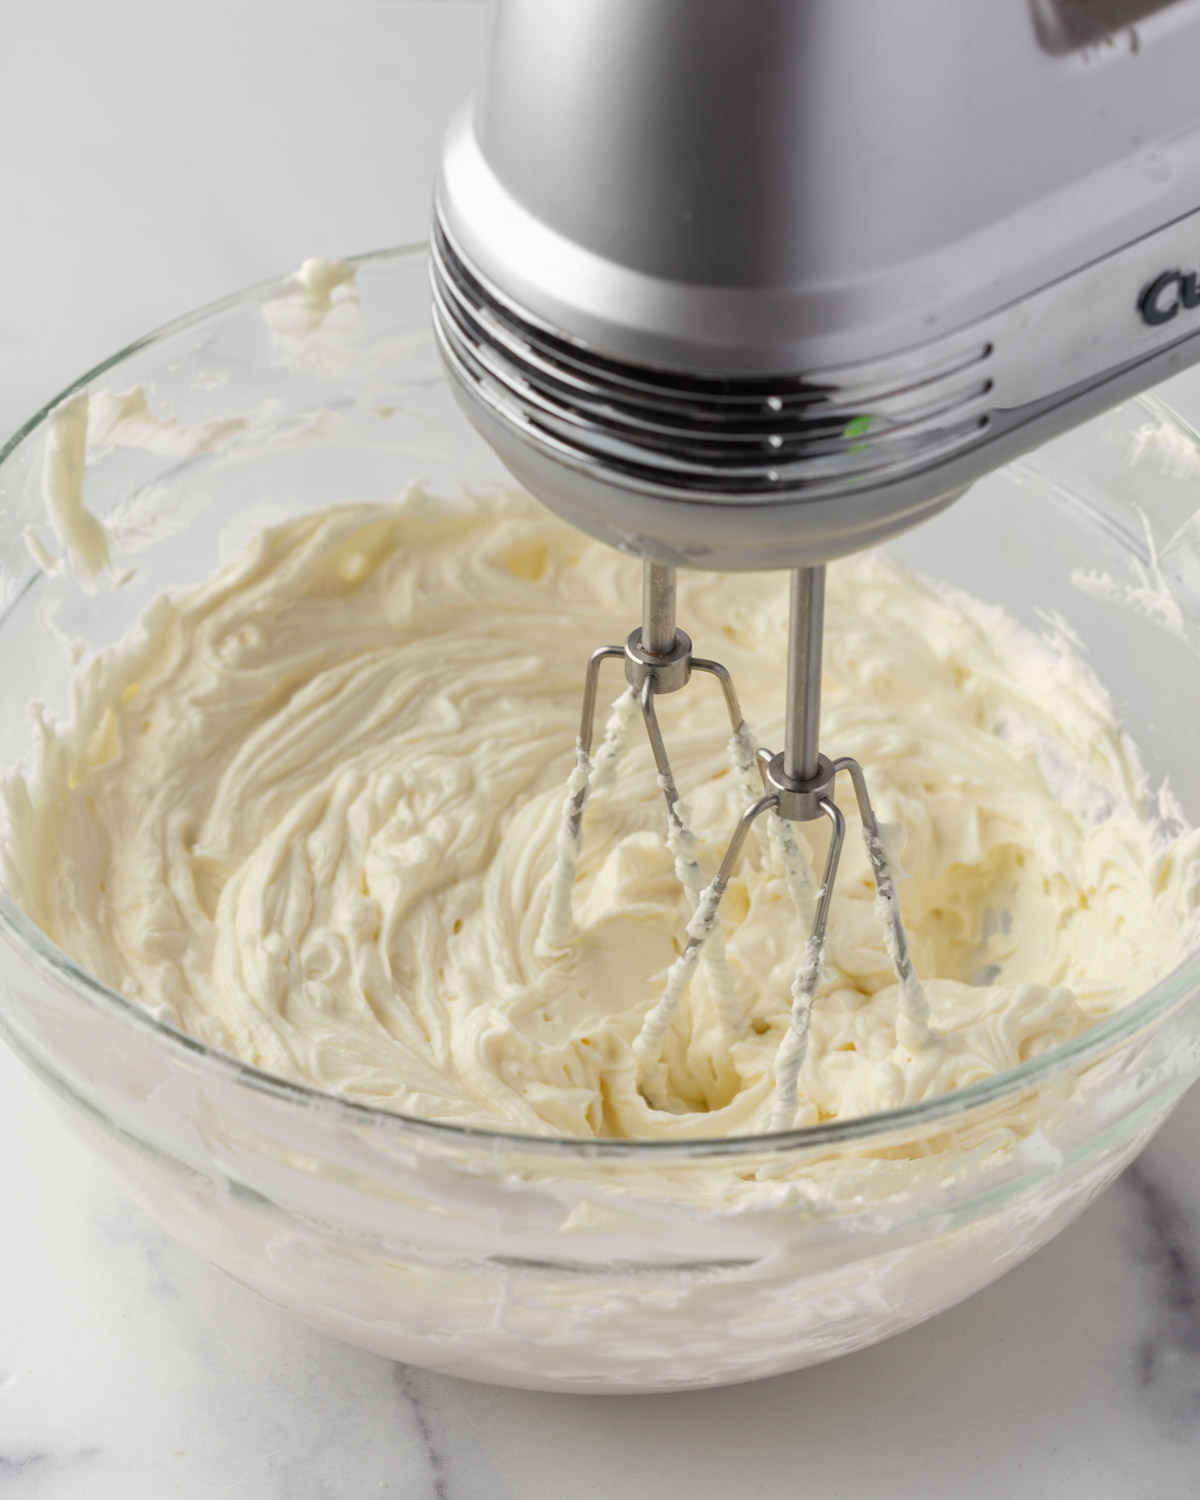
Whip the Cream Cheese Filling
Whip the cream cheese. In a large bowl, using the stand mixer or a hand mixer, whip the cream cheese until light and airy.
Slowly add the sugar while the mixer is mixing. Whisk until fully incorporated. Lastly, add the heavy cream and whisk until smooth.
Place in a piping bag with a large piping tip. Set aside.
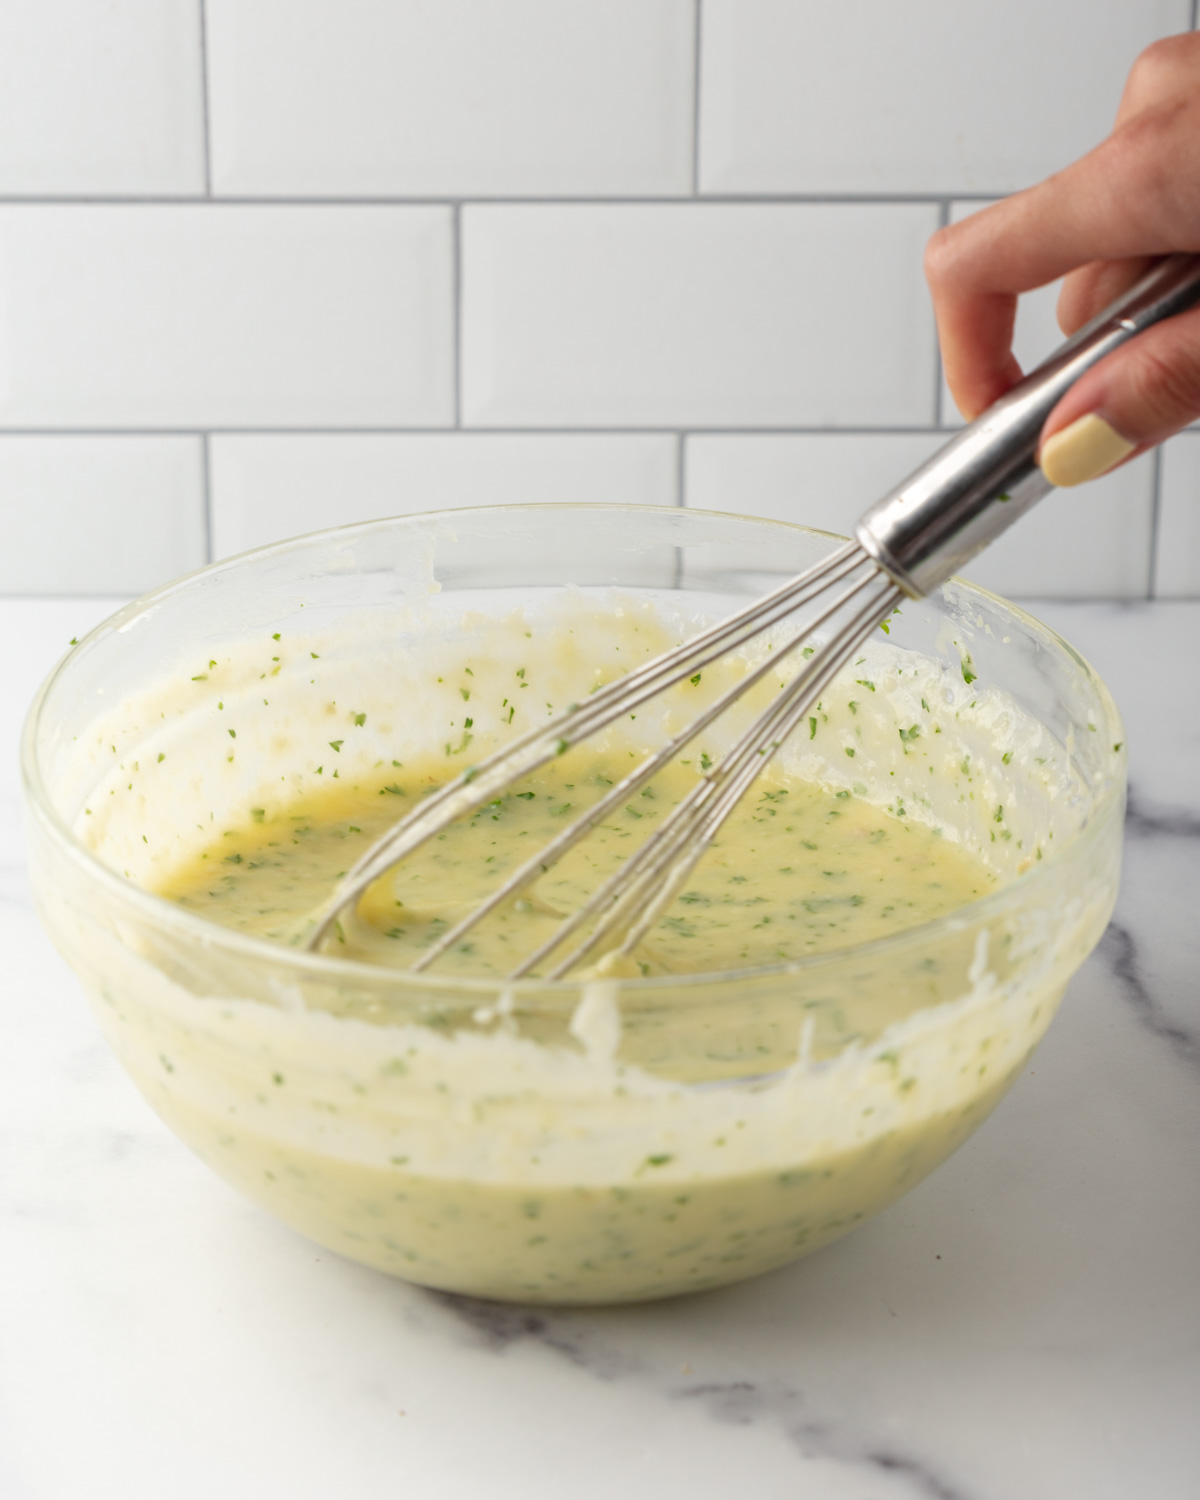
Make the Honey Garlic Butter Custard
Melt the butter in a medium bowl. Mix in the minced garlic, condensed milk, and honey.
When the butter has cooled, add in the eggs and parsley. Whisk until combined. Set aside.
Assemble and Bake
Preheat oven to 350°F and line a baking sheet with parchment paper
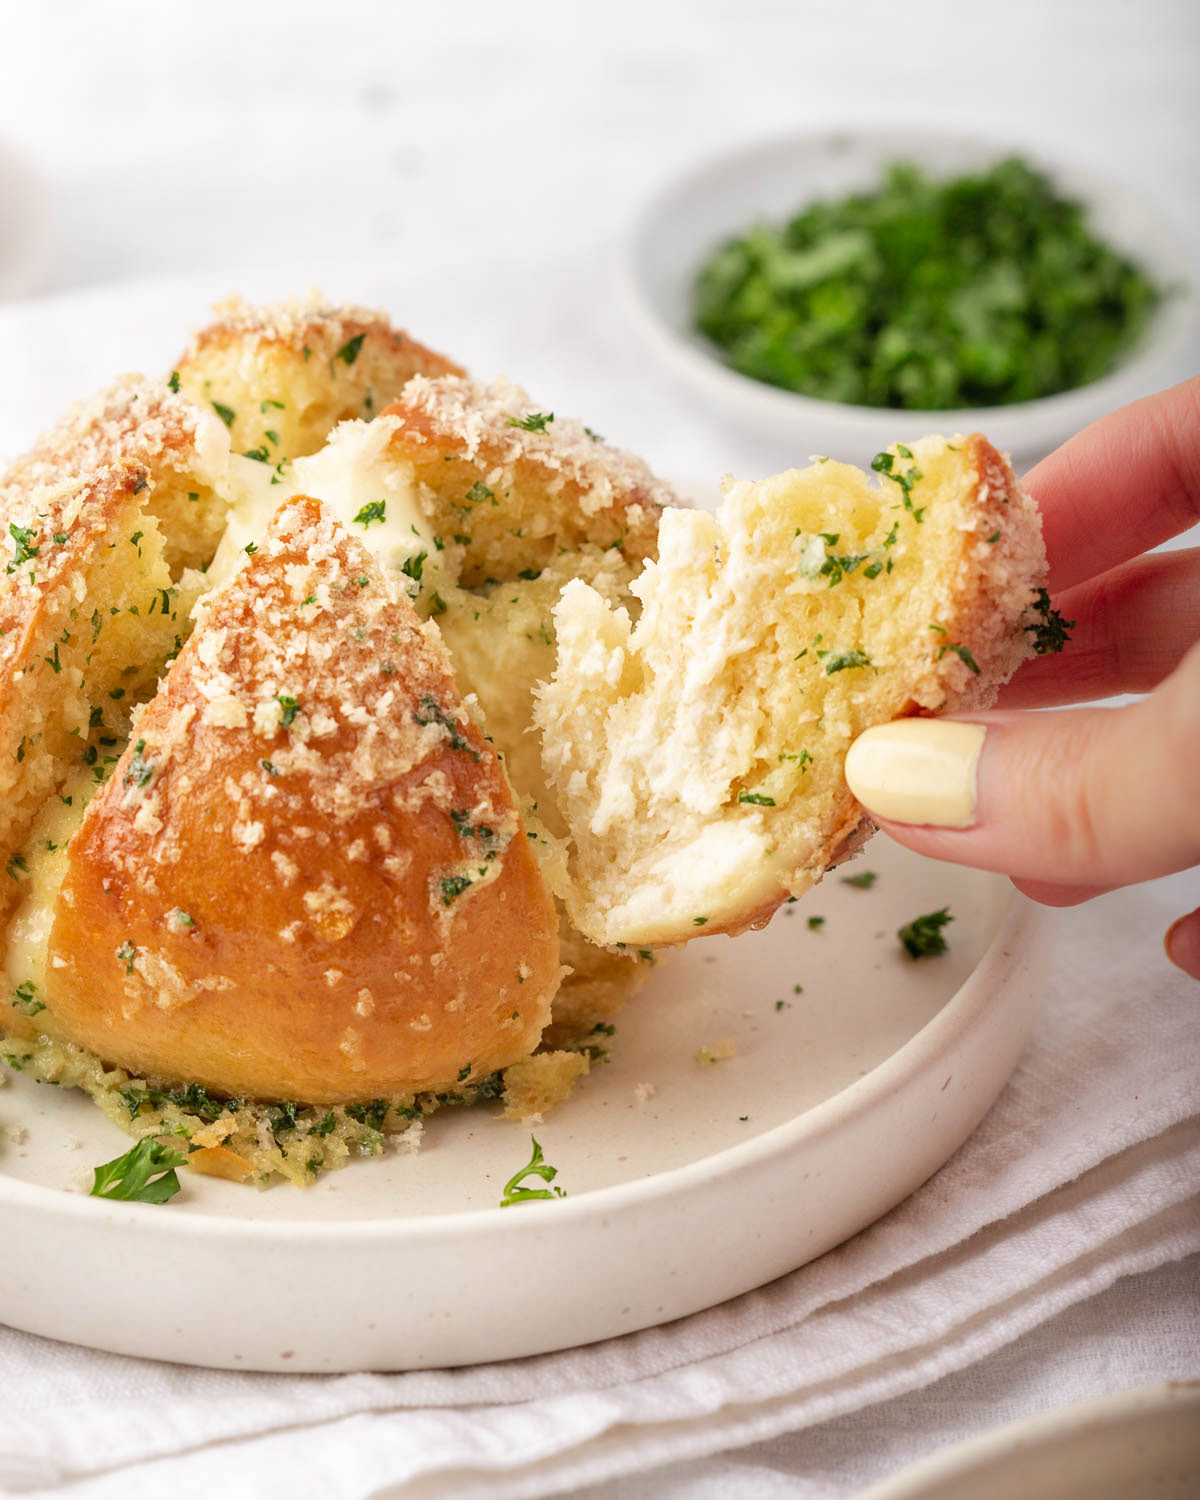
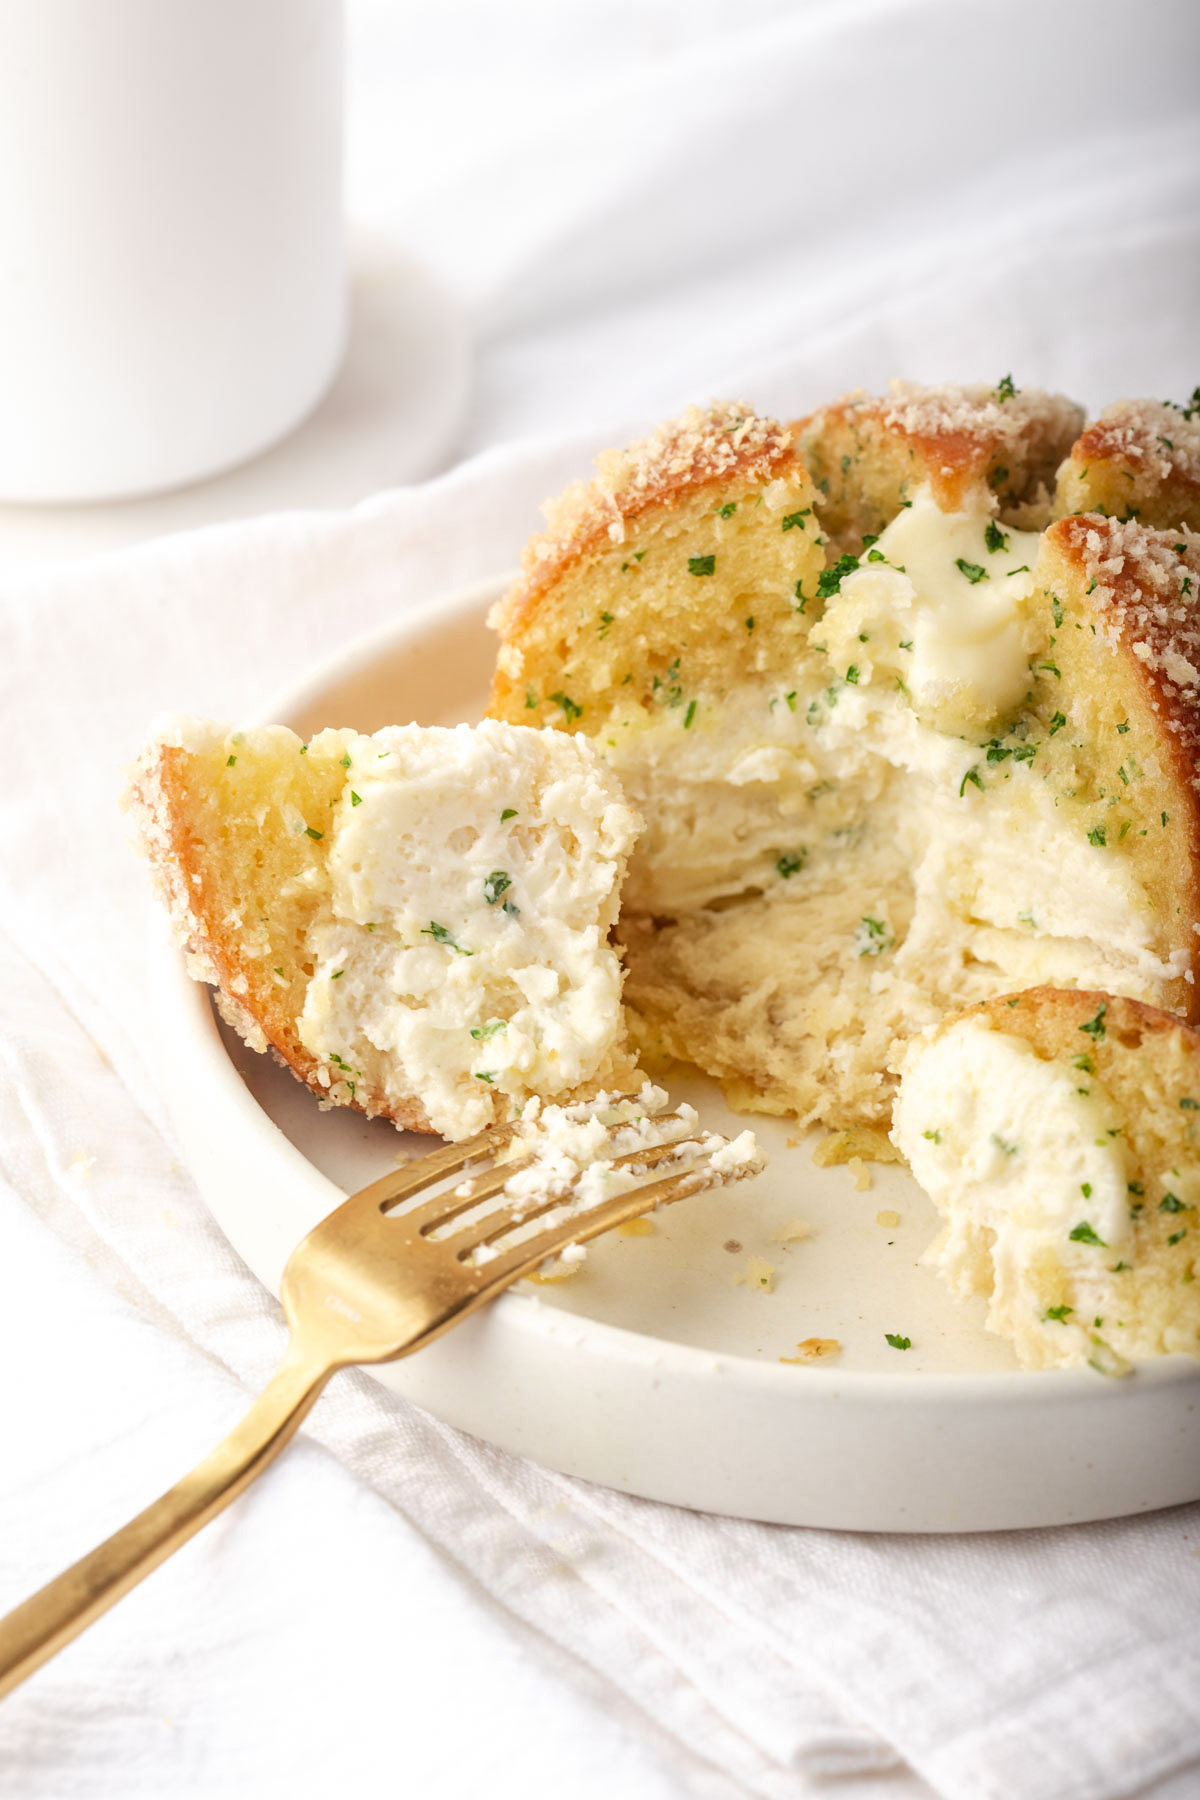
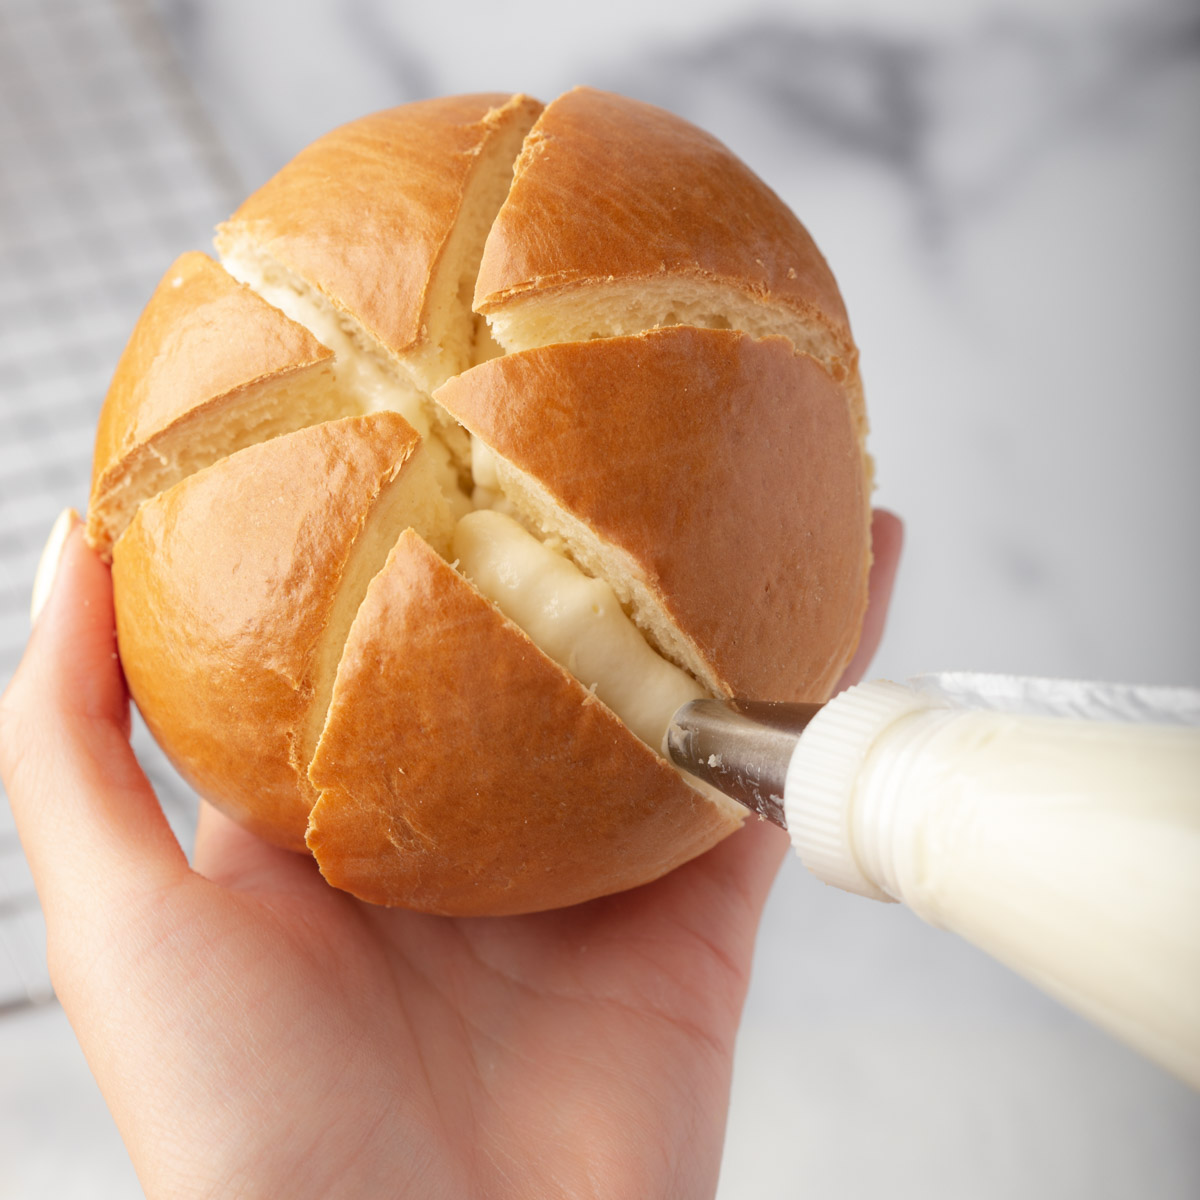
Slice each Korean bread roll into 6 sections or three slices across each side. BE CAREFUL not to cut the bread all the way through. The bread still needs to be attached at the bottom.
Pipe in the sweet cream cheese in-between each section.
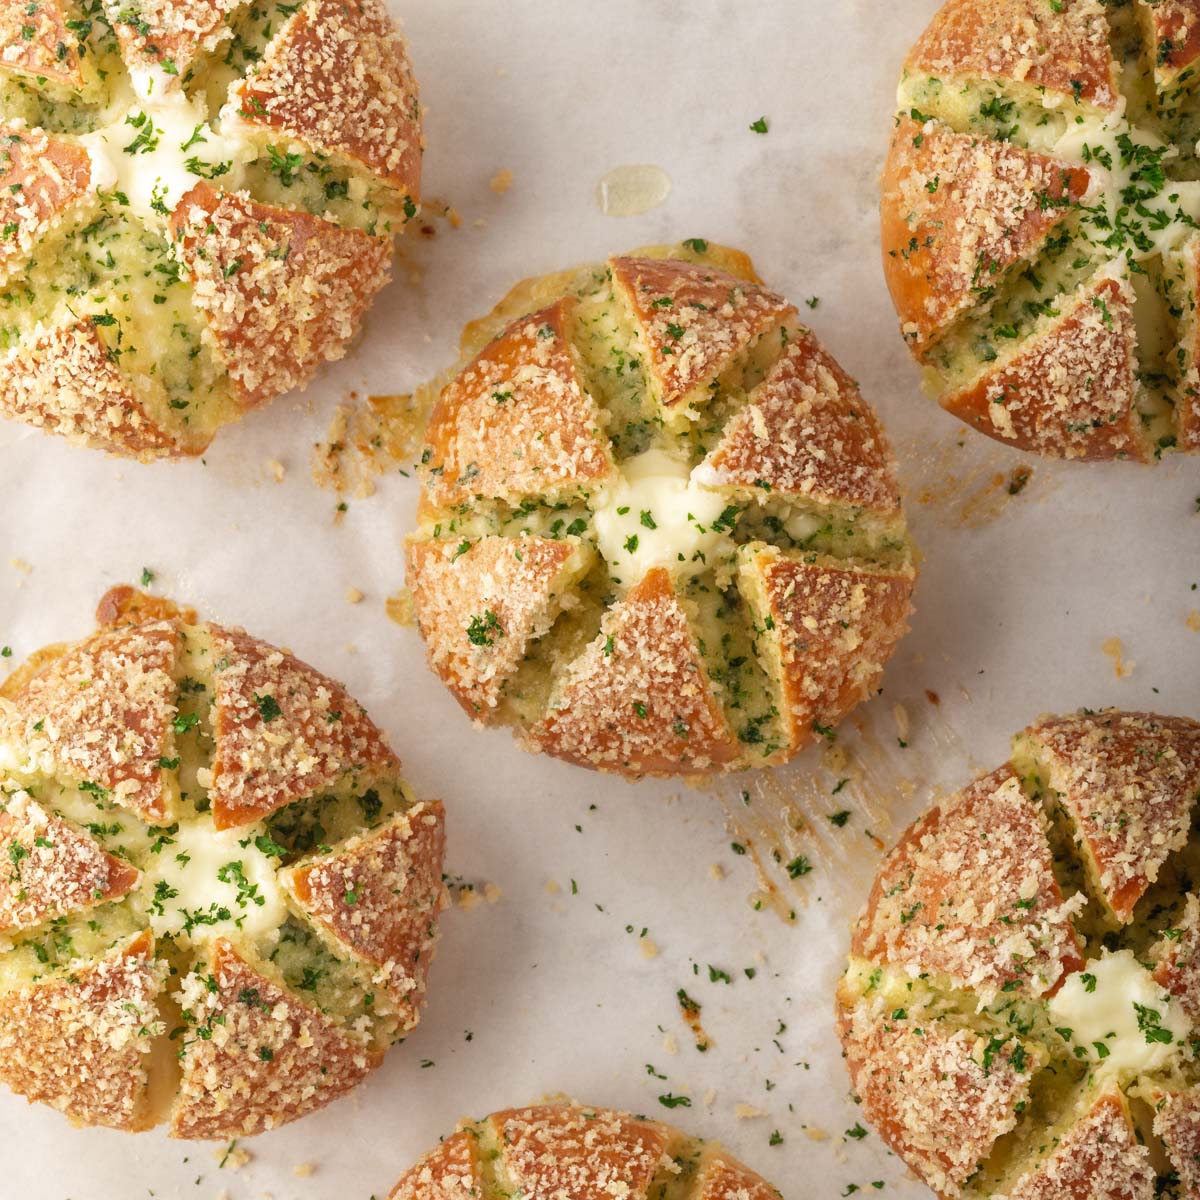
Pour the honey garlic butter over each bread roll, until it’s evenly coated. Make sure to coat all the corners and crevices. You can also simply dunk the bread rolls to immerse them completely. Hold the roll upside down to drain excess butter.
Sprinkle with panko bread crumbs or parmesan cheese. Or both!
Place each Korean garlic bread roll on a parchment-lined baking sheet. Bake for 10-15 minutes at 350°F or until the tops are crispy
Tips for The Best Korean Cream Cheese Garlic Bread
Use a scale! I did my best to convert the ingredients into measurements, however, to get the most precise and no-fail bake it is best if you use a scale for the most accurate reading.
If using active dry yeast, heat milk to 110-115 F and mix in the yeast. Cover and wait about 10 min until the yeast blooms.
If you don’t have a stand mixer, you can knead by hand. Simply mix all the dough ingredients together with a whisk first until combined and then knead on a lightly floured surface until the dough passes the windowpane test.
Do the windowpane test. To make sure the dough is ready, take a small piece of dough and stretch it with your fingers. It should not break and should stretch thin enough that you can see your fingers through it. If it rips easily, keep kneading.
Do the poke test. Alternatively, you can see if the dough is ready by poking the dough. If it springs back immediately it is ready. If it sinks in, keep kneading.
When shaping the dough into balls, tightly tuck the dough. This is important for the dough to maintain its shape after it is proofed a second time and baked. If the dough is not tight enough it will flatten.
During the second bake, if the Korean cream cheese garlic bread starts to get too dark lightly cover with foil to prevent it from burning.
Storage Instructions
You can store these Korean garlic cheese bread in the refrigerator in an airtight container for up to 5 days.
Reheat: To reheat simply pop the garlic cream cheese bread in the oven at 350F for roughly 3-5 minutes.
Frozen: This Korean bread can also be frozen for up to 3 months. To reheat frozen buns, thaw the buns in the refrigerator overnight and reheat in the oven.
Step aside basic garlic bread, make room for the new superstar Korean Cream Cheese Garlic bread. These Korean bread rolls stuffed with sweetened cream cheese and then dipped in a honey garlic butter custard are the best thing since sliced bread.
Make the dough. In the stand mixer bowl with the paddle attachment, mix together the bread flour, sugar, instant yeast, and milk until combined. The dough will be crumbly and that's ok. (If using active dry yeast, see notes)
Add eggs and salt. Once mixed together, add in the eggs in at a time and then the salt. Mix until the dough begins to form. The dough will be really sticky at this point.
Switch to your dough hook and knead at medium speed for 7 minutes until the dough is no longer sticky. The dough should be smooth, elastic and should spring back when you press your finger into it.
Add butter. Then add softened butter mixing on medium speed. Mix until incorporated. (If you don't have a stand mixer, see notes)
Increase speed to high (10 speed) and knead for about 15-20 minutes. You will know the dough is done if it passes the window-pane test: pinch a small piece of dough from the ball and stretch it. It should not break easily, and light should be able to shine through it revealing your fingers.
Proof the dough. Roll and tuck the dough under itself to form a smooth ball. Place in a lightly greased bowl, cover with plastic wrap and place the dough in a warm place (oven at 100F) for about 1 hour or double in size.
Remove the dough and knead. Once doubled in size, check to see if the dough is proofed by poking the dough, the dough should not bounce back. Deflate the dough and knead on a lightly floured surface for about 3-4 minutes to relax and smooth the dough.
Divide the dough and shape into balls. Divide the dough into 8 equal pieces. Gently tuck the dough balls under itself to tighten the dough and form smooth buns.
Proof the dough again. On a parchment-lined baking sheet, cover loosely with plastic wrap or a towel and let them rise for 30 minutes.
Brush with egg wash and bake. Bake at 350°F for 18-20 minutes or until golden brown.
Whip the Sweet Cream Cheese Filling
Whip the cream cheese. In a large bowl, using the stand mixer or a hand mixer, whip the cream cheese until light and airy.
Slowly add the sugar while the mixer is mixing. Whisk until fully incorporated. Lastly, add the heavy cream and whisk until smooth.
Place in a piping bag with a large piping tip. Set aside.
Make the Honey Garlic Butter Custard
Melt the butter in a medium bowl. Mix in the minced garlic, condensed milk, and honey.
When the butter has cooled, add in the eggs and parsley. Whisk until combined. Set aside.
Assembly
Preheat oven to 350°F and line a baking sheet with parchment paper
Slice each bread roll into 6 sections or three slices across each side. BE CAREFUL not to cut the bread all the way through. The bread still needs to be attached at the bottom.
Pipe in the sweet cream cheese in-between each section.
Pour the honey garlic butter over each bread roll, until it’s evenly coated. Make sure to coat all the corners and crevices. You can also simply dunk the bread rolls to immerse them completely. Hold the roll upside down to drain excess butter.
Sprinkle with panko bread crumbs or parmesan cheese. Or both! This part is all up to you. Pipe the center with remaining cream cheese.
Place each bread roll on a parchment-lined baking sheet. Bake for about 8-10 minutes at 350°F or until the tops are crispy
Notes
Use a scale! I did my best to convert the ingredients into measurements, however to get the most precise and no fail bake it is best if you use a scale for the most accurate reading. I love this kitchen scale.
If using active dry yeast, heat milk to 110-115 F and mix in the yeast. Cover and wait about 10 min until the yeast blooms.
If you don't have a stand mixer, you can knead by hand. Simply mix all the dough ingredients together with a whisk first until combined and then knead on a lightly floured surface until the dough passes the window pane test.
Do the window pane test. To make sure the dough is ready, take a small piece of dough and stretch it with your fingers. It should not break and should stretch thinly enough that you can see your fingers through it. If it rips easily, keep kneading.
Do the poke test. Alternatively, you can see if the dough is ready by poking the dough. If it springs back immediately it is ready. If it sinks in, keep kneading.
When shaping the dough into balls, tightly tuck the dough. This is important for the dough to maintain its shape after it proofs a second time and bakes. If the dough is not tight enough it will flatten.
During the second bake, if the bread starts to get too dark lightly cover with foil to prevent from burning.
Storage Instructions: You can store these in the refrigerator in an airtight container for up to 5 days. To re-heat simply pop them in the oven at 350F for roughly 3-5 minutes. They can also be frozen for up to 3 months. To re-heat frozen buns, bring the buns to room temperature and re-heat in oven.


Rate & Review What did you think of this recipe?