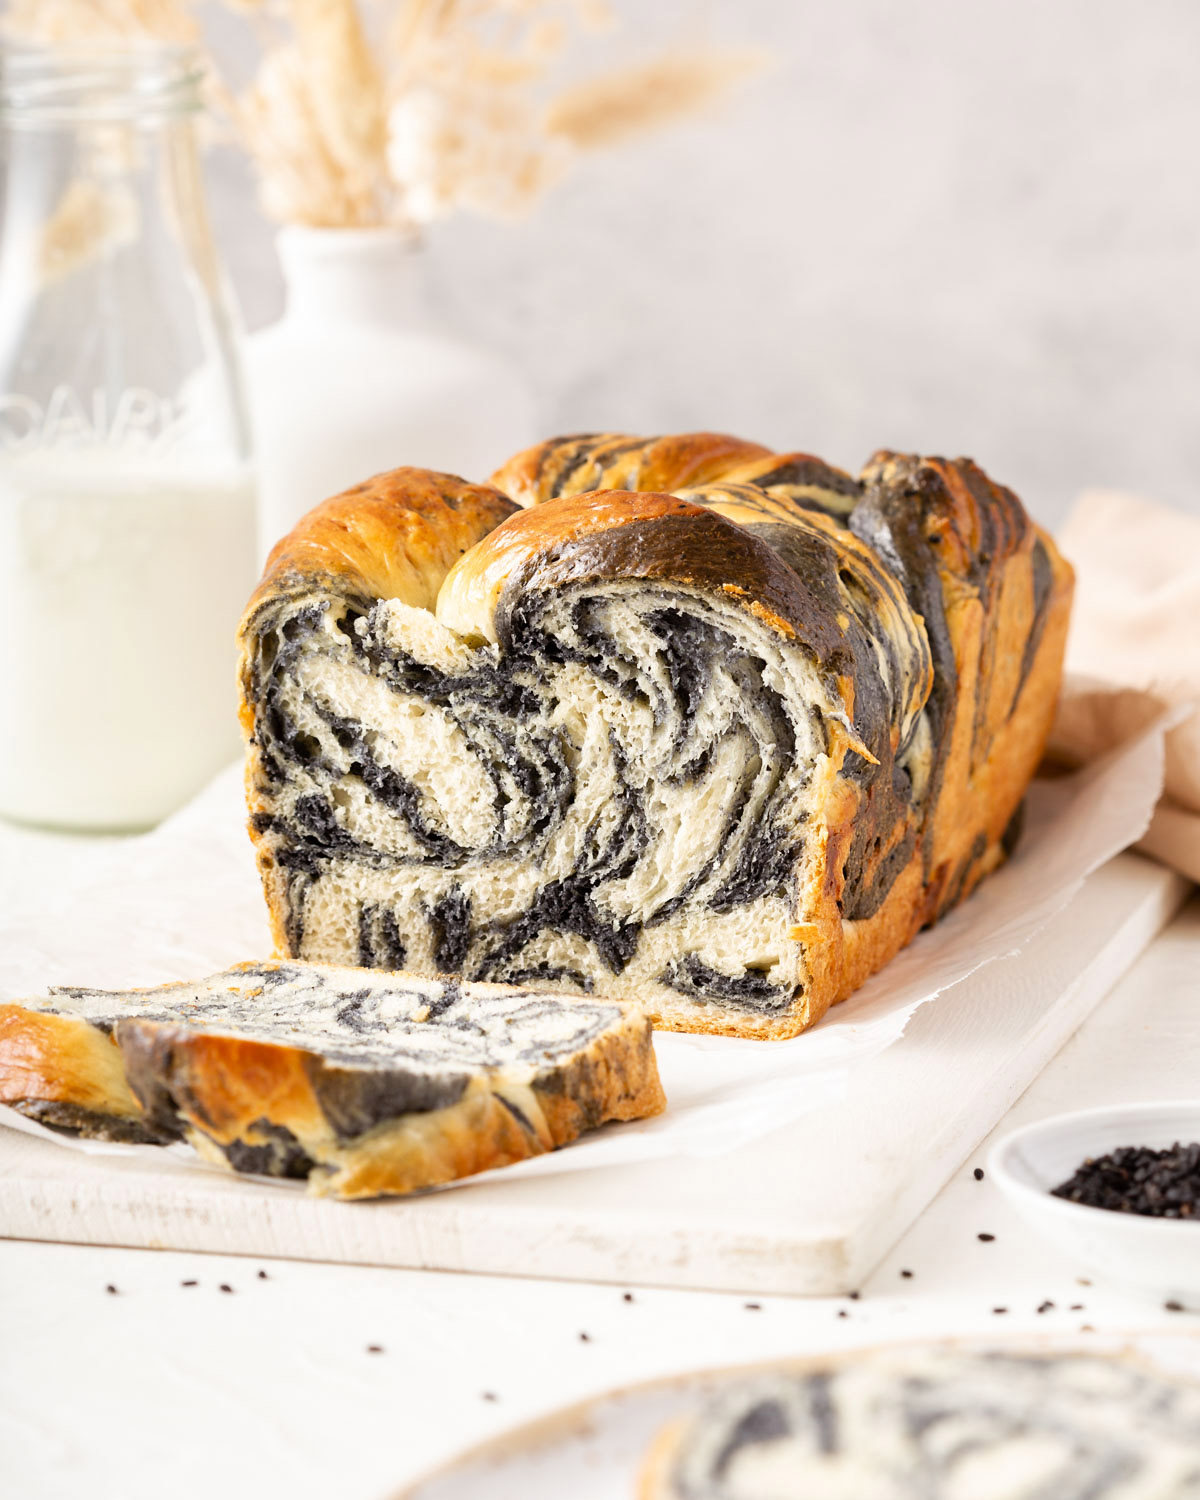
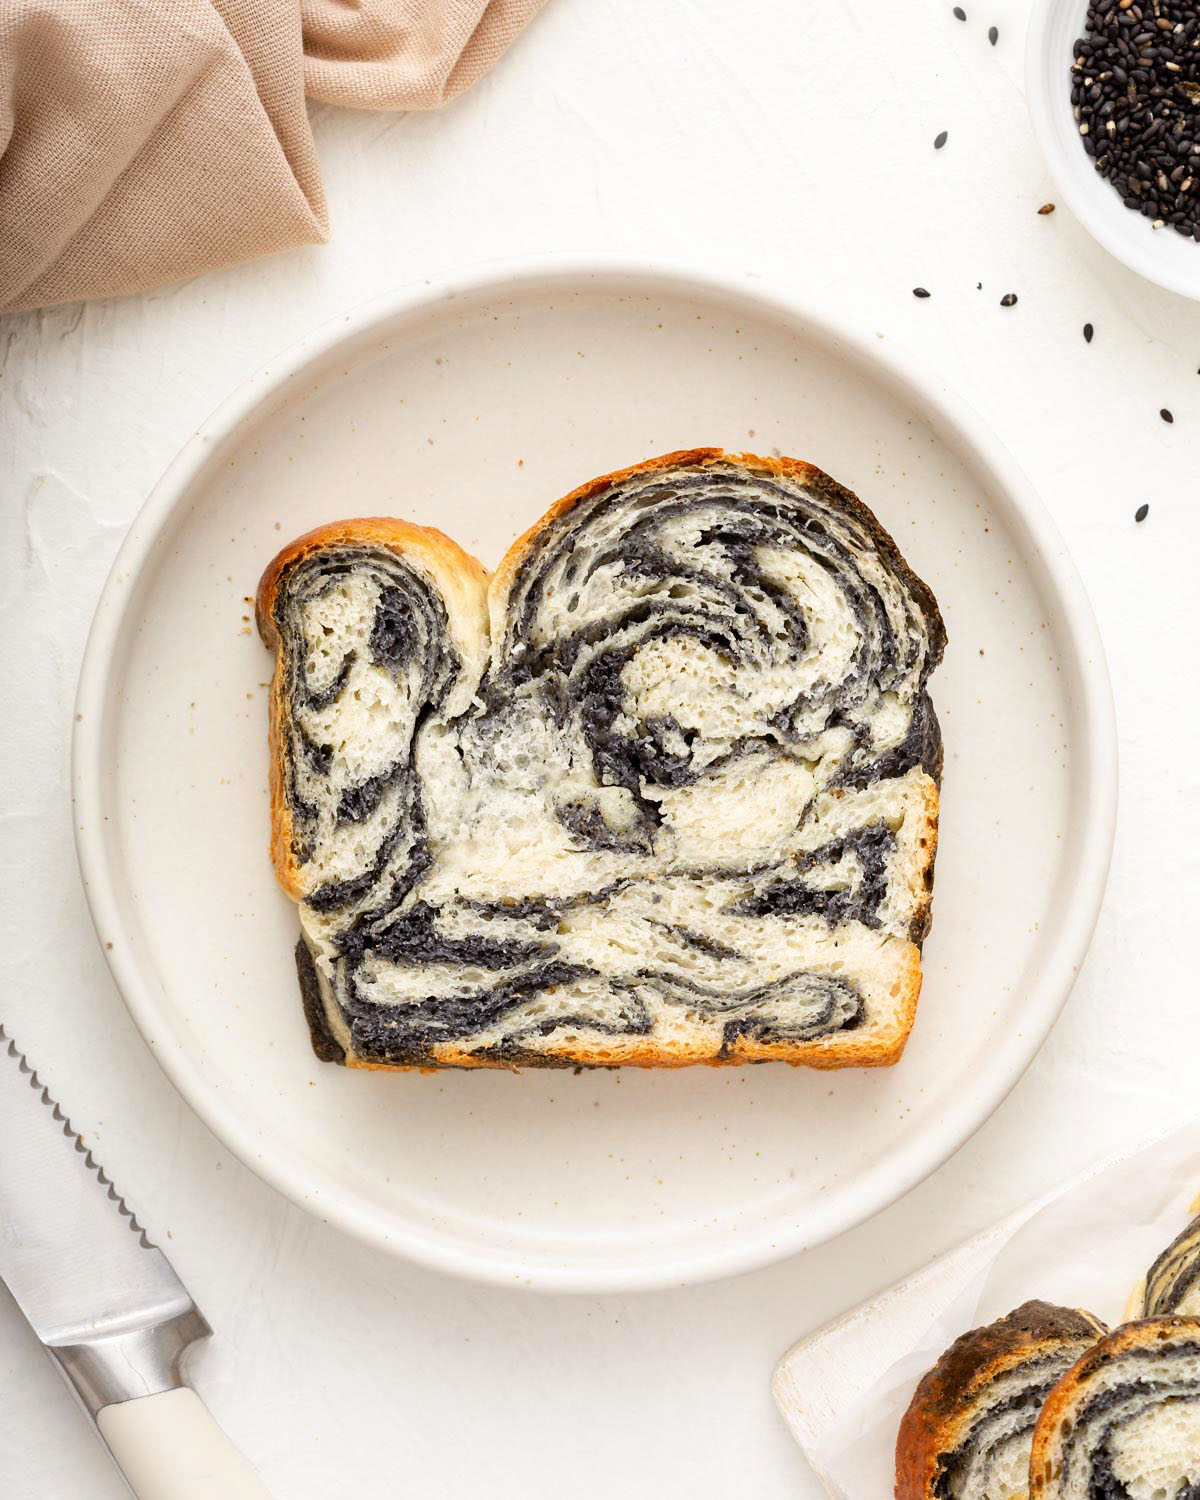
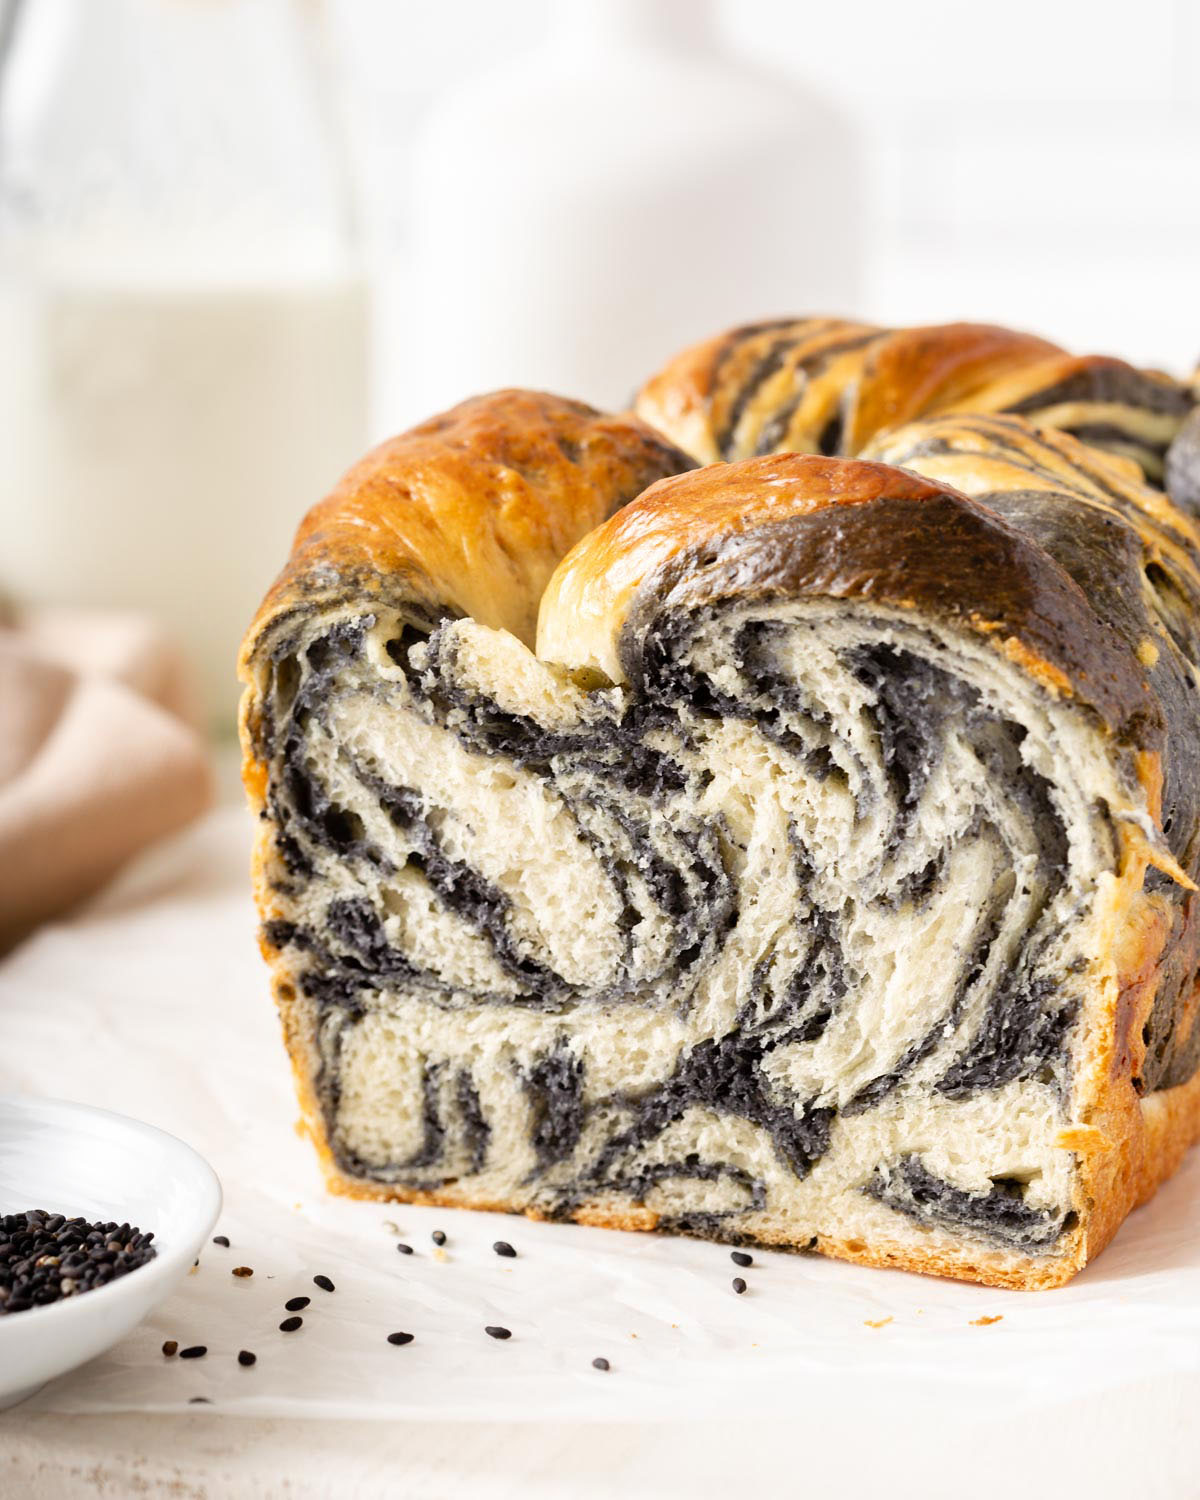
This easy Black Sesame Marble Milk Bread is made with a soft and fluffy Hokkaido milk bread flavored with toasted sesame seeds, braided together to create a nutty and beautifully intricate loaf.
This easy Black Sesame Marble Milk Bread is made with a soft and fluffy Hokkaido milk bread flavored with toasted sesame seeds, braided together to create a nutty and beautifully intricate loaf. Wow, all of your friends with your bread-making skills with this easy marble bread recipe!
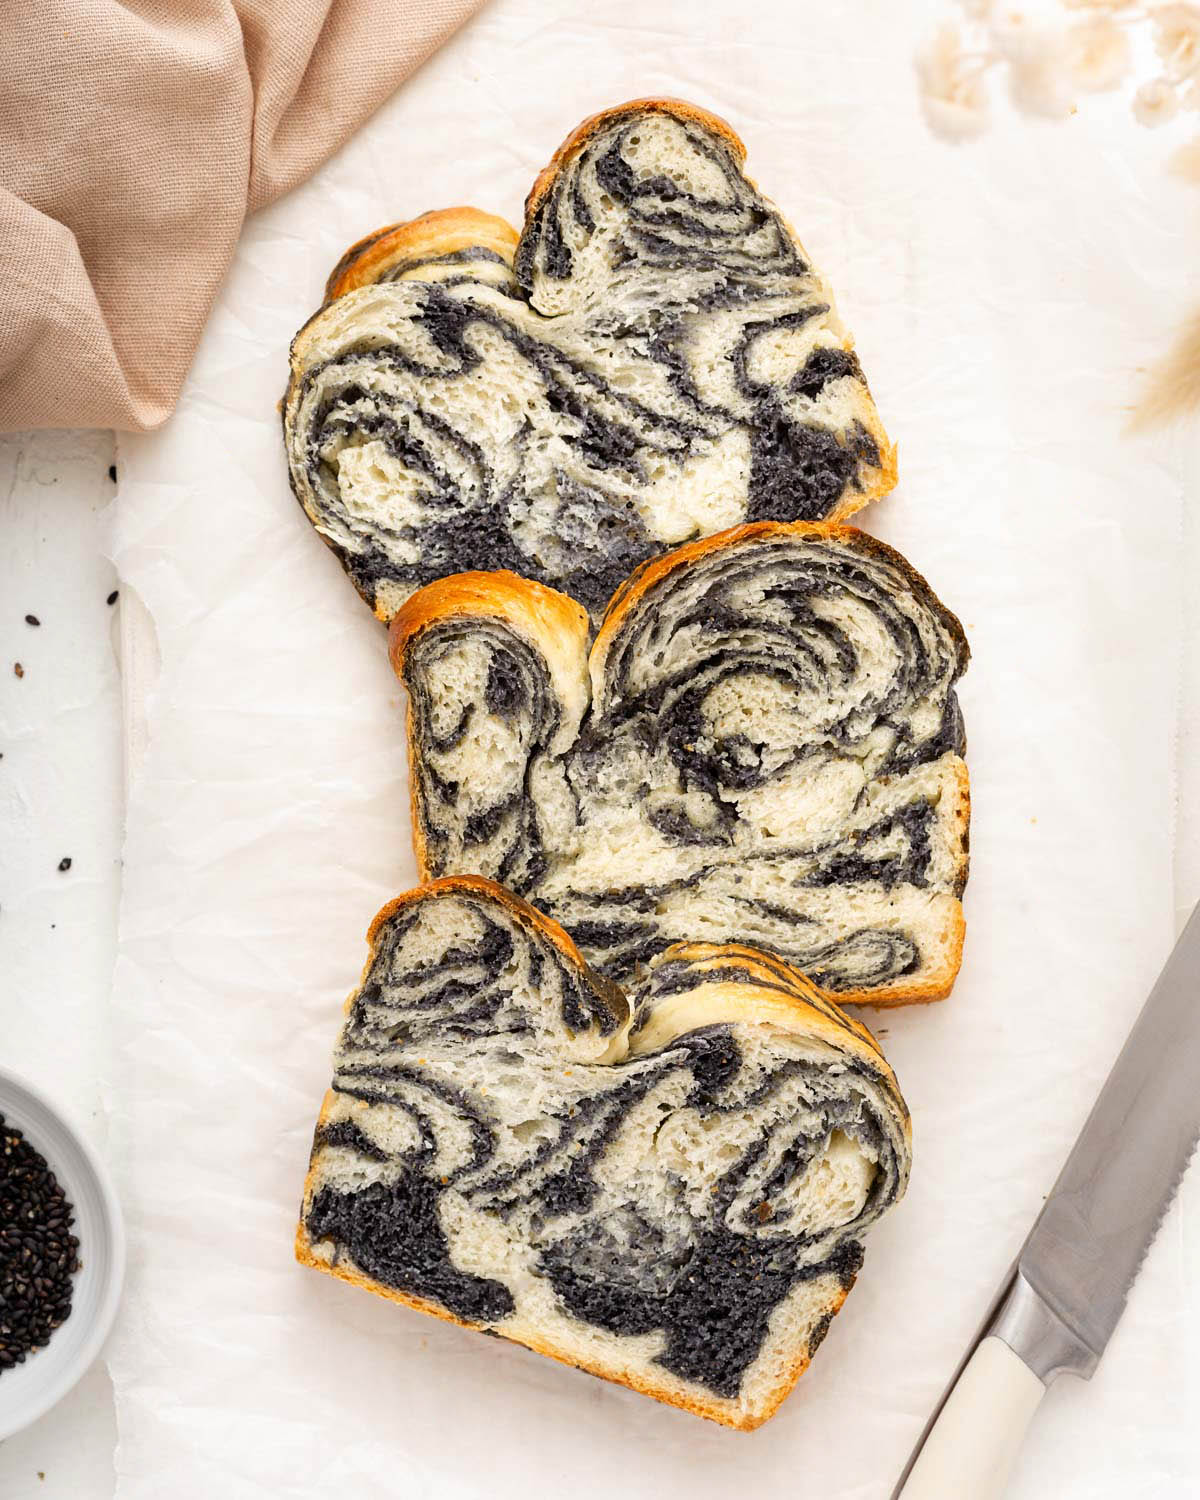
This absolutely stunning showstopper black sesame marble milk bread weaves thin layers of toasted black sesame in between layers of pillowy soft milk bread. This bread is airy, light, and filled with a rich black sesame flavor. Each slice has a unique design that is as delicious as it is beautiful. Despite the look, the shaping method is straightforward and easy to make!
Milk bread is a Japanese-style white bread that originated from the Hokkaido region of Japan. It also is referred to as shokupan, which literally translates to “eating bread” and is the general name for milk bread in Japanese.
Milk bread is absolutely the softest, and most versatile white bread ever invented. It has a soft crust and the inside is subtly sweet that gives you a melt-in-your-mouth experience. The special texture of Hokkaido milk bread comes from the high hydration percentage and the addition of a starter. I love using milk bread to experiment with different flavors because it creates the easiest and most versatile base. If you haven’t already, check out my Ube Swirl Milk Breadfor extra inspo!
Kitchen Equipment
Kitchen Scale: to make a foolproof bread recipe, you need the same exact measurements. The best way to get these measurements without any room for error is using a kitchen scale. This kitchen scale I got on Amazon has been my most reliable scale to date.
Kitchenaid Stand Mixer: my Kitchenaid stand mixerhas been by far my favorite kitchen investment. It is perfect for making bread, cakes, pasta, and so much more. It saves me so much time and energy and is truly the best kitchen invention ever created.
8.5 x 4.5 x 2.5 Bread Pan: I like using my USA bread panfor my bread because they have those sharp corners and a non-stick coating that always makes the most perfect loaf.
Bench Scraper: abench scraper is the best tool for bread because it slices the dough seamlessly and you have full control over the slices.
Rolling Pin: I like using a French rolling pin for almost all of my doughs because it gives you more control over how even the dough rolls out, but that is just my personal preference.
Ingredients
Tangzhong method: Tangzhong uses 7% of the entire flour contents of the recipe and uses a ratio of 1 part flour to 5 parts liquid. Heat it on the stove until it thickens to the consistency of thick paste. You can use the starter when it is cooled to the touch. You can also make this the day before and refrigerate overnight. Be sure to bring it down to room temperature before adding to dough.
Toasted Black Sesame Seeds: I like to buy already pre-toasted black sesame seeds since it saves time and the toasted aspect really highlights the flavor of the sesame seeds. If you don’t have toasted black sesame seeds, you can always pour them onto a skillet and lightly toast them until they are fragrant. However, since they are black it may be difficult to see whether or not you burned them.
Granulated Sugar: Adds the subtle sweetness to the loaf and the black sesame paste
Bread Flour: Bread flour contains more protein than all-purpose. The higher amounts of protein forms the gluten that makes this loaf super soft.
Yeast: This will make the bread rise. I used instant dry yeast which can be added directly into the flour and does not need to be activated in advance with warm liquid.
Milk Powder: makes the bread softer and adds flavor to the loaf without adding extra moisture. You can find milk powder online or at any local grocery market.
Salt: adds a subtle extra flavoring to the bread.
Whole Milk: the key ingredient in this milk bread. I use full fat milk to make the bread richer and more velvety.
LargeEgg: tenderizes and lightens up the crumb, makes the bread rise and binds the ingredients together
Unsalted Butter: for the milk bread, adding the butter results in a higher rise, a softer texture and a longer shelf life. The butter is also used in creating the black sesame paste.
How To Make Black Sesame Bread
I have broken down this black sesame milk bread recipe into four simple sections 1. Tangzhong, 2. Black Sesame Paste, 3. Knead the Two Doughs, 4. Shape the dough. It may seem daunting, but like anything else in life if you work your way through it one step at a time you will find that the end result is always rewarding.
Tangzhong
In a small saucepan, combine the bread flour and water and whisk to remove all lumps. Cook over medium-low heat for 3-5 minutes until the roux starts to thicken and reaches 150°F or 65°C, while constantly whisking. The roux should have a pudding-like consistency. Remove from heat, place in a small bowl, cover and refrigerate until cooled about 4 hours or up to 24 hours. Before baking remove from refrigerator and bring to room temperature for at least 30 minutes. Drain any excess water.
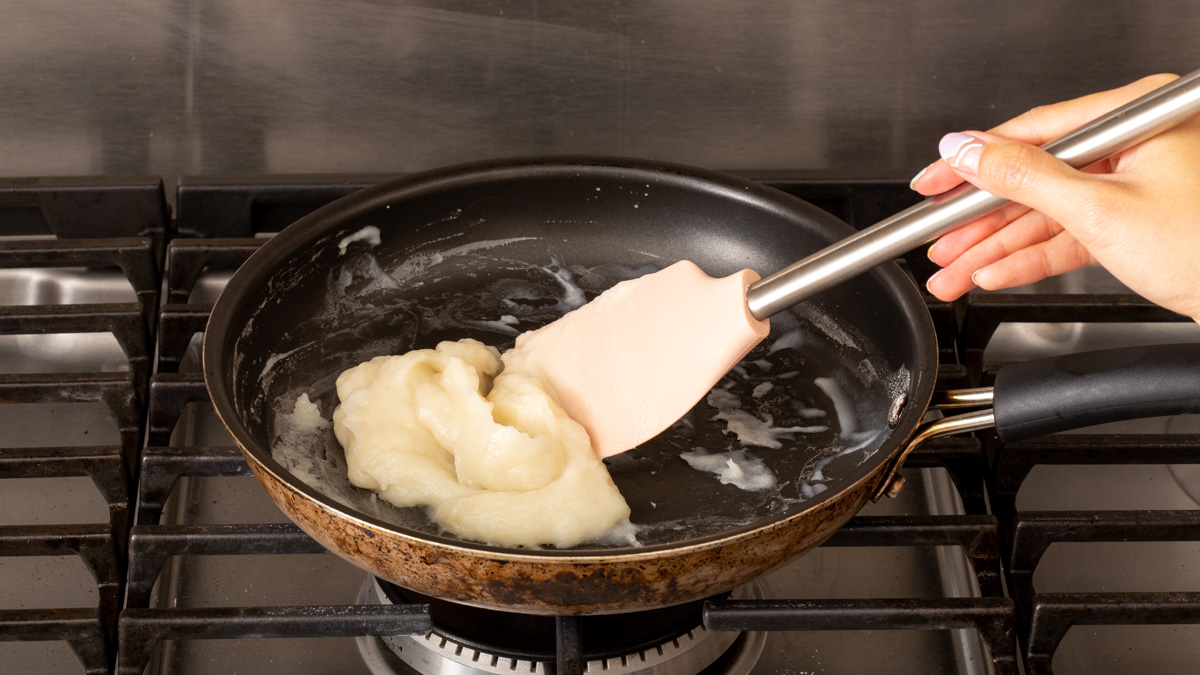
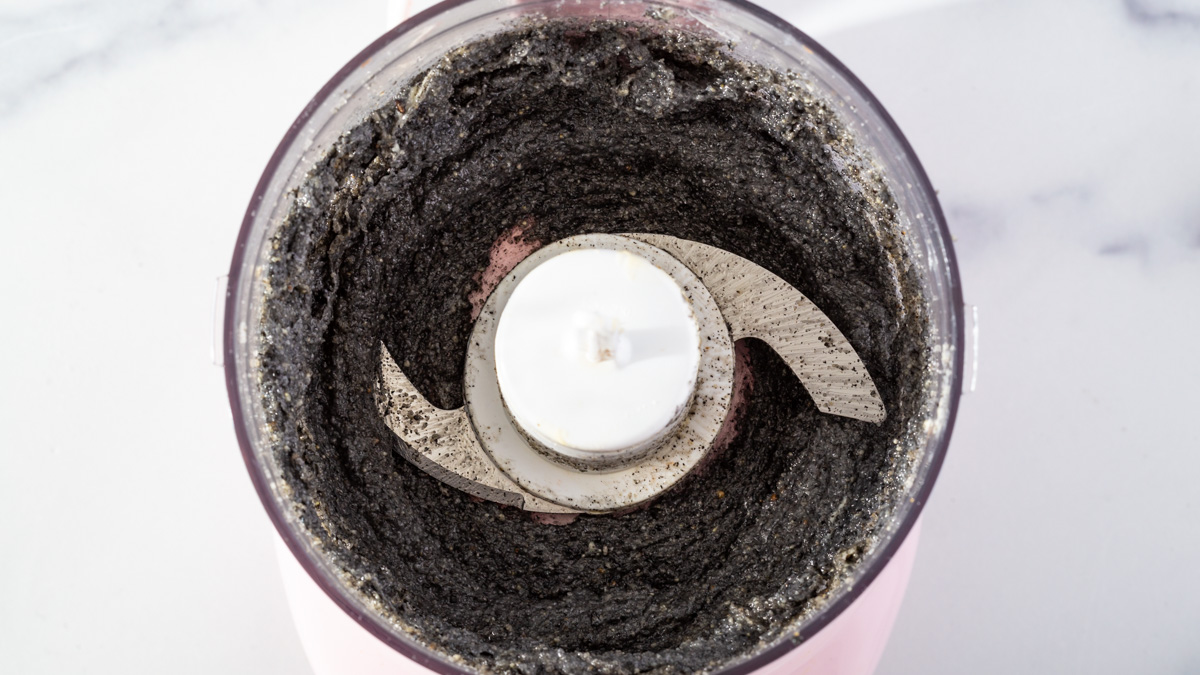
Black Sesame Paste
Finely grind the black sesame seeds in a small food processor. Add the sugar and softened butter. Pulse to make a paste. Transfer to a small bowl, cover, and set aside.
Knead the Two Doughs
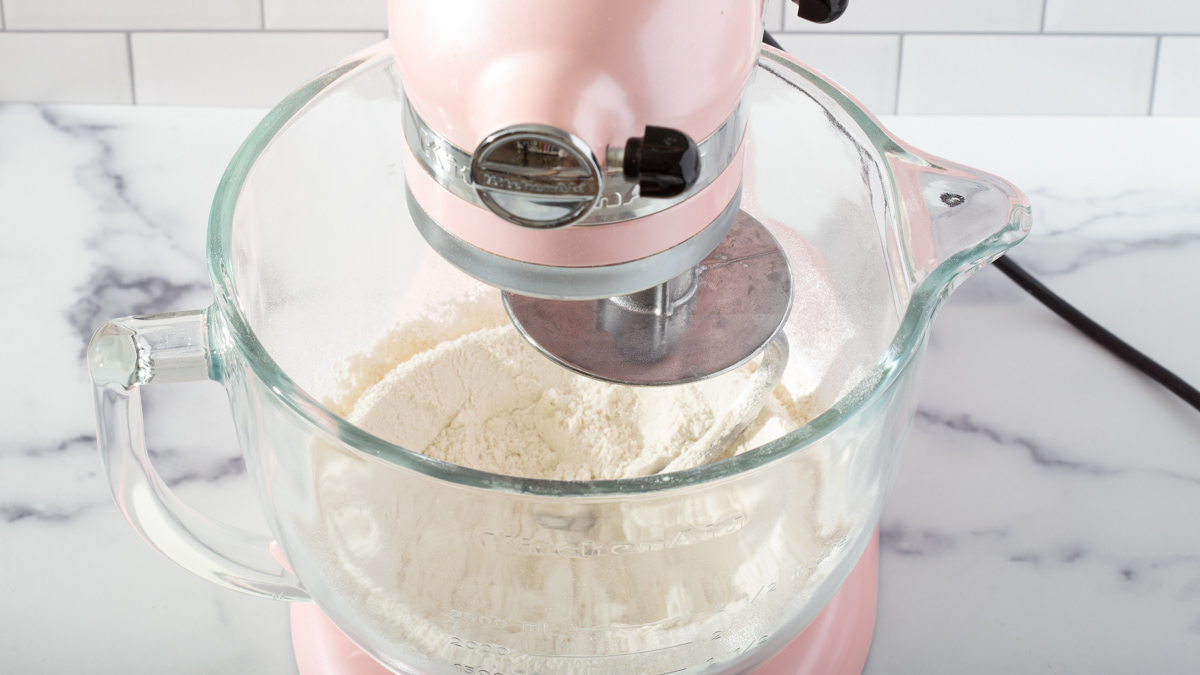
Create the Dough. In a stand mixer with the hook attachment, mix the flour, sugar, yeast, milk powder, and salt until combined. Then add warmed milk (105°F-110°F), tangzhong, and egg and knead on low until ingredients are combined for 5 minutes.
Add the butter. Once the dough has formed, add the softened room temperature butter. Increase speed and knead until combined around 5-7 minutes. The dough should be tacky but not sticky. It should not be overly sticking to the bottom of the bowl. If it is too wet, add 1-2 more tablespoons of bread flour.
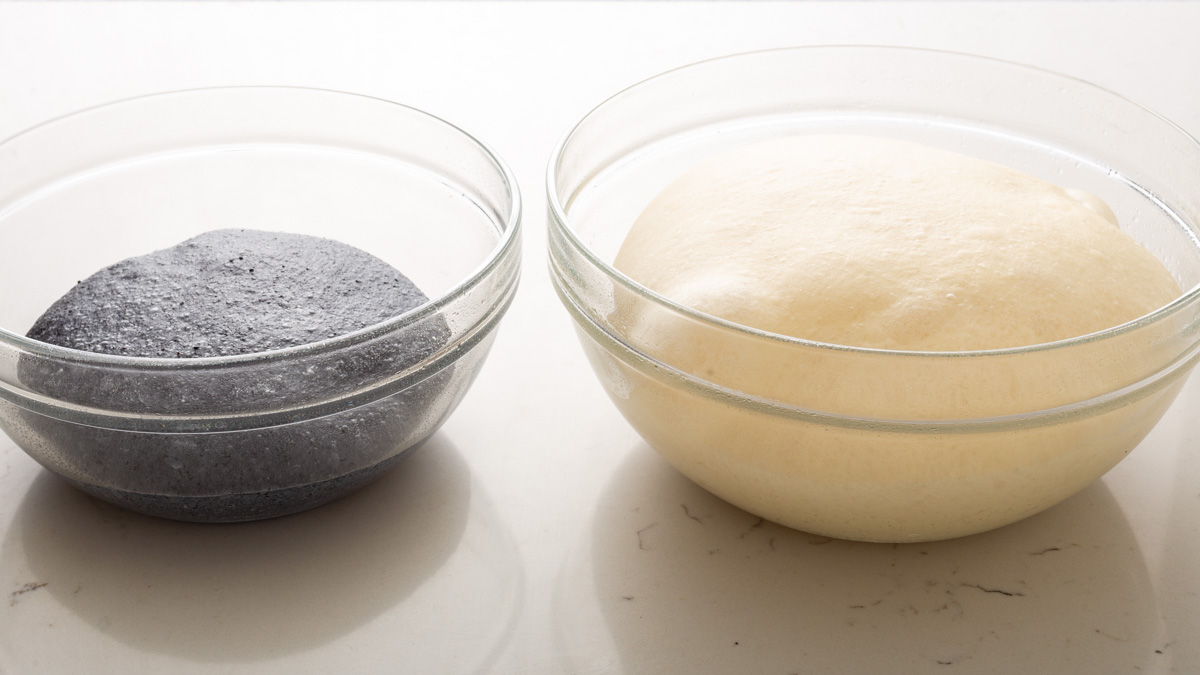
Divide the dough into 1/3 and 2/3 portions. Using a scale and a bench knife, separate the dough into 1/3 and 2/3 portions.
Make the sesame dough. Place the smaller 1/3 portion of dough back in the mixer, add the sesame paste, and knead until combined. About 3-4 more minutes.
Proof the Doughs. Shape the doughs into balls and place in two lightly greased bowls cover with plastic wrap and proof in a warm place for 1-2 hours until double in size.
Shape The Dough
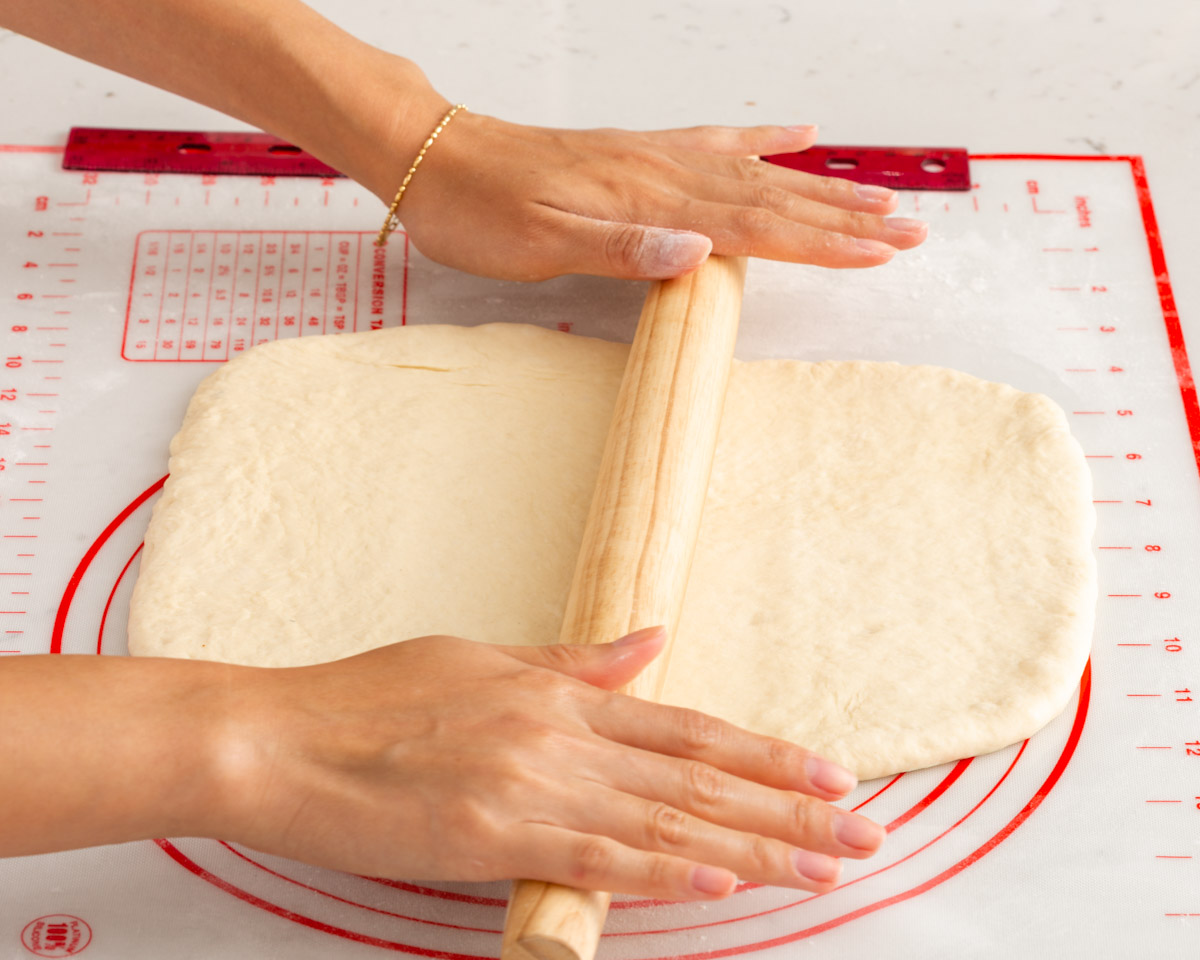
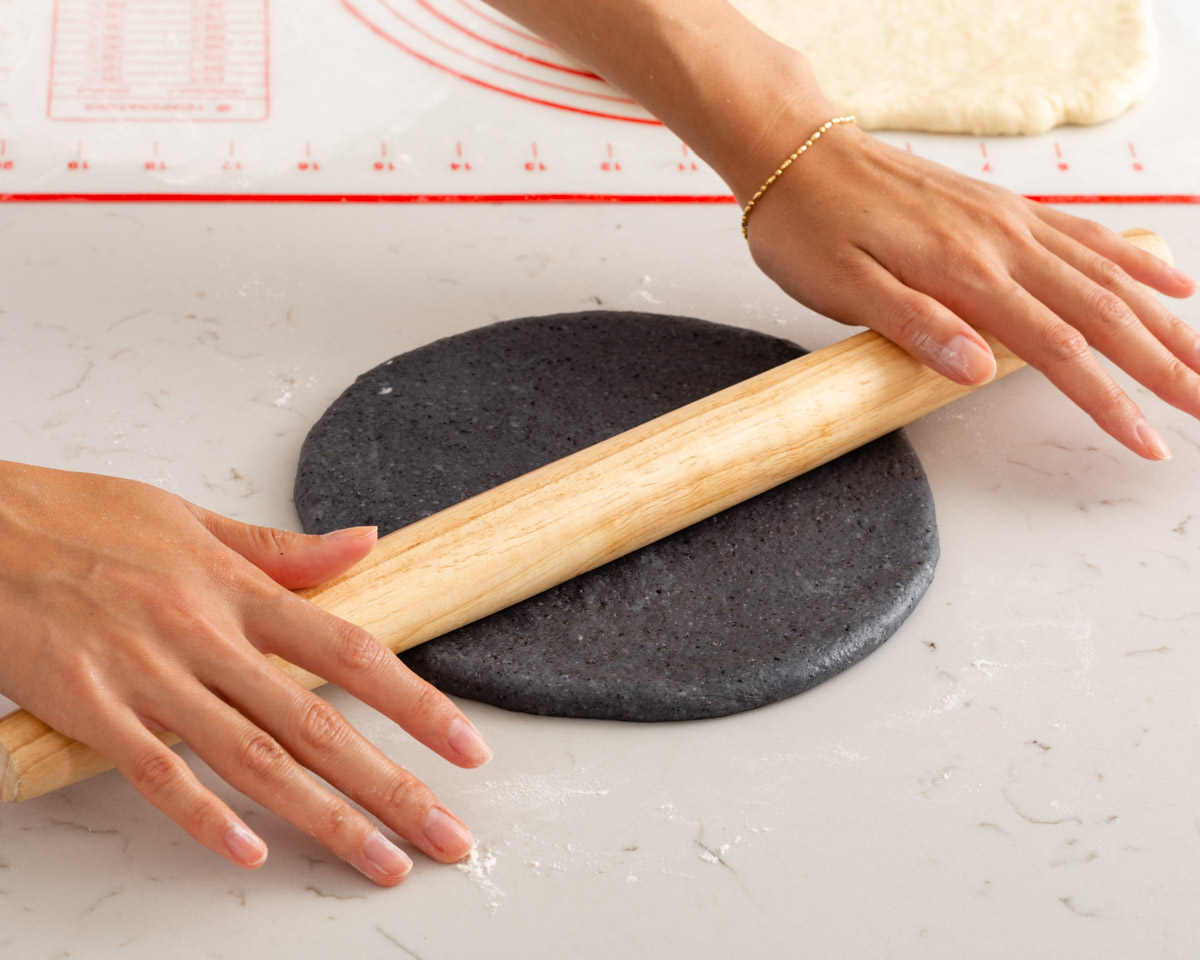
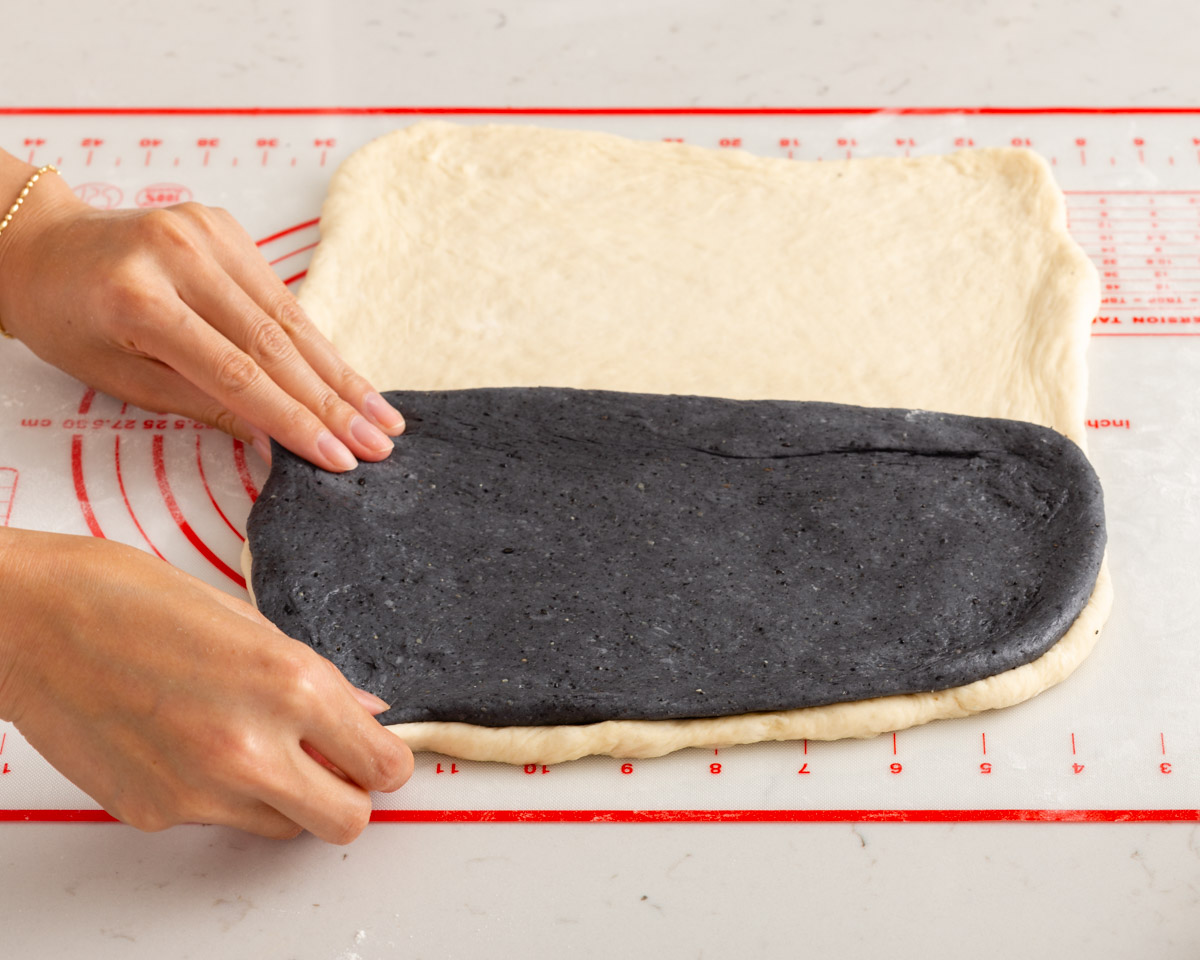
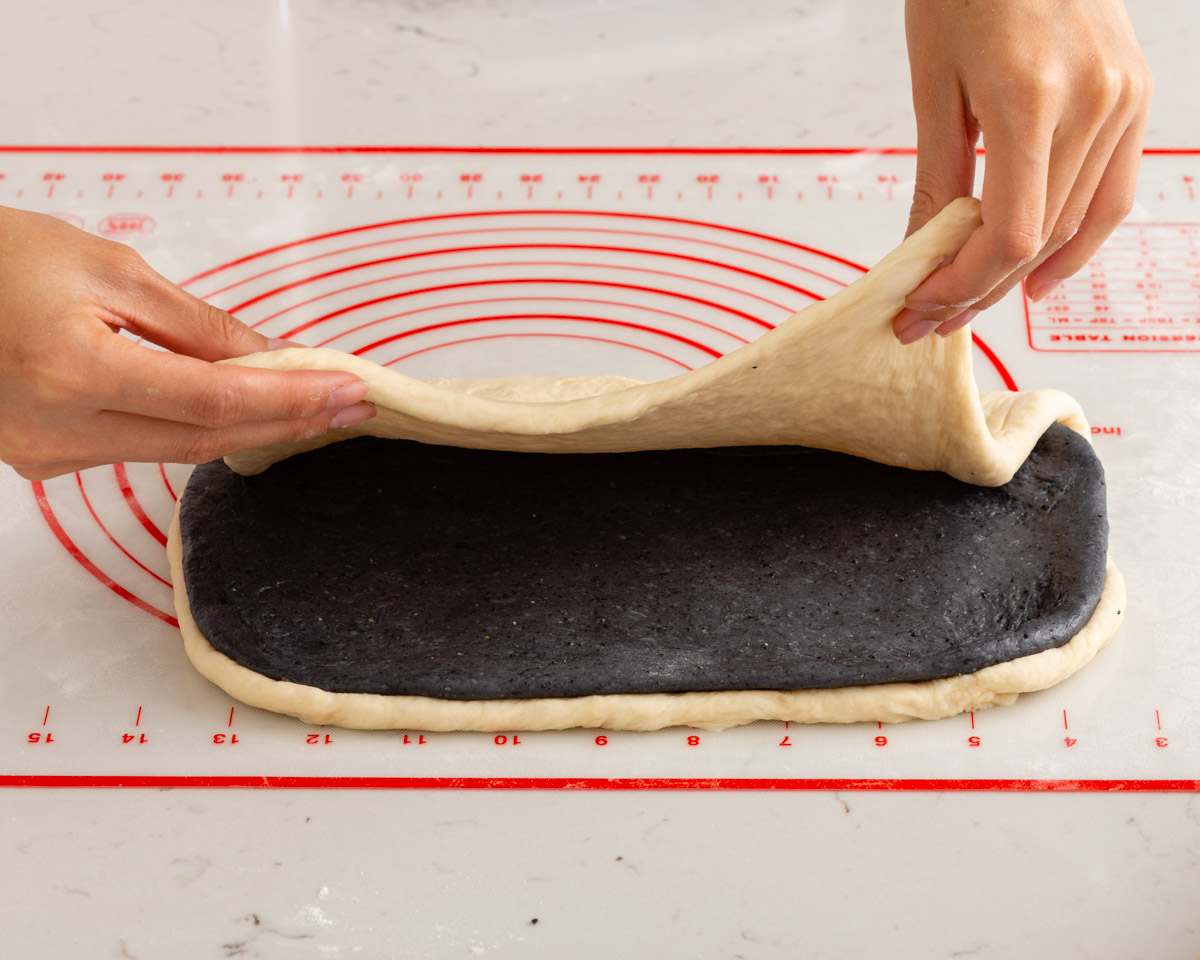
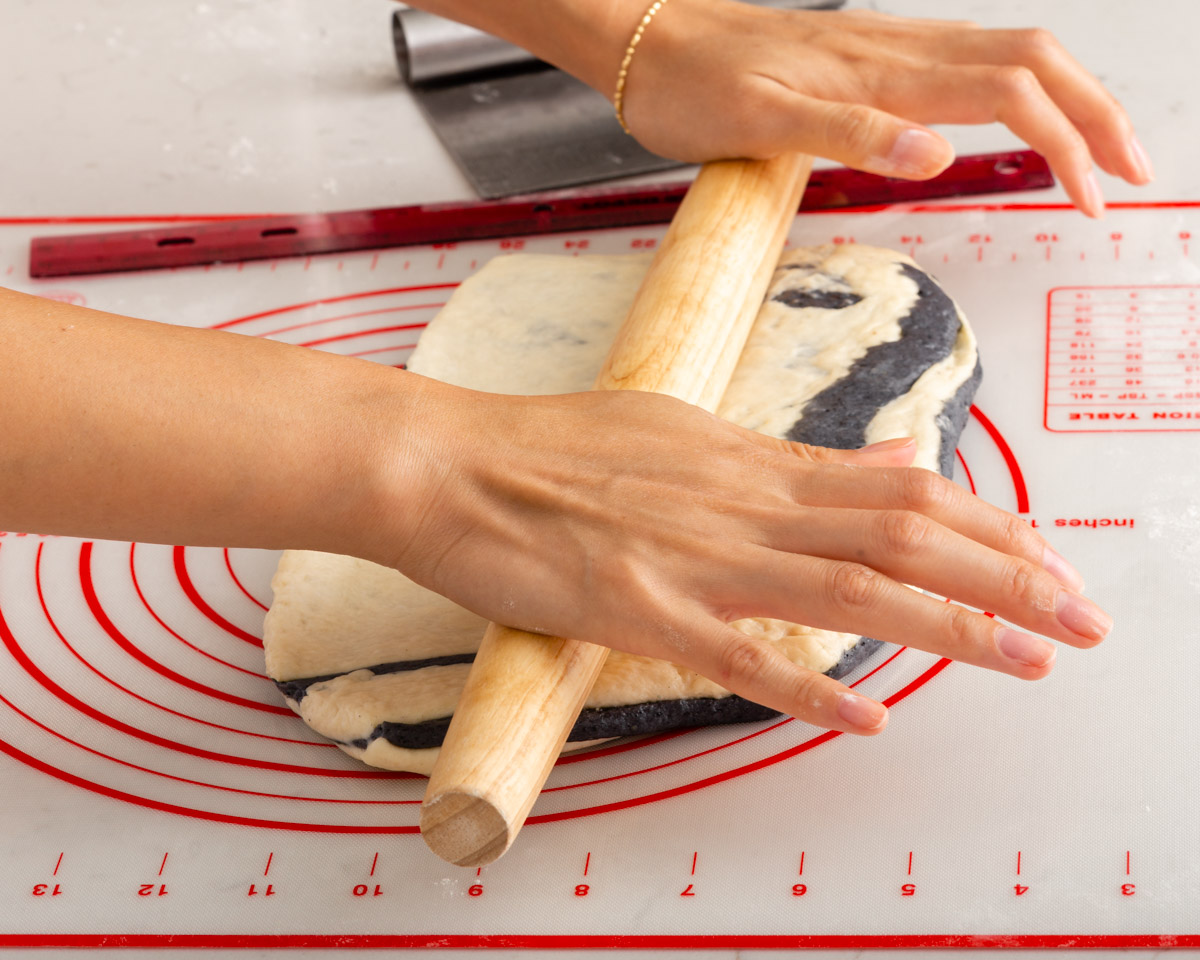
Roll out the doughs. When the doughs have doubled, remove them from the bowl. Using a rolling pin, roll out the larger plain dough into about an 8 x 12 in (20 x 30 cm) rectangle. Roll out the smaller sesame dough into a 8 x 6 in (20×15 cm) rectangle. Place the sesame dough on top of the plain dough and fold the plain dough over the sesame dough.
Roll out plain dough.Roll out sesame dough.Stack sesame dough onto half of plain dough.Fold over plain dough on top.Roll to press doughs together.
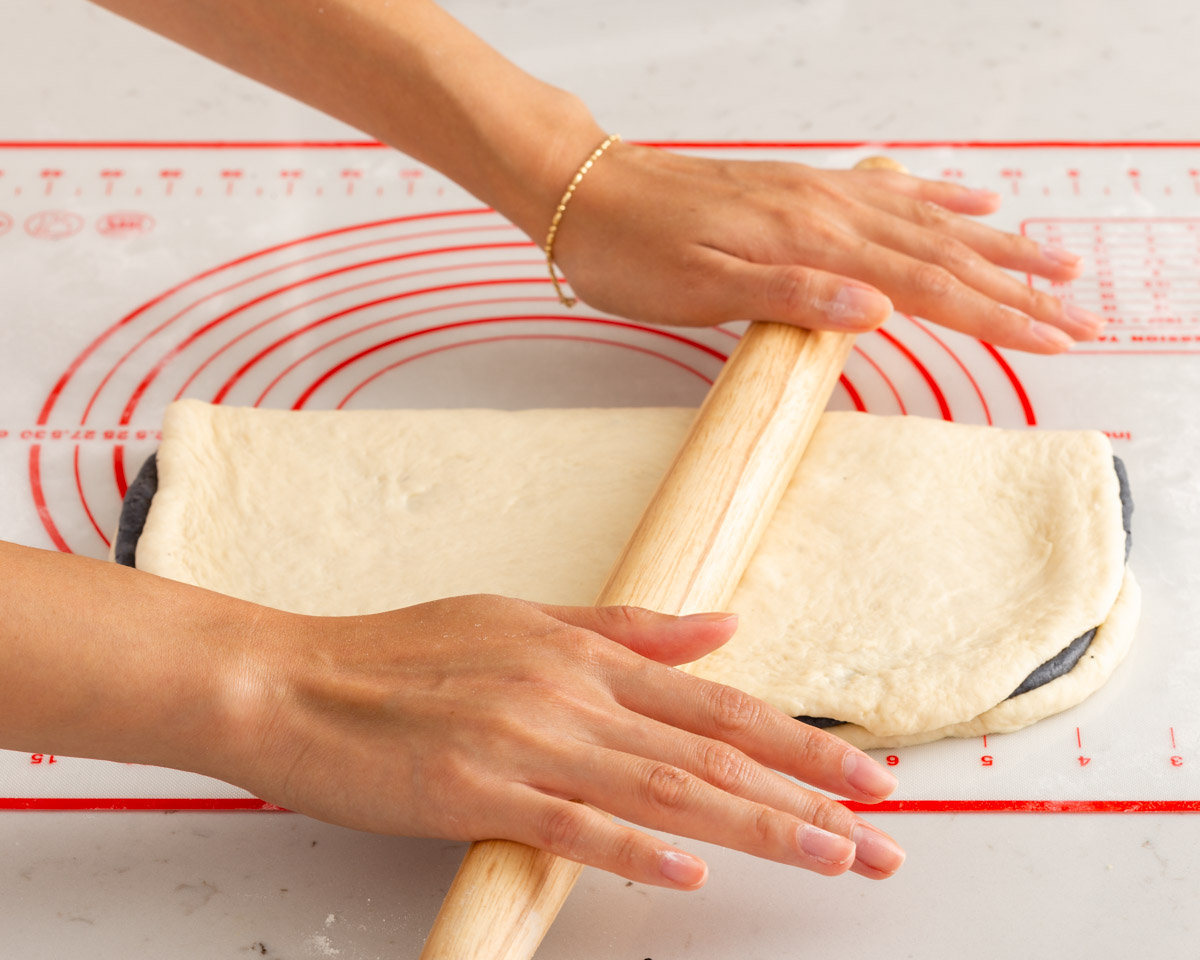
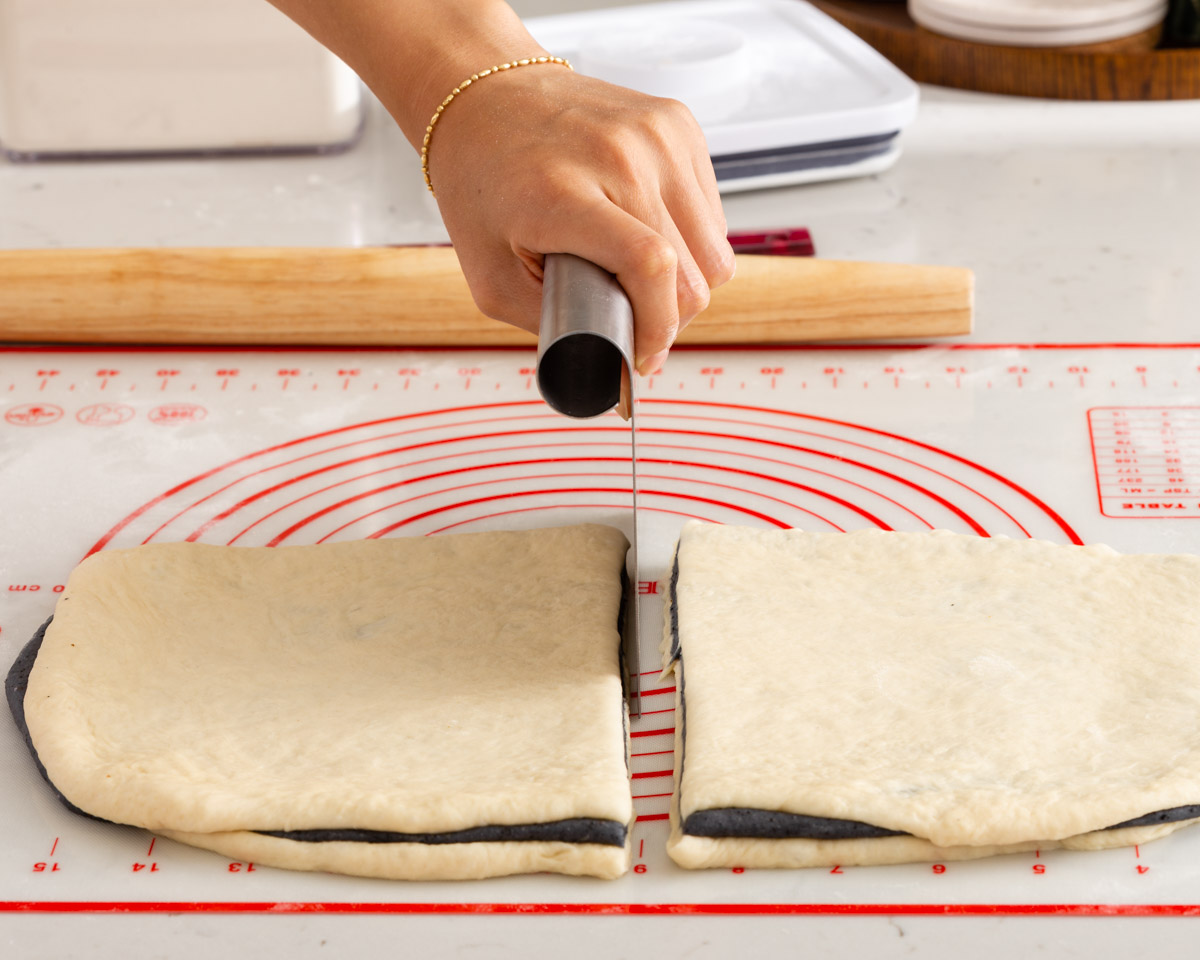
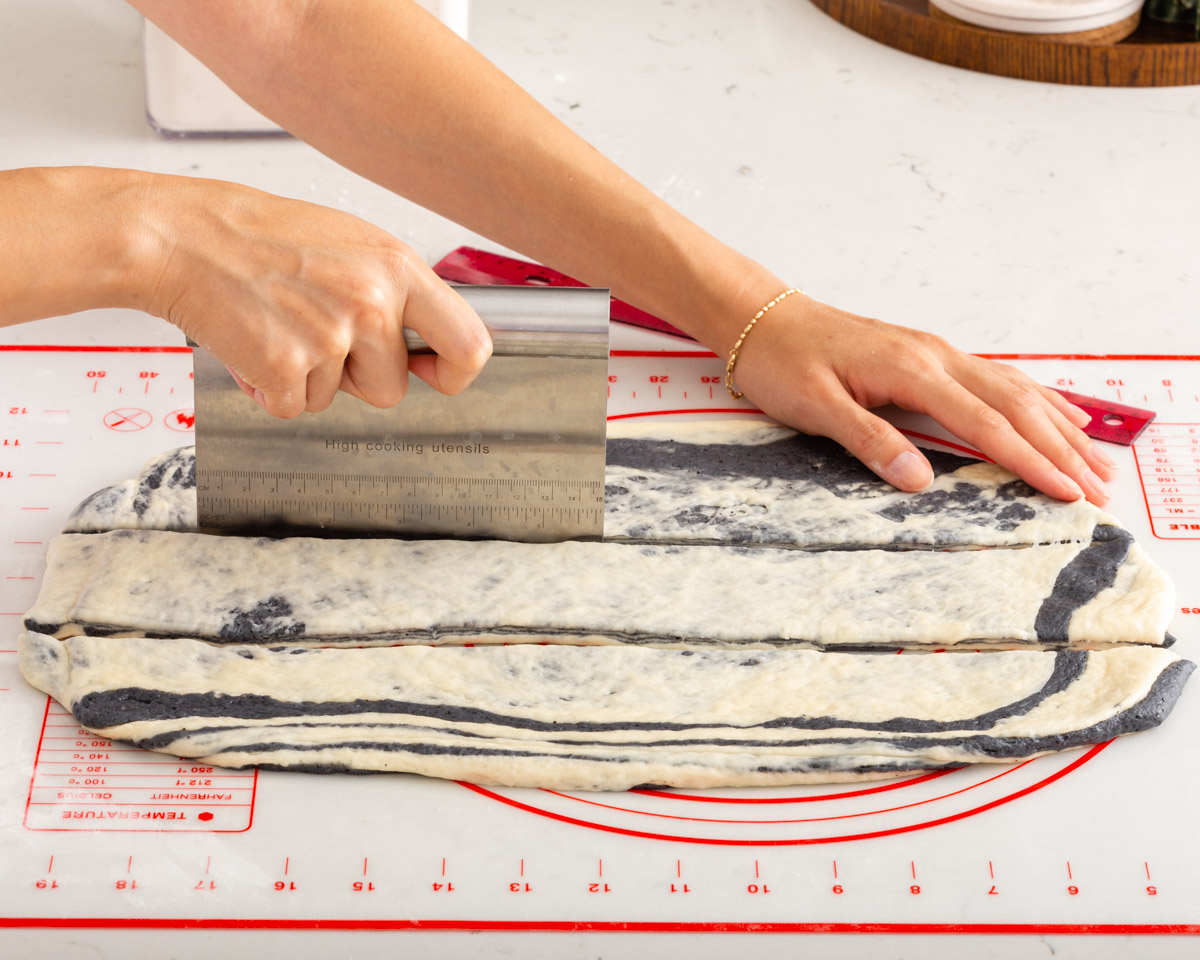
Cut the dough in half and roll out 3 times. Using a bench scraper, pizza cutter, or knife, cut the dough in half on the longer side of the dough then stack the two pieces on top of each other. Then roll the dough back into an 8 x 12 in (20 x 30 cm) rectangle. Continue to cut in half and roll out a total of 3 times.
Slice in half.Stack.Press again. Repeat 3x.
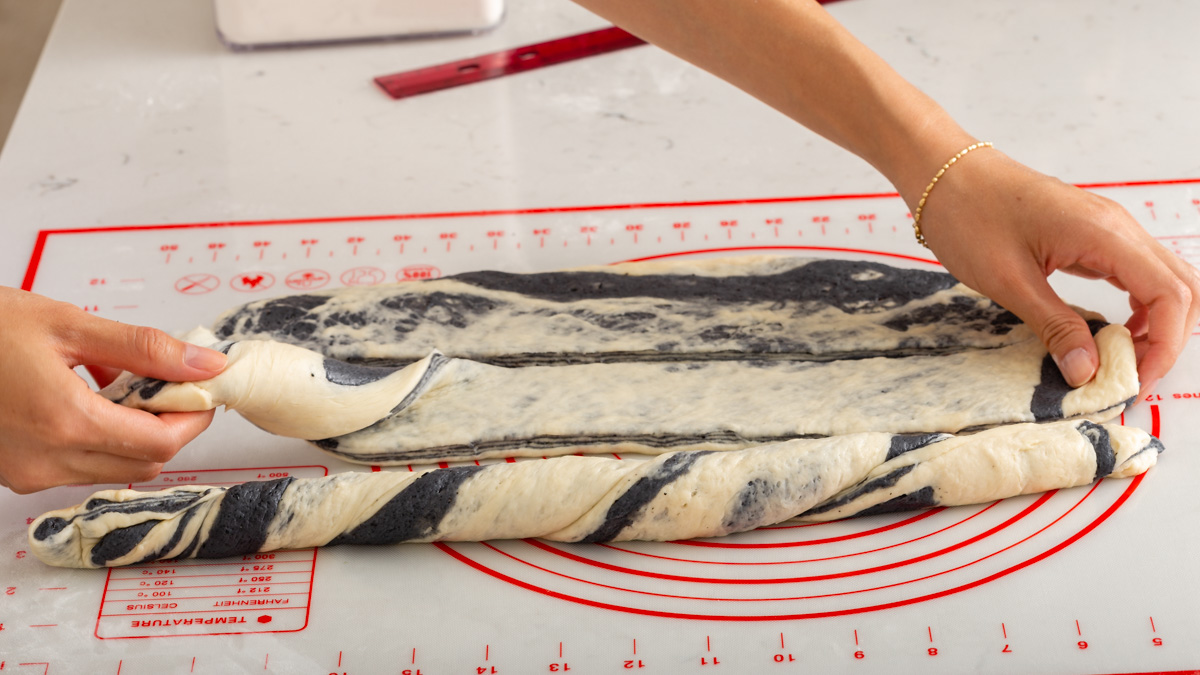
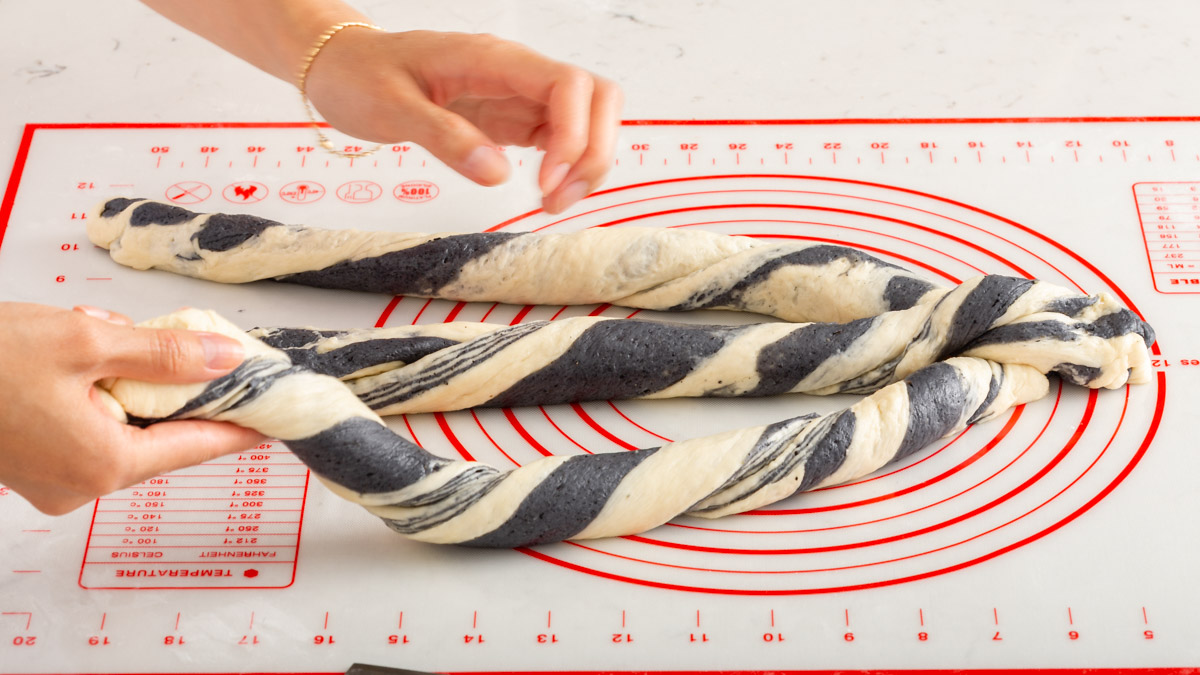
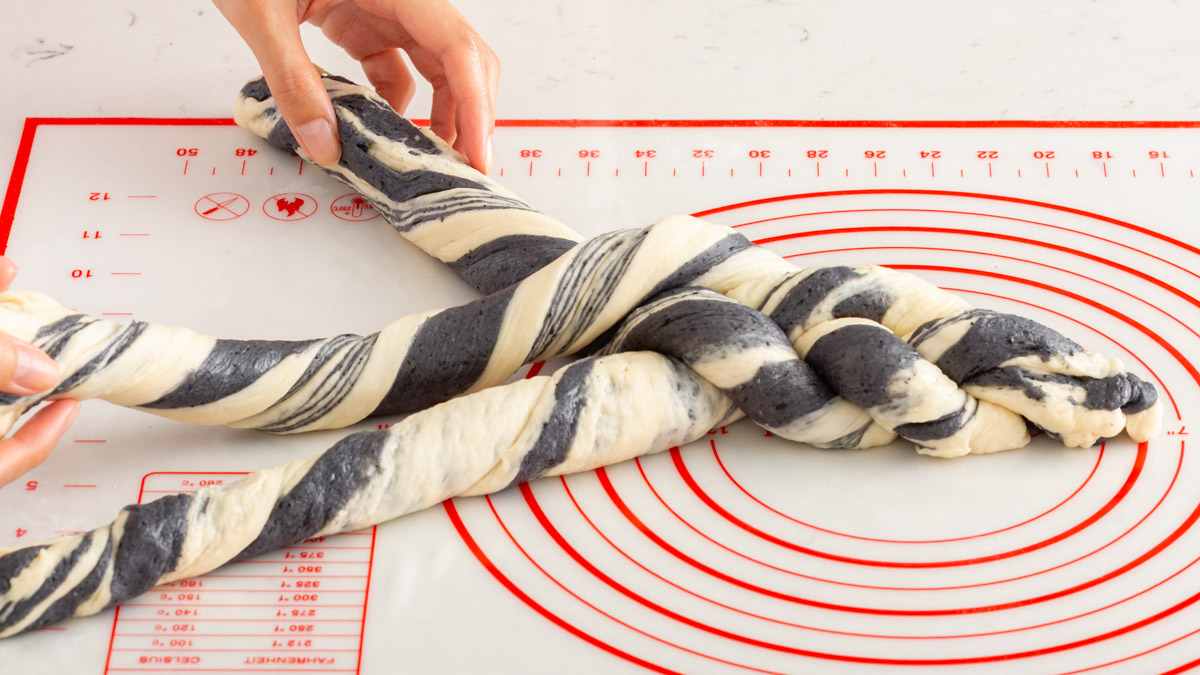
Cut the dough into 3 strips and braid. Using the bench scraper, pizza cutter, or knife, slice the dough lengthwise into 3 equal 12-inch strips. Roll each strip into a log/rope shape and braid the ropes together.
Slice into 3 strips.Twist each strip into a tube.Overlap tips of strips to begin braiding.Alternate overlapping the left and right strip over the middle to braid.Continue until completely braided.
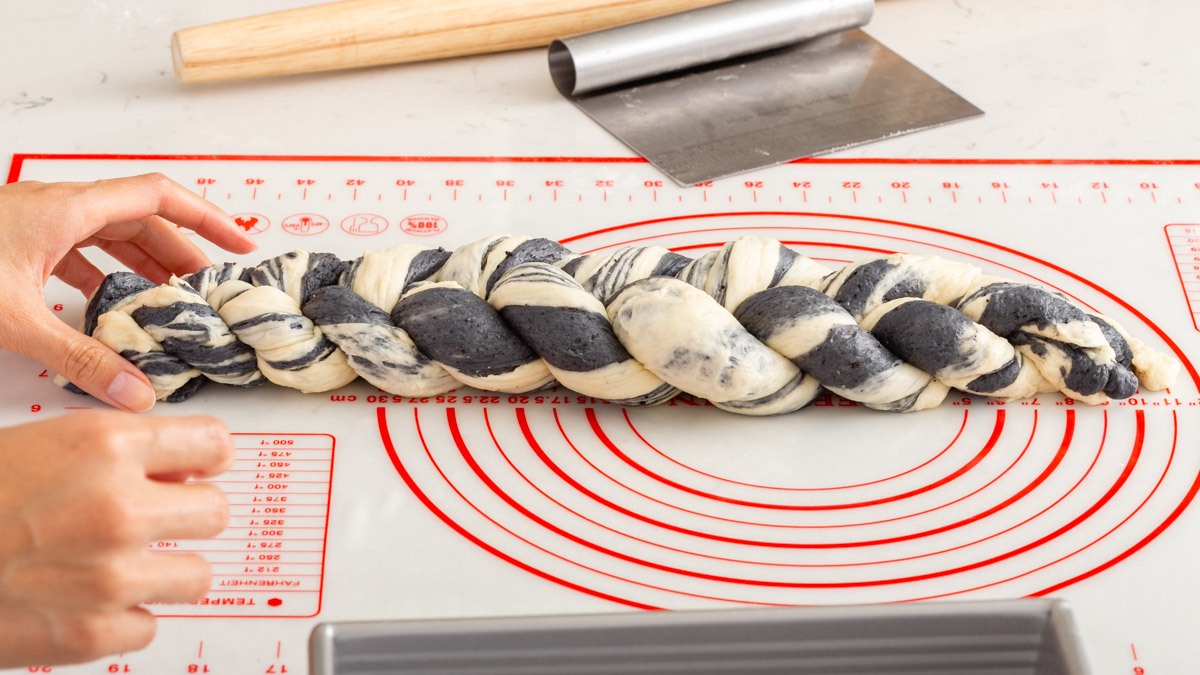
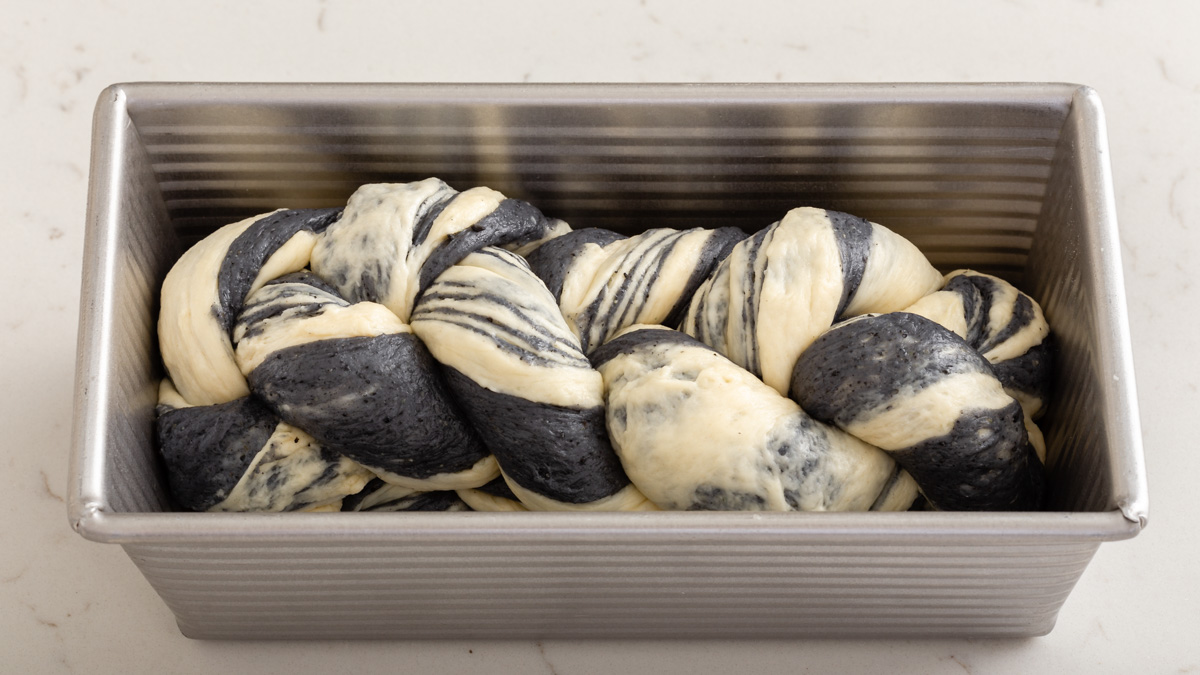
Second Proof Dough. Fold the ends of the braided dough so the bread fits in the bread pan. Next, proof in a warm place for another 45 min to 1 hour or until doubled in size.
Bake. Preheat oven to 350°F (175°C). Brush with egg wash, bake for 30 minutes. Cool in the pan for about 5-10 minutes. Then remove the loaf from the pan and cool on a wire rack completely before slicing and serving.
Tips For The Best Black Sesame Bread
Use a scale! Breadmaking is a science that needs to be extra precise to produce a consistent loaf. I currently use this cute pink kitchen scaleand it has been the most reliable scale I’ve had to date.
Yeast: you can use active yeast instead of instant yeast, but make sure to activate the yeast in a warm 110-115°F for about 5 minutes before mixing the ingredients.
Butter: Soften the butter and add to the dough AFTER it has formed a ball to prevent the oil and fat from melting into the gluten formation.
Texture of the dough. The dough should be slightly tacky and not overly sticky. If the dough is too sticky, slowly add in more bread dough 1 tablespoon at a time while the mixer is kneading the dough. Alternatively, if the dough is too dry add warmed milk into the dough 1 tablespoon at a time until you reach the right consistency. The texture of the sesame dough will be a little more wet considering it has more butter in it!
Standard Loaf Pan: I used a standard 8.5 x 4.5 x 2.5 inch bread pan. If you use a bigger loaf pan the height will be smaller.
Proofing: typically, breads with more hydration takes longer to proof. It can take between 1-2 hours. The dough will rise in a warm place around 75-100°F. I have a proofing setting in my oven that sets my oven temperature to 100°F. If you don’t have a proofing setting you can place a pan or cup of boiling water in the oven with your dough to create a humid and warm environment. After shaping, make sure to proof the bread again to get that fluffy cloud-like texture.
Storage Instructions
This black sesame marble milk bread recipe lasts longer than other types of bread due to the starter. The bread should last up to one week on the counter in an airtight container. It can last up to a month if stored in the freezer.
This easy Black Sesame Marble Milk Bread is made with a soft and fluffy Hokkaido milk bread flavored with toasted sesame seeds, braided together to create a nutty and beautifully intricate loaf. Wow, all of your friends with your bread-making skills with this easy marble bread recipe!
3tablespoon(21 g) toasted black sesame seedsfinely ground
1 ½tablespoon(20 g) granulated sugar
1 ½tablespoon(20 g) unsalted butter
Japanese Milk Bread
2 ¼cup(325 g) bread flour
2tablespoon(30 g) granulated sugar
1teaspoon(5 g) instant yeast
1tablespoon(10 g) milk powder
½teaspoon(5 g) salt
½cup(125 g) whole milk 105°F-110°F warmed
1large egg~50 g, room temperature
2tablespoon(25 g) unsalted buttersoftened room temperature
Egg wash
1egg yolk
1tablespoonmilk
Instructions
Tangzhong
In a small saucepan, combine the bread flour and water and whisk to remove all lumps. Cook over medium-low heat for 3-5 minutes until the roux starts to thicken and reaches 150°F or 65°C, while constantly whisking. The roux should have a pudding-like consistency. Remove from heat, place in a small bowl, cover and refrigerate until cooled about 4 hours or up to 24 hours. Before baking remove from refrigerator and bring to room temperature for at least 30 minutes. Drain any excess water.
Black Sesame Paste
Finely grind the black sesame seeds in a small food processor. Add the sugar and softened butter. Pulse to make a paste. Transfer to a small bowl, cover, and set aside.
Make the Two Doughs
Create the Dough. In a stand mixer with the hook attachment, mix the flour, sugar, yeast, milk powder, and salt until combined. Then add warmed milk (105°F-110°F), tangzhong, and egg and knead on low until ingredients are combined for 5 minutes.
Add the butter. Once the dough has formed, add the softened room temperature butter. Increase speed and knead until combined around 5-7 minutes. The dough should be tacky but not sticky. It should not be overly sticking to the bottom of the bowl. If it is too wet, add 1-2 more tablespoons of bread flour.
Divide the dough into 1/3 and 2/3 portions. Using a scale and a bench knife, separate the dough into 1/3 and 2/3 portions.
Make the sesame dough. Place the smaller 1/3 portion of dough back in the mixer, add the sesame paste, and knead until combined. About 3-4 more minutes.
Proof the Doughs. Shape the doughs into balls and place in two lightly greased bowls cover with plastic wrap and proof in a warm place for 1-2 hours until double in size.
Shape The Dough
Roll out the doughs. When the doughs have doubled, remove them from the bowl. Using a rolling pin, roll out the larger plain dough into about an 8 x 12 in (20 x 30 cm) rectangle. Roll out the smaller sesame dough into a 8 x 6 in (20x15 cm) rectangle. Place the sesame dough on top of the plain dough and fold the plain dough over the sesame dough.
Cut the dough in half and roll out 3 times. Using a bench scraper, pizza cutter, or knife, cut the dough in half on the longer side of the dough then stack the two pieces on top of each other. Then roll the dough back into an 8 x 12 in (20 x 30 cm) rectangle. Continue to cut in half and roll out a total of 3 times.
Cut the dough into 3 strips and braid. Using the bench scraper, pizza cutter, or knife, slice the dough lengthwise into 3 equal 12-inch strips. Roll each strip into a log/rope shape and braid the ropes together.
Second Proof Dough. Fold the ends of the braided dough so the bread fits in the bread pan. Next, proof in a warm place for another 45 min to 1 hour until doubled in size.
Bake. Preheat oven to 350°F (175°C). Brush with egg wash, bake for 30 minutes. Cool in the pan for about 5-10 minutes. Then remove the loaf from the pan and cool on a wire rack completely before slicing and serving.
Notes
Use a scale! Bread making is a science that needs to be extra precise to produce a consistent loaf. I currently use this scale and I love it!
Yeast: you can use active yeast instead of instant yeast, but make sure to activate the yeast in a warm 110-115°F for about 5 minutes before mixing the ingredients.
Butter: Soften the butter and add to the dough AFTER it has formed a ball to prevent the oil and fat from melting into the gluten formation.
The texture of the dough. The dough should be slightly tacky and not overly sticky. If the dough is too sticky, slowly add in more bread dough 1 tablespoon at a time while the mixer is kneading the dough. Alternatively, if the dough is too dry add warmed milk into the dough 1 tablespoon at a time until you reach the right consistency. The texture of the sesame dough will be a little more wet considering it has more butter in it!
Standard Loaf Pan: I used a standard 8.5 x 4.5 x 2.5-inch bread pan. If you use a bigger loaf pan the height will be smaller.
Proofing: typically, bread with more hydration takes longer to proof. It can take between 1-2 hours. The dough will rise in a warm place around 75-100°F. I have a proofing setting in my oven that sets my oven temperature to 100°F. If you don't have a proofing setting you can place a pan or cup of boiling water in the oven with your dough to create a humid and warm environment. After shaping, make sure to proof the bread again to get that fluffy cloud-like texture.
This Black Sesame Marble Milk Bread looks absolutely breathtaking! I love the combination of flavors and the beautiful marbling effect. Can’t wait to try making it for my family—perfect for breakfast or a snack! Thanks for sharing the recipe!
Absolutely amazing recipe! I made this yesterday and it turned out just beautifully. While my “marbling” technique needs a bit of work – it didn’t impact the flavor or texture of the final loaf one single bit. The crust and crumb have that enviable “pillowy, pull-apart” quality that tangzhong is known for – and the sesame seeds add an incredibly rich nuttiness to every bite. I had two slices of this bread this morning with nothing on them – not even butter – and savored every crumb! I used the Brod and Taylor proofing box set at 95F and both rises took 90-120 minutes. For the final rise, the top of the dough was just beneath the top of the Pullman pan. It puffed up well beyond the top of the pan when baked. I did tent the top of my loaf with foil after the first 15 minutes to prevent over-browning and also baked it an additional 10 minutes just to make sure it was done. I would do exactly the same thing next time. It feels like this would also make an incredible cinnamon raisin bread – and I’ll try that iteration next. Thanks so much for sharing this lovely recipe!
Beautiful and amazing taste!
We’re so glad you loved it and can’t wait for you to share it with friends and family! 🥰