The softest, most delicate Japanese strawberry shortcake recipe with homemade whipped cream is perfect for your next dinner party! This beautiful cake is so light and delicious it will impress all of your guests!
The softest, most delicate Japanese strawberry shortcake recipe with homemade whipped cream is perfect for your next dinner party! This beautiful cake is so light and delicious it will impress all of your guests!
When my best girlfriend from high school came to visit me from New York, I decided to throw my very first grown-up dinner party. I asked her what her favorite dessert was and she was very specific (which was also very helpful). She told me she loved this light and soft vanilla cake that pairs with fresh berries. Instantly, my mind flashed to these gorgeous Japanese strawberry shortcakes layered with fresh berries and whipped cream and I knew this was the one.
This Japanese strawberry shortcake is soft, delicate, and light. It is perfect for the hot summer months when strawberries are in season. The cake’s foundation is a genoise sponge cake that does not use any chemical leaveners. The rise of the cake depends solely on the amount of air that is whipped into the eggs. This process provides that light and soft crumb that everyone knows and loves. This cake may seem complicated at first glance, but it really isn’t with the tips and tricks I’ve listed below. Pair this Japanese Strawberry Shortcake with some irresistible Japanese hot dogs for the perfect backyard picnic!
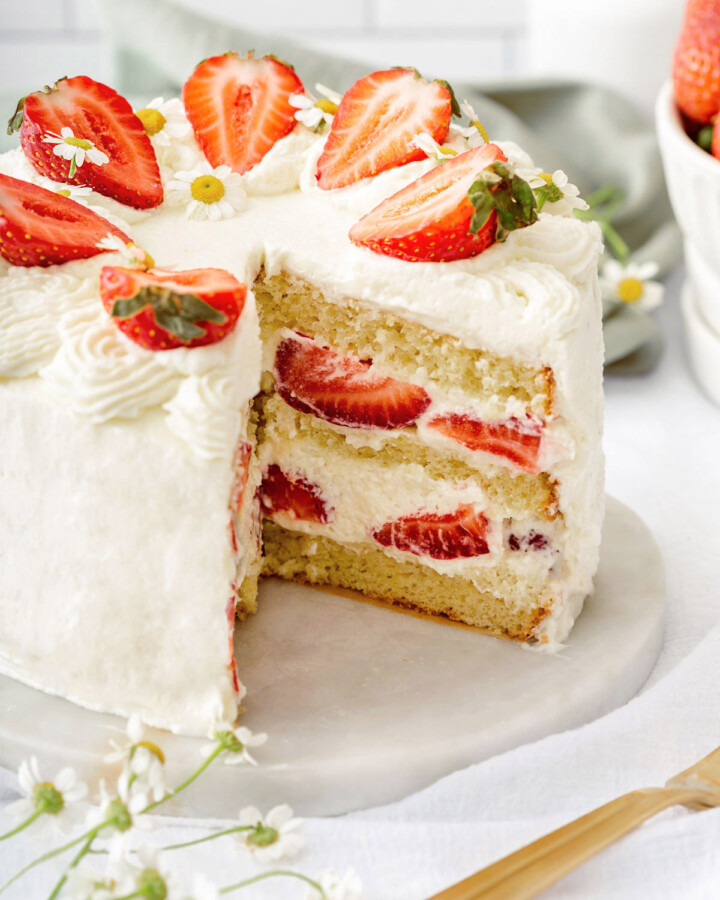
The Japanese Strawberry Shortcake is not a typical US strawberry shortcake. The Japanese version contains homemade whipped cream and strawberries layered in between layers of a soft and airy genoise sponge cake. The cake yields a soft, light, and delicate texture that melts in your mouth almost as quickly as the whipped cream does.
This genoise sponge cake is used among a lot of Asian bakeries. More specifically, the sponge cake can be found in Chinese bakery cakes and Korean fresh cream cakes. What makes this a Japanese sponge cake is all the fresh strawberries inside and on top of the cake. The strawberry version can be found all over Japan. In Japan, it is also called a Christmas cake and is sold during the winter months. It is popular for a reason. It is so simple, yet so delicious at the same time.
HowCan I Make the Cake Soft and Airy?
The secret technique in making the airiest cake is to whip the eggs on high to achieve optimal air bubbles in the cake and then gently folding in the flour without removing all that air. If you are too rough with folding the flour then the cake will be incredibly dense and will not rise. However, on the flip side, if you do not fold the mixture enough where all the ingredients are thoroughly mixed, the denser ingredients will fall to the bottom of the cake resulting in a dense and raw cake.
How do I know when my sponge is done cooking?
Bake time is incredibly important for this delicate cake. Most of the time a genoise sponge cake collapses because it has not been baked long enough for the moisture to be baked out. When a cake is under-baked it will result in the center of the cake collapsing.
There are a few ways to determine whether your cake is ready to be taken out of the oven.
Toothpick test: Place a toothpick in the center of the cake, if it comes out clean or with a few dried crumb than it is ready.
Cake pulling away from the sides: if the top of the cake is a soft golden brown and the cake is beginning to pull away from the sides of the cake pan then it is ready!
Ingredients
For the Genoise Sponge Cake
Eggs: The eggs are the key ingredient for this cake. Since the cake has no chemical leaveners (baking powder/baking soda) the air in the eggs creates that beautiful rise in the cake. Make sure your eggs are at room temperature for an even rise.
Granulated Sugar: the sugar helps activate the eggs to reach their lightest and fluffiest potential.
Honey: I like using honey as an extra sweetener in the cake. You can also sub out the honey for 4 g of more granulated sugar instead.
Cake Flour: the cake flour yields a softer crumb than all-purpose flour. This is a personal choice you can always substitute with all-purpose flour.
Whole Milk: Whole milk adds a tiny bit of moisture to the cake
Unsalted Butter: the unsalted butter adds to the moisture and the nice soft crumb.
Vanilla Extract: the vanilla extract adds a subtle vanilla flavor to the cake. I love using Rodelle’s Vanilla Extract.
For the Whipped Cream and Garnish
Heavy Whipping Cream: Make sure the heavy whipping cream is cold. Do not remove from the refrigerator until you are JUST about to use it. This will allow your cream to whip up quickly.
Powdered Sugar: Powdered sugar blends in the heavy whipping cream more evenly than granulated sugar and it also aids in stabilizing the whipped cream.
Gelatin Powder (Optional): I like using gelatin powder to stabilize my whipped cream. During hot summer months, whipped cream without gelatin tends to just melt away when the temperature shifts. I always use Knox Gelatin powder.
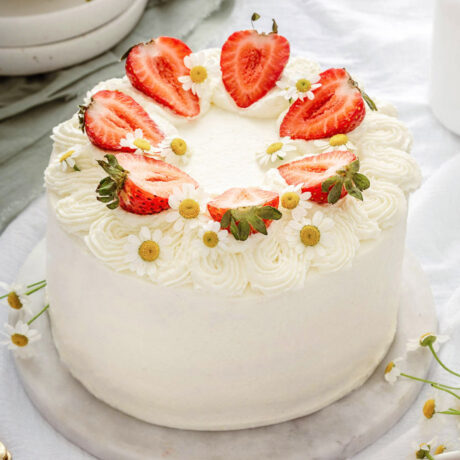
Fresh Strawberries: This cake is such a simple cake with very soft flavors. The star of the cake really is the fresh strawberries. If you can use your local farmer’s market strawberries for this cake it will yield the optimal results!
How To Make Japanese Strawberry Shortcake
This cake uses a genoise cake as a base, is filled with and decorated with stabilized whipped cream, and sprinkled with fresh ripe strawberries throughout!
Genoise Cake
Preheat the oven to 325°F or 160°C. Line a 6-inch cake pan with parchment paper.
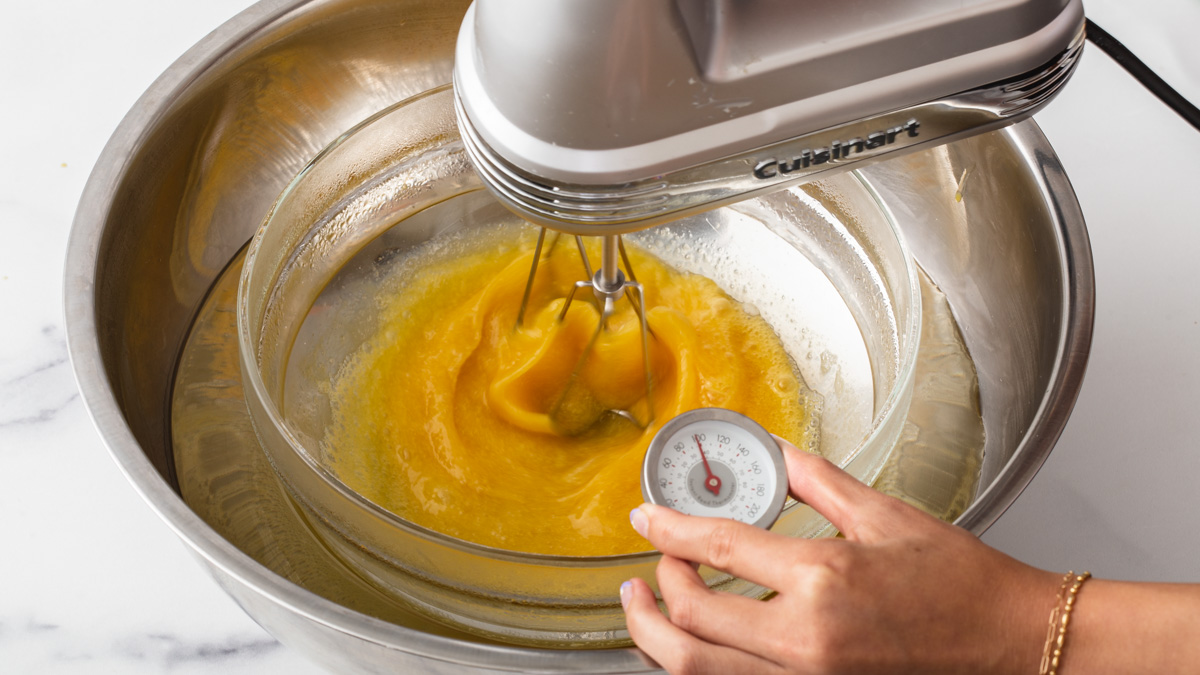
Heat the egg mixture to 104°F or 40°C. In a medium sized heat proof bowl, add the egg, granulated sugar and honey. Place the mixing bowl inside a large stainless steel bowl and fill with hot water. Using a hand mixer whisk the mixture on low-medium and bring the temperature to 100-105 F.
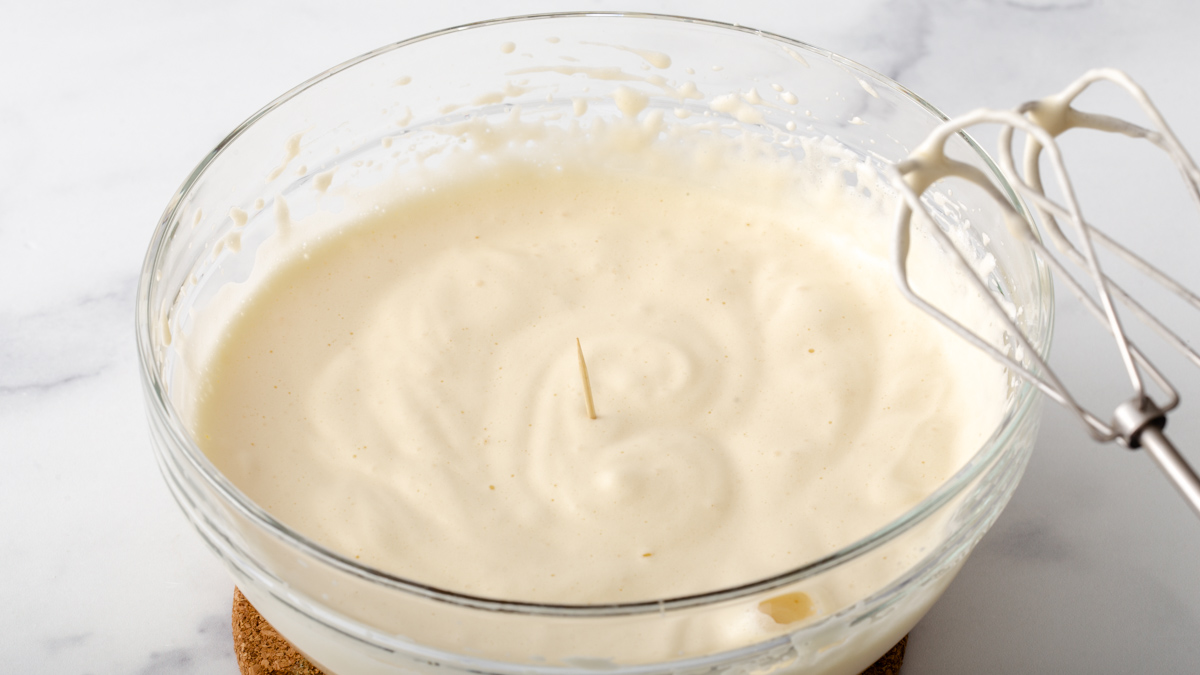
Whisk air into the egg mixture. Once it reaches 104°F or 40°C take it out of the water bath and continue mixing on high until the batter is pale yellow/ivory and the volume has increased. To test if it’s the right consistency you should be able lift the batter and produce a trail on top of the mixture, if it holds its shape it is ready. You can also test it by placing a toothpick in the center of the mixture and if it holds then the batter is ready.
Test the batter with a toothpick!
Tighten the air bubbles. Once you achieve the right consistency, take the hand mixer and whisk gently on low to remove all the large air bubbles for about 1-2 minutes.
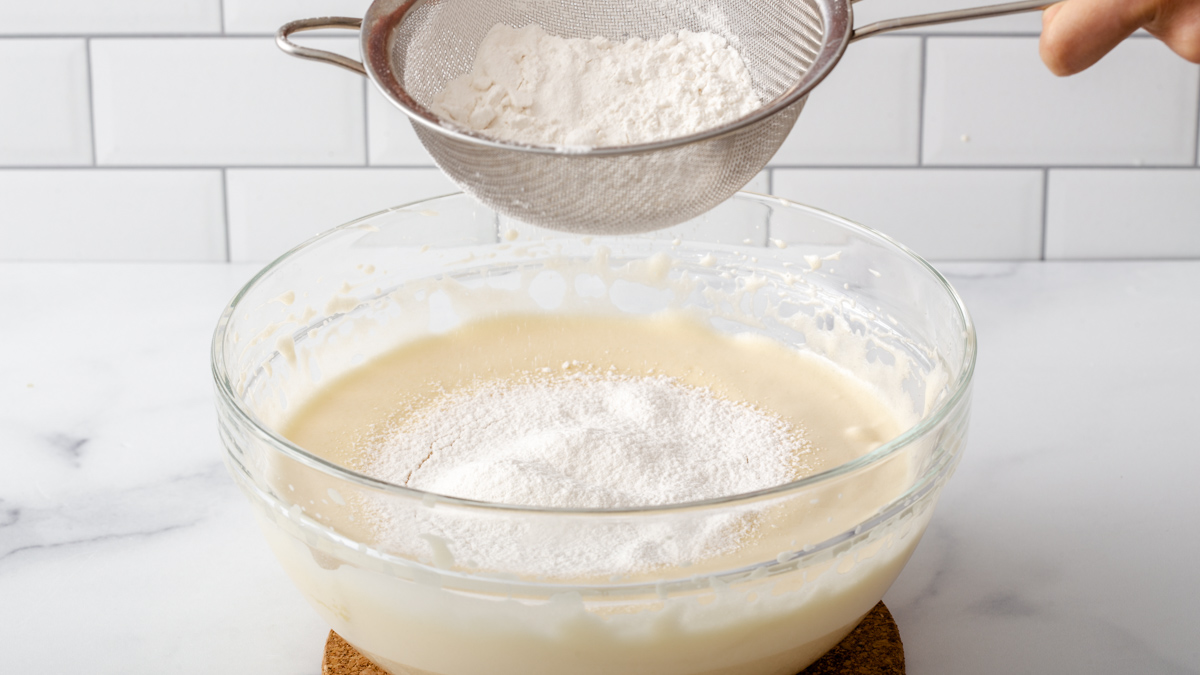
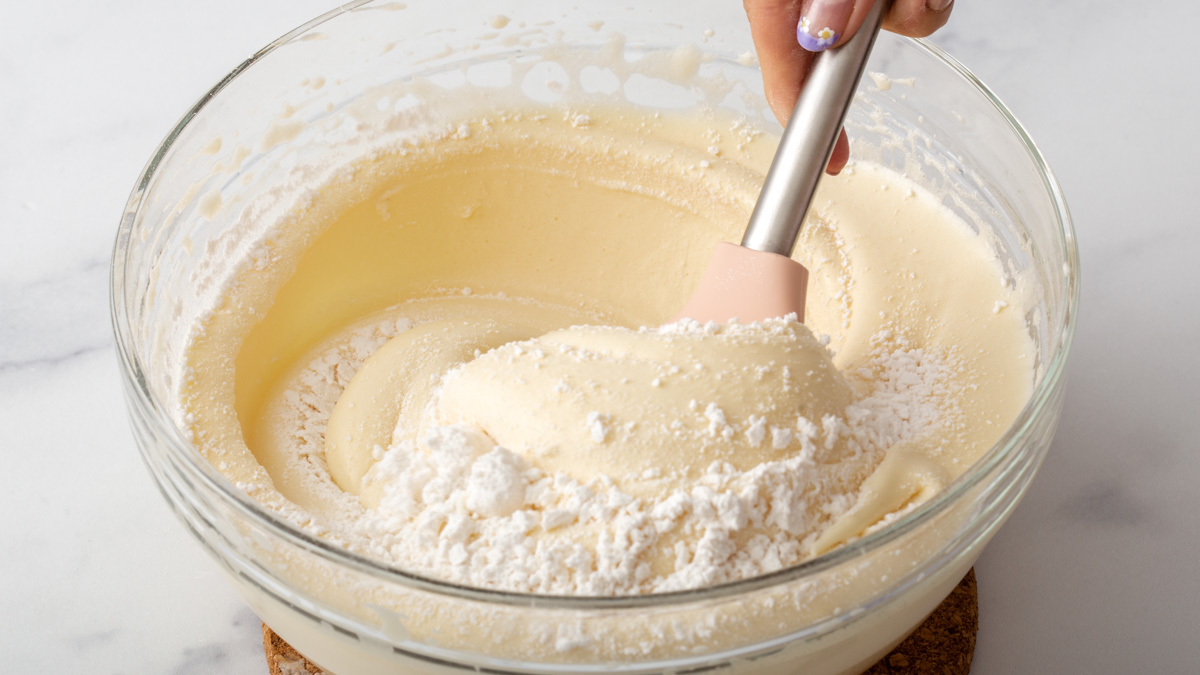
Sift in the flour. Sift in the flour and fold it in gently.
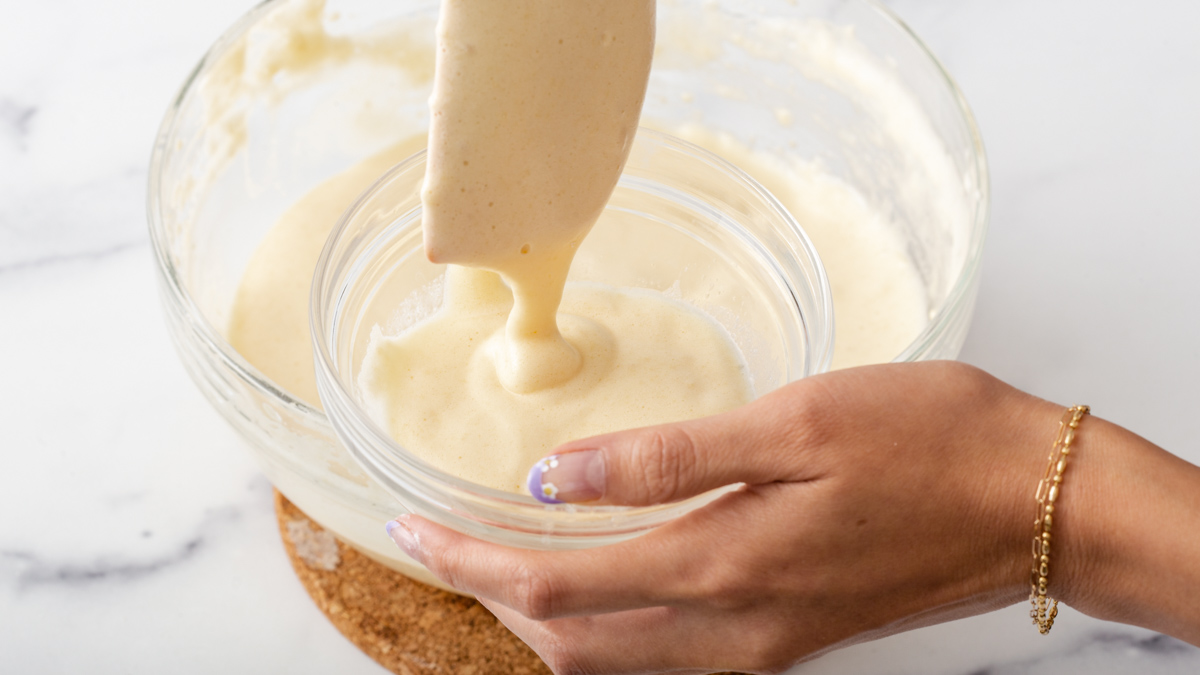
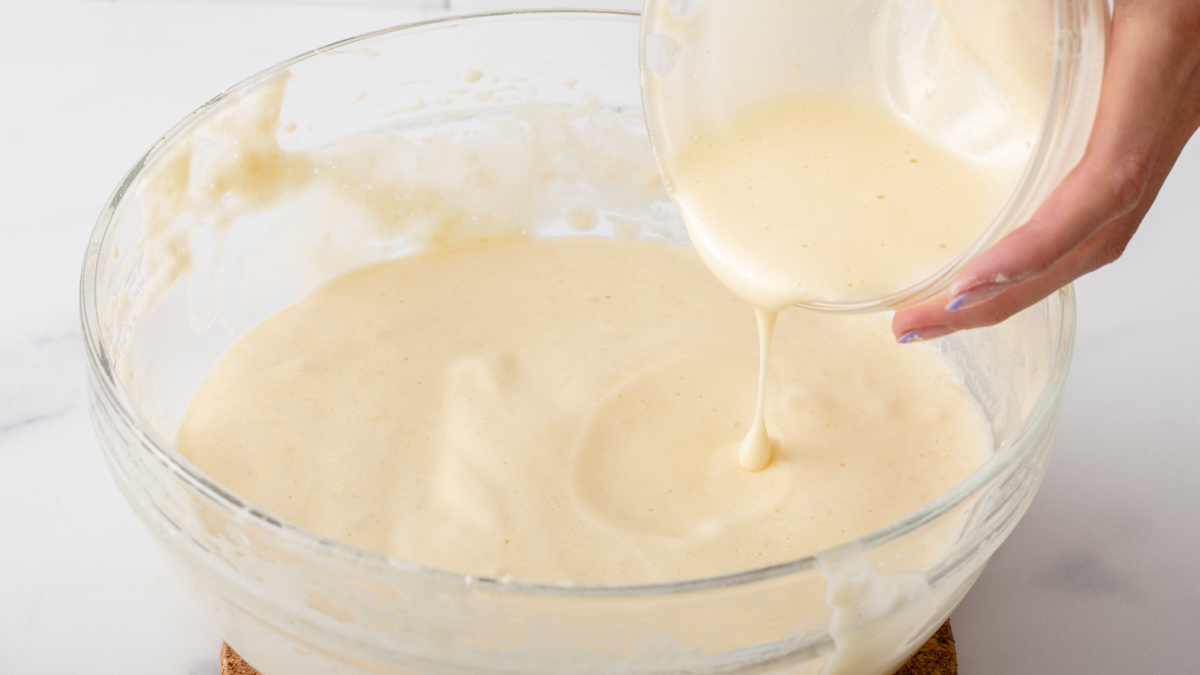
Melt the butter in the milk. In a small sauce pan, heat the milk and butter over low heat and mix until the butter has melted and reaches 140°F or 60°C. Place in a small heat proof bowl.
Add the butter mixture into the batter. Take a small amount of the egg batter and mix it in the small bowl of the butter mixture. Then pour this into the original batter and gently fold until combined.
Transfer to the cake pan, tap the cake pan on the workspace once to release air bubbles and bake at 325°F or 160°C for 30-35 minutes.
Once you take it out of the oven, tap the cake down onto the workspace again to prevent the cake from collapsing as it cools. Remove the cake and turn the cake upside down to cool for 10 minutes.
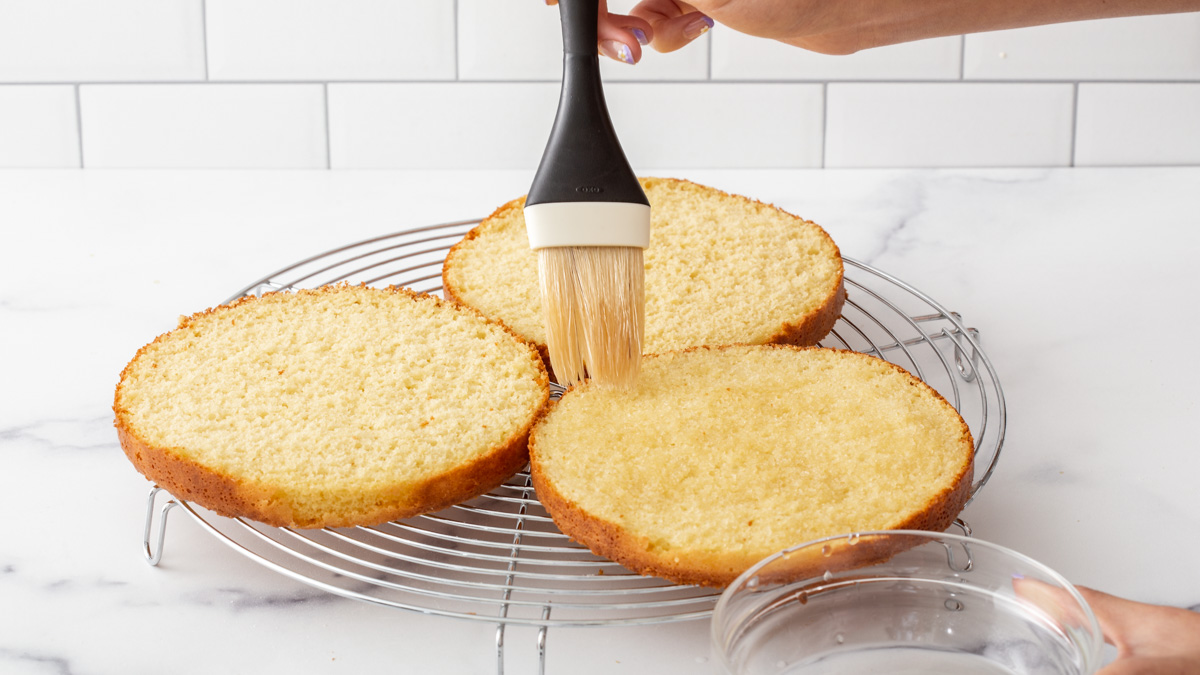
Let the cake cool completely before slicing the cake into 3 sections of about 1.5 cm each.
Simple Syrup
In a small saucepan, on medium heat mix together the sugar and water until the sugar is completely dissolved. Once dissolved pour into a heat proof bowl and set aside.
Vanilla Stabilized Whipped Cream
If using gelatin, add cold water to a small heat proof bowl. Then sprinkle the gelatin across the top, immediately whisk to mix this ensures all the gelatin will be absorbed by the water. Let the gelatin bloom for 5 minutes. Then microwave the gelatin for 5-7 seconds or until dissolved. Add 1 tsp of heavy cream and mix to chill the gelatin.
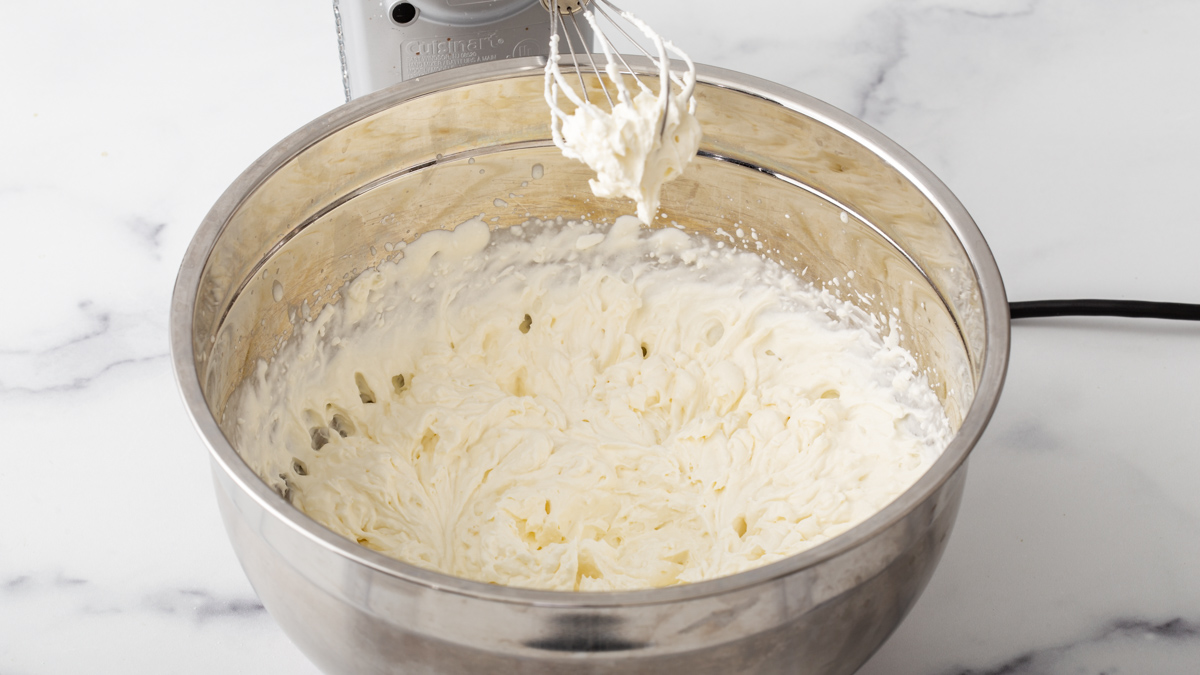
Whip heavy cream, sugar and vanilla. In a chilled mixing bowl, using an electric mixer beat the heavy cream until frothy. Then add the sifted powdered sugar and vanilla until soft peaks form. If using gelatin, slowly pour the cooled gelatin in when the cream is at soft peaks and mix until combined and until stiff peaks form. Be careful not to over whip where the cream is thick and chunky.
Transfer to a piping bag. Set aside.
Assembly
Brush on simple syrup onto each cake slice. Using a pastry brush, brush an even coat of simple syrup onto the tops of each of your cake slices.
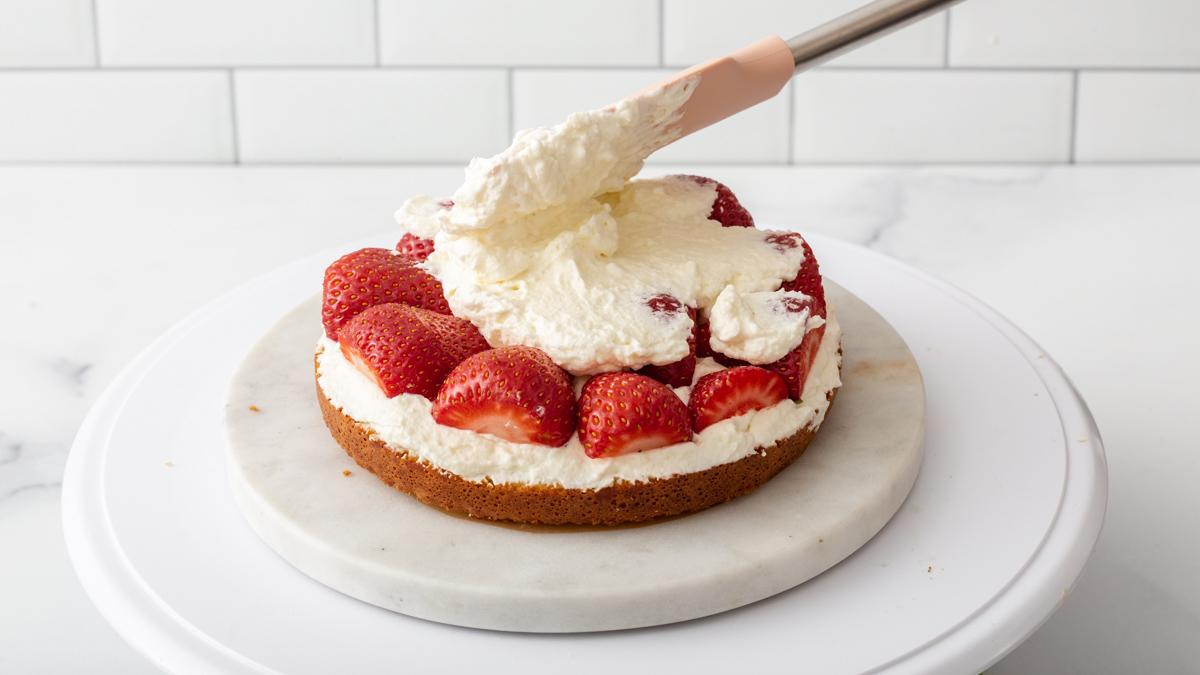
Add whipped cream and strawberries. For each layer, spread on a generous layer of whipped cream followed by halved strawberries and another layer of whipped cream.
Decorate! Place the cake slices above the whipped cream, even out the whipped cream and decorate.
Tips For The Genoise Cake
Use a scale! This is very important to get the precise measurements and the right proportions for each ingredient. I love my Amazon Kitchen scale.
Bring the temperature of the egg mixture to 104°F or 40°C this allows the air to be incorporated and the sugar to melt completely.
Make sure to whisk the egg mixture until pale yellow. Take the time to test whether the mixture is whipped enough by placing a toothpick in the mixture. If it holds then it is ready.
Tighten the bubbles in the batter. By whisking the mixture on low speed AFTER it has reached peak fluffiness, it removes the unwanted large air bubbles in the mixture.
Make sure to fold the flour until JUST combined. Over mixing will reduce in lower cake volume whereas under mixing will result in a dense cake bottom.
Shock the cake before and after it comes out of the oven. Shock the cake by dropping it onto your workspace from about 5-6 inches above your workspace. Do this once before you place the cake into the oven to remove any remaining large air bubbles. Repeat again right after you remove the cake from the oven to prevent your cake from sinking as it cools.
Tips for the Whipped Cream
Use cold heavy whipping cream. For the whipped cream, it is best to use cold straight from the refrigerator whipping cream. This will make whipping the cream so much easier and quicker.
Don’t pour the gelatin in the whipped cream until soft peaks form. This will guarantee the whipped cream will hold at room temperature without melting. Also this will prevent the gelatin from being shocked by the cold cream and cause tiny little gelatin pieces in your whipped cream.
Storage Instructions
You can store an undecorated cake by wrapping it in plastic wrap and placing it in the refrigerator for 2-3 days or in the refrigerator for up to 1 month.
If the Japanese strawberry shortcake is decorated, you can store the cake covered in the refrigerator for up to 1-2 days.
The softest, most delicate Japanese strawberry shortcake recipe with homemade stabilized whipped cream is perfect for your next dinner party! This beautiful cake is so light and delicious it will impress all of your guests!
2teaspoongelatin + 2 teaspoon water+ 1 teaspoon heavy whipping creamoptional
Garnish
1lbstrawberrieswashed and sliced
Instructions
Genoise Cake
Preheat the oven to 325°F or 160°C. Line a 6-inch cake pan with parchment paper.
Heat the egg mixture to 104°F or 40°C. In a medium-sized heat-proof bowl, add the egg, granulated sugar, and honey. Place the mixing bowl inside a large stainless steel bowl and fill it with hot water. Using a hand mixer whisk the mixture on low-medium and bring the temperature to 100-105°F. (This will melt the sugar and allow the batter to gain volume easier.
Whisk air into the egg mixture. Once it reaches 104°F or 40°C take it out of the water bath and continue mixing on high until the batter is pale yellow/ivory and the volume has increased. To test if it's the right consistency you should be able to lift the batter and produce a trail on top of the mixture, if it holds its shape it is ready. Or you can stick a toothpick in and if it holds then it is ready.
Tighten the air bubbles. Once you achieve the right consistency, take the hand mixer and whisk gently on low to remove all the large air bubbles for about 1-2 minutes. The final result should be smooth and silky.
Sift in the flour. Sift in the flour and fold it in gently. Be careful not to remove all the air by over mixing. Stop immediately when it is combined.
Melt the butter in the milk. In a small saucepan, heat the milk and butter over low heat and mix until the butter has melted and reaches 140°F or 60°C. Place in a small heat-proof bowl.
Add the butter mixture into the batter. Take a small amount of the egg batter and mix it in the small bowl of the butter mixture. This cools down the butter and milk and creates less shock to the batter. Then pour this into the original batter and gently fold until combined. Do not over mix.
Transfer to the cake pan, tap the cake pan on the workspace once to release air bubbles, and bake at 325°F or 160°C for 30-35 minutes. Test to see if the cake is ready by poking the center with a toothpick.
Once you take it out of the oven, tap the cake down onto the workspace again to prevent the cake from collapsing as it cools. Remove the cake and turn the cake upside down to cool for 10 minutes.
Let the cake cool completely before slicing the cake into 3 sections of about 1.5 cm each.
Simple Syrup
In a small saucepan, on medium heat mix together the sugar and water until the sugar is completely dissolved. Once dissolved pour into a heat-proof bowl and set aside.
Vanilla Whipped Cream
If using gelatin, add cold water to a small heat-proof bowl. Then sprinkle the gelatin across the top, immediately whisk to mix this ensures all the gelatin will be absorbed by the water. Let the gelatin bloom for 5 minutes. Then microwave the gelatin for 5-7 seconds or until dissolved. Add 1 tsp of heavy cream and mix to chill the gelatin.
Whip heavy cream, sugar, and vanilla. In a chilled mixing bowl, using an electric mixer beat the heavy cream until frothy. Then add the sifted powdered sugar and vanilla until soft peaks form. If using gelatin, slowly pour the cooled gelatin in when the cream is at soft peaks and mix until combined and until stiff peaks form. Be careful not to over whip where the cream is thick and chunky.
Transfer to a piping bag. Set aside.
Assembly
Brush on simple syrup onto each cake slice. Using a pastry brush, brush an even coat of simple syrup onto the tops of each of your cake slices.
Add whipped cream and strawberries. For each layer, spread on a generous layer of whipped cream followed by halved strawberries and another layer of whipped cream.
Decorate! Place the cake slices above the whipped cream, even out the whipped cream, and decorate
Notes
Bring the temperature of the egg mixture to 104 F or 40 C this allows the air to be incorporated and the sugar to melt completely.
Make sure to whisk the egg mixture until pale yellow/ivory. Take the time to test whether the mixture is whipped enough by placing a toothpick in the mixture. If it holds then it is ready.
Tighten the bubbles in the batter. By whisking the mixture at low speed AFTER it has reached peak fluffiness, it removes the unwanted large air bubbles in the mixture.
Make sure to fold the flour until JUST combined. Over mixing will reduce in lower cake volume whereas under mixing will result in a dense cake bottom.
Shock the cake before and after it comes out of the oven. Shock the cake by dropping it onto your workspace from about 5-6 inches above your workspace. Do this once before you place the cake into the oven to remove any remaining large air bubbles. Repeat again right after you remove the cake from the oven to prevent your cake from sinking as it cools.
Use cold heavy whipping cream. For the whipped cream, it is best to use cold straight from the refrigerator whipping cream. This will make whipping the cream so much easier and quicker.
Don't pour the gelatin into the whipped cream until soft peaks form. This will guarantee the whipped cream will hold at room temperature without melting. Also, this will prevent the gelatin from being shocked by the cold cream and cause tiny little gelatin pieces in your whipped cream.
Storage Instructions. You can store an undecorated cake by wrapping it in plastic wrap and placing it in the refrigerator for 2-3 days or in the refrigerator for up to 1 month. If the cake is already decorated, you can store the cake covered in the refrigerator for up to 1-2 days.
Hello! I’m just wondering what’s the flower you used and where is it from? Been seeing it on a lot of desserts and we’re curious if it’s edible. Thanks!
Hi! I got these flowers at Trader Joe’s! They are Chamomile flowers so they are technically edible. However, I don’t prefer the taste of these flowers, so I don’t eat them and only use them for decoration.