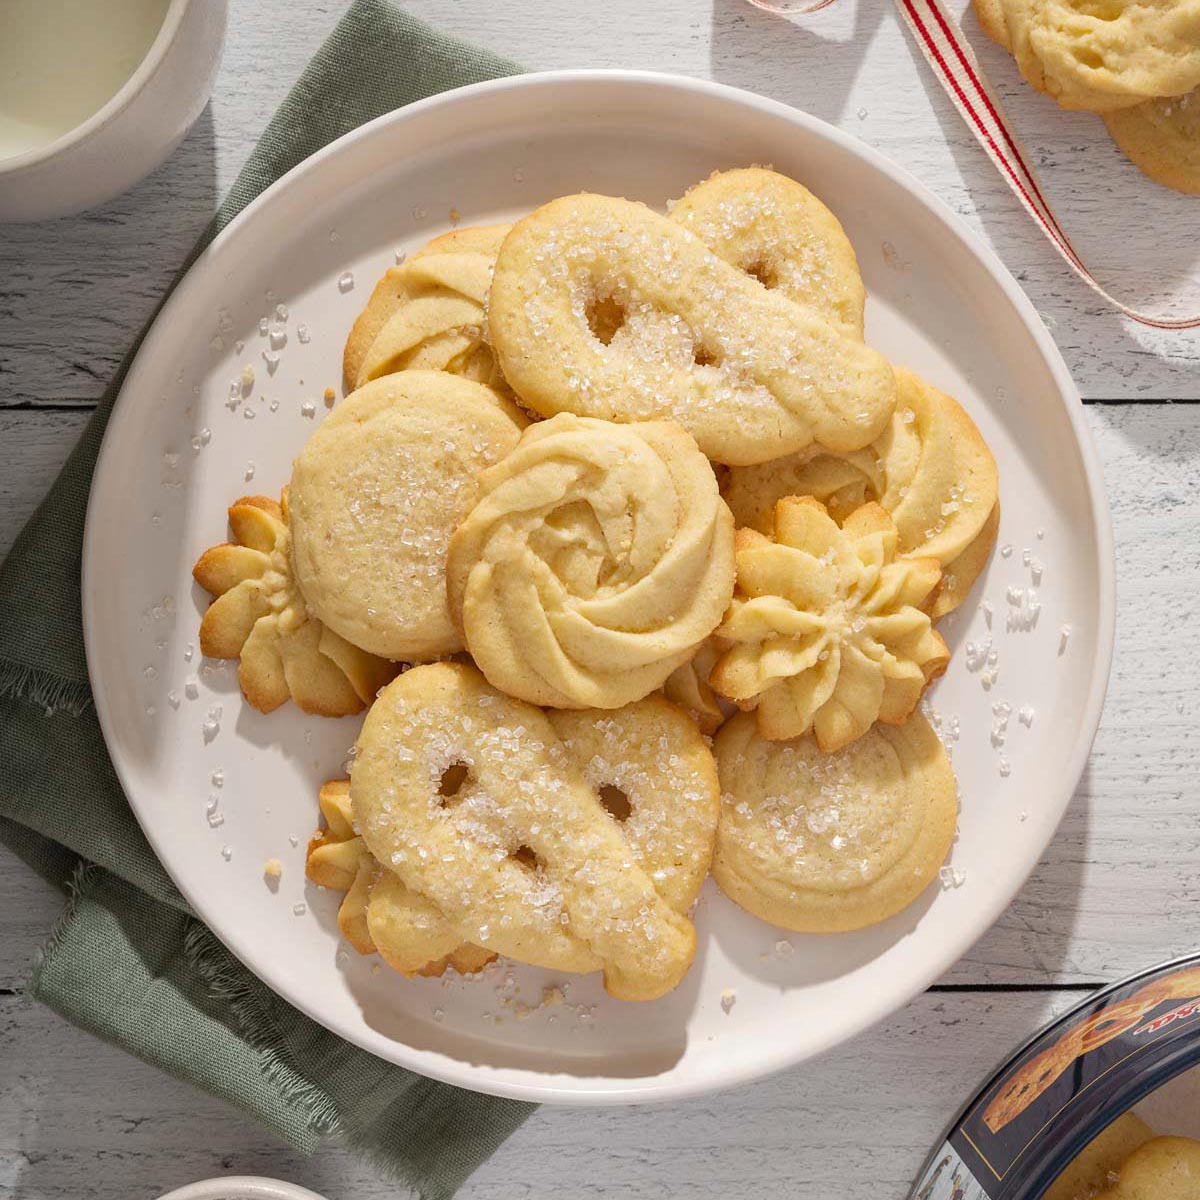
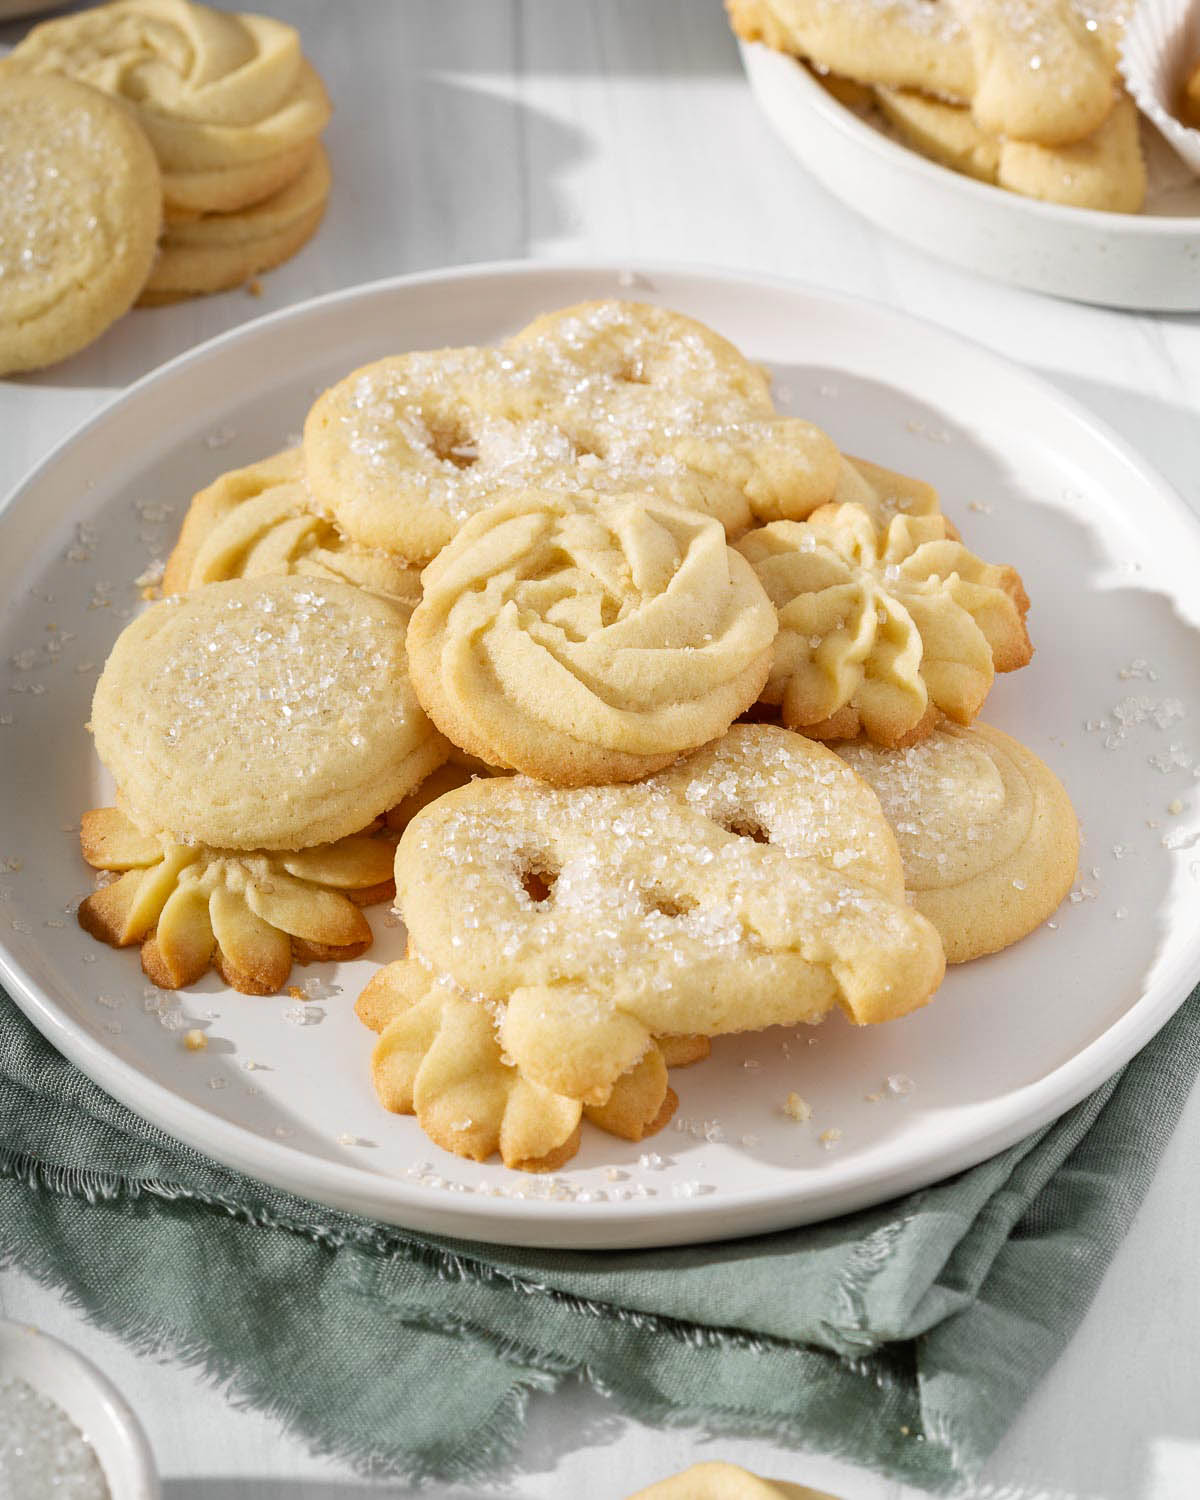
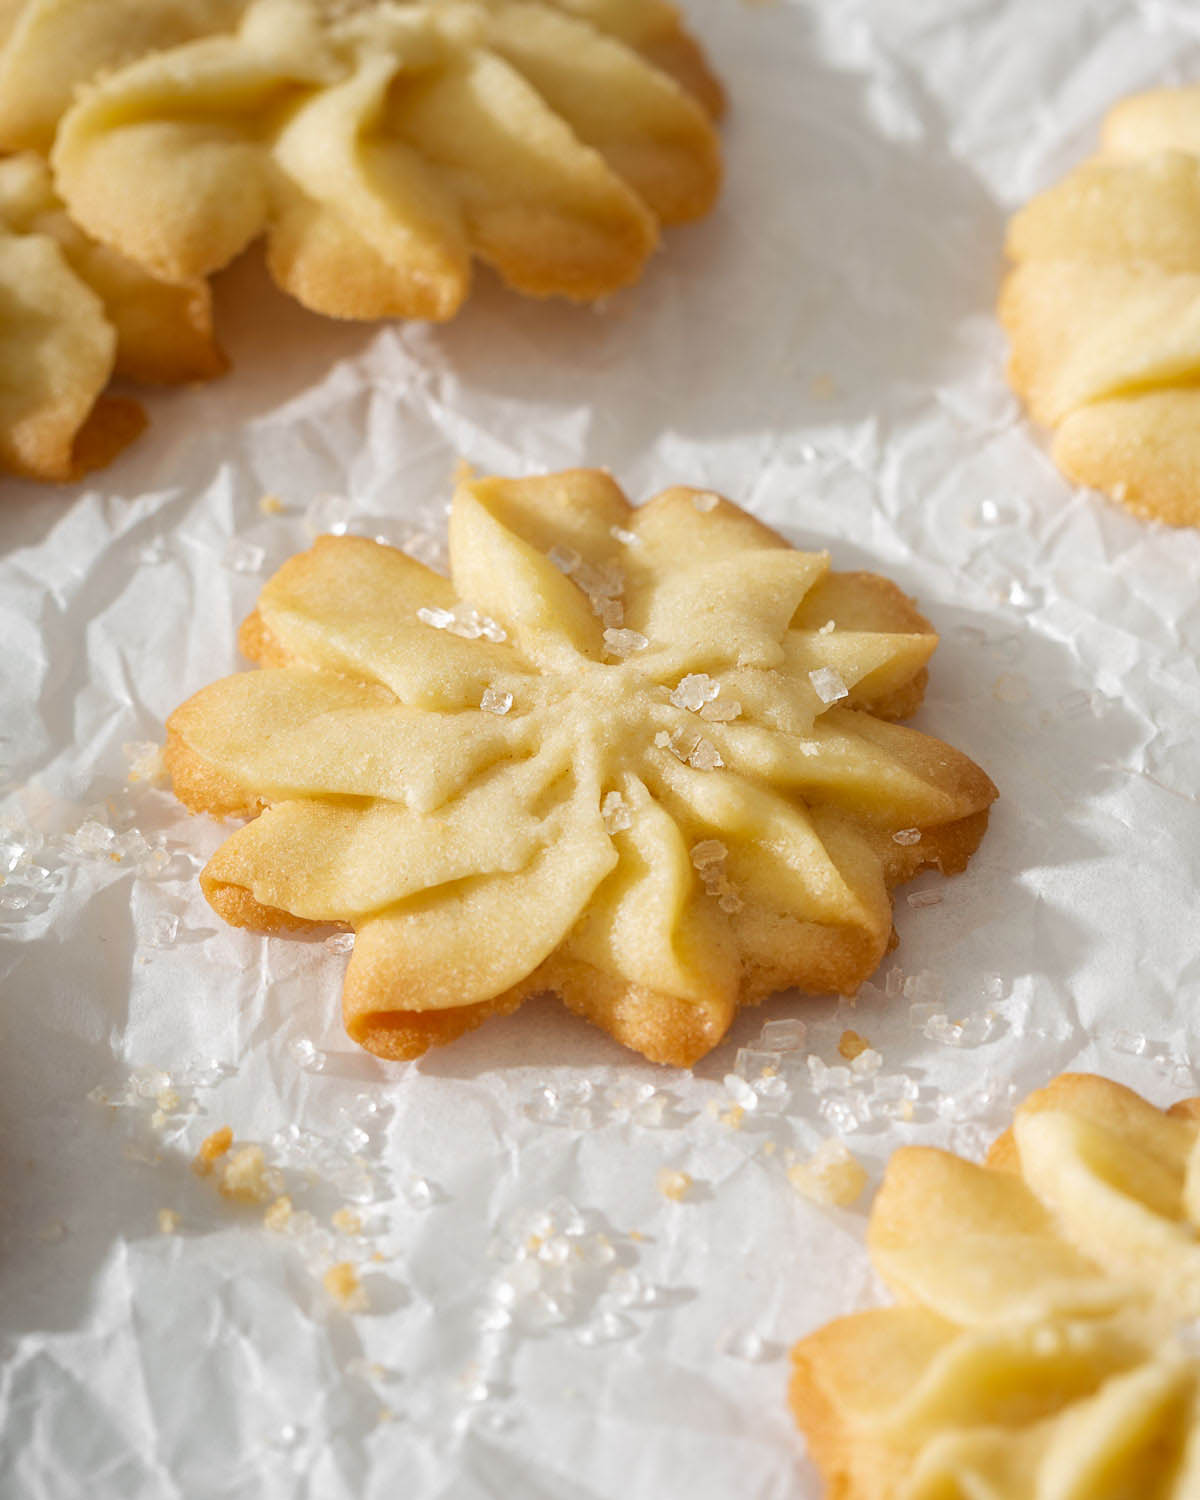
These melt-in-your-mouth Danish butter cookies are synonymous with nostalgia and the holiday season. These simple and delicious butter cookies are perfect for gifting this year!
Classic, delicious, and straight-to-the-point cookies are a must! These holiday butter cookies are a staple cookie that I make every year. Growing up, my grandma would always have a circle tin of Danish butter cookies in her pantry that I would have to fight my cousins for. Even though all the cookies taste the same, I loved the pretzel-shaped ones the most. In my mind, they just tasted better than the rest. Now, every year I associate the holiday season with these cookies. This Danish butter cookies recipe is even better than the classic grocery store cookies, they are crumbly, melt in your mouth, not overly sweet, and absolutely addicting.
Kitchen Scale: a kitchen scale is absolutely NECESSARY if you want to have foolproof bakes. This will ensure you have the exact measurements for each ingredient. My little pink kitchen scale is both aesthetic and precise.
Stand Mixer or Hand Mixer: you can use either a stand mixer or an electric hand mixer to cream the butter together with the ingredients. It may need a lot of elbow power if you decide to do this by hand.
Half-sheet Baking Sheet: you will need multiple baking sheets for this recipe. I have always used Nordicware aluminum baking sheets and they have never failed me.
Slipmat:slipmats are a baking tool that was sent from heaven. They never stick to any bake which makes the process so seamless.
Piping Bag and Star Tips: you will need a piping bag with a star tip in order to get the cookies to look like these shapes
Ingredients
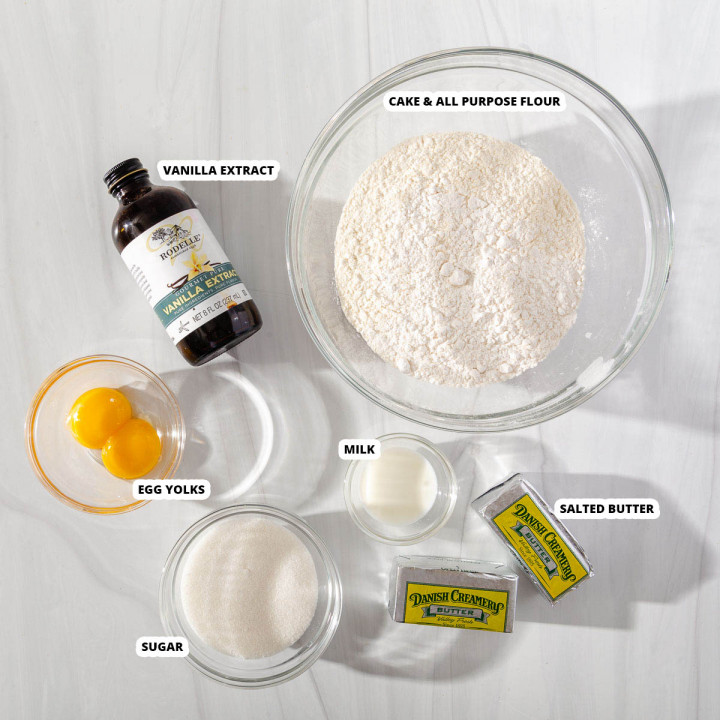
These Danish butter cookies are only made with 7 ingredients, thus the quality of EVERY ingredient matters.
Butter: these are called BUTTER cookies. You need high-quality butter for the most delicious flavor. I recommend splurging an extra dollar for European-style butter which has more butterfat=more flavor.
Granulated Sugar: what are cookies without a little sugar? The sugar adds the sweetness to the cookies.
Egg yolks: the eggs bind the ingredients of the cookie together.
Vanilla Extract: vanilla is one of the main components of flavor in these cookies. Make sure to use high-quality vanilla extract.
Milk: the milk loosens up the dough allowing it to be more pipeable. It also adds a creamy flavor to the cookie.
All-Purpose Flour and Cake Flour: this recipe combines both all-purpose flour and cake flour to give the cookies a crunch yet crumbly texture. Make sure to measure your flour correctly with a scale or fluff your flour and level it off with a knife.
How To Make Danish Butter Cookies
This Danish butter cookie recipe is probably the easiest cookie recipe that you will ever come across and it is so buttery and delicious!
Make space in the refrigerator and prep the baking mats. Make room in your refrigerator for a baking sheet so the shaped cookies can chill for 20-30 minutes. Without chilling, the piped cookies may over-spread. Line two baking sheets with parchment paper or silicone baking mat. Set aside.
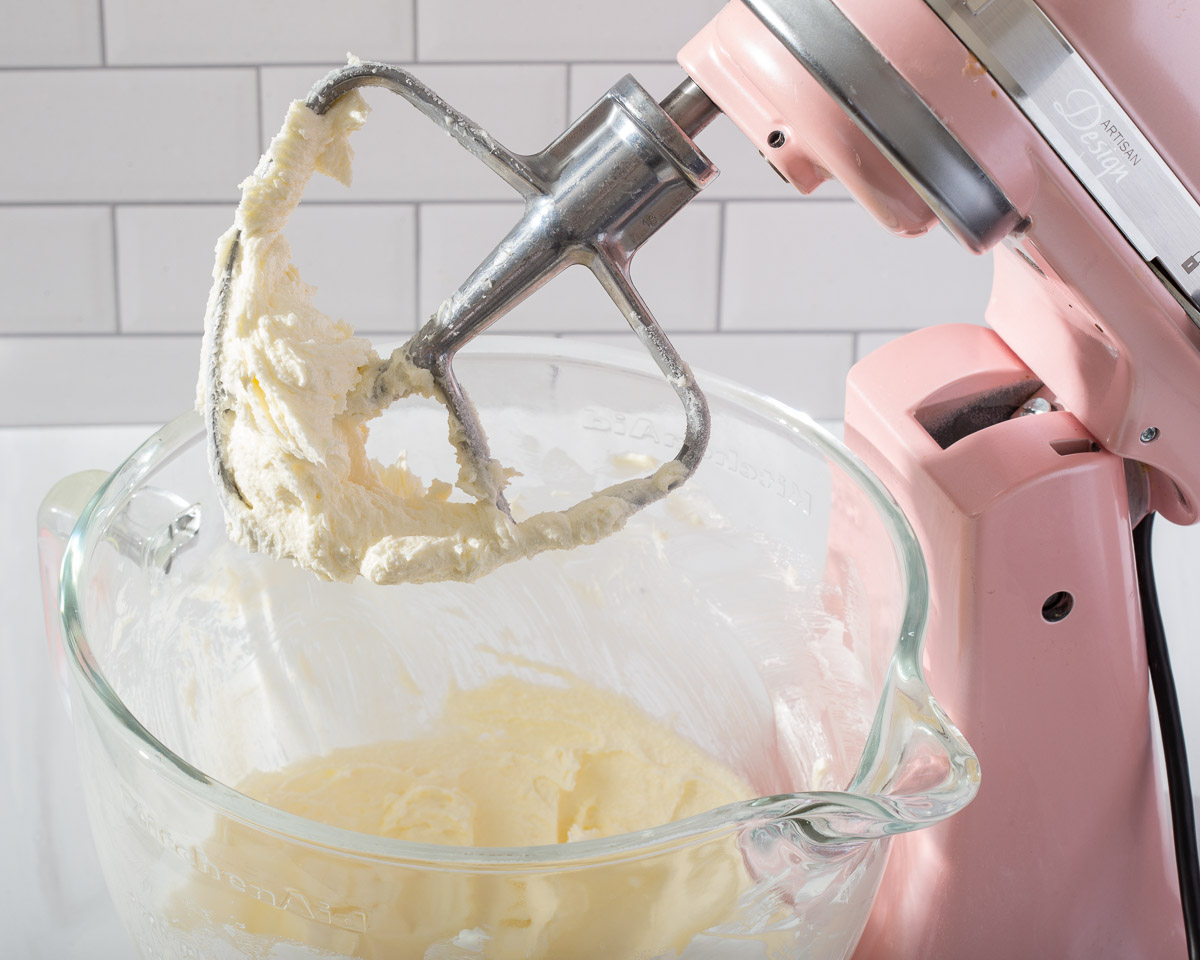
Cream butter, sugar salt. In the bowl of a stand mixer fitted with a paddle attachment, cream butter on medium speed until smooth. With the mixer still running on low, slowly add in sugar and salt. Mix on medium speed until light and fluffy.
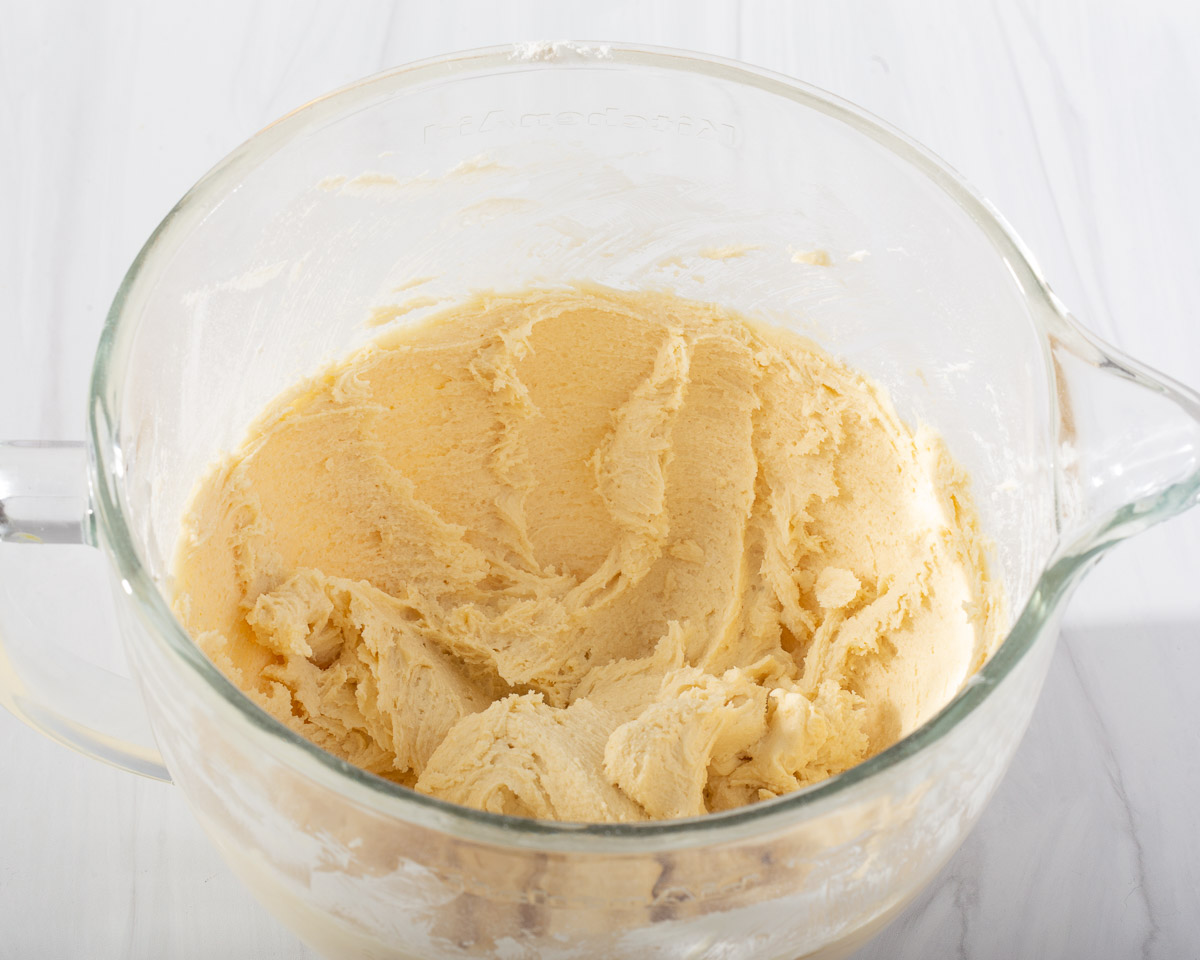
Incorporate egg yolks, vanilla and milk. While mixing, add egg yolks, vanilla and milk. Continue to mix on medium speed until well combined. Scrape down sides of bowl for thorough mixing.
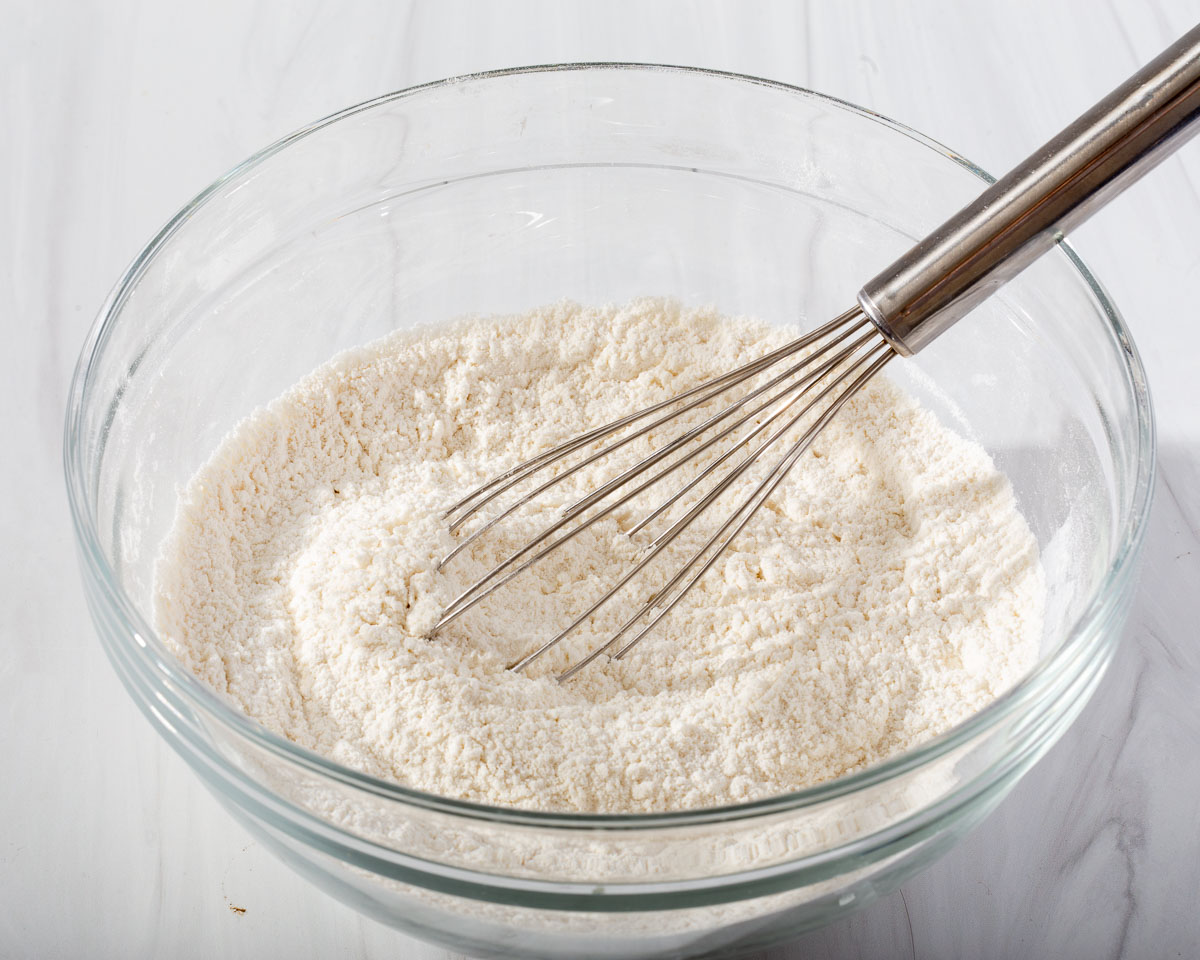
Mix dry ingredients and add into mixture. In a medium sized mixing bowl, whisk the flour, and cake flour. Add flour mixture to mixer in two additions, and scrape down the sides of the bowl. Mix on low speed until combined and no traces of flour.
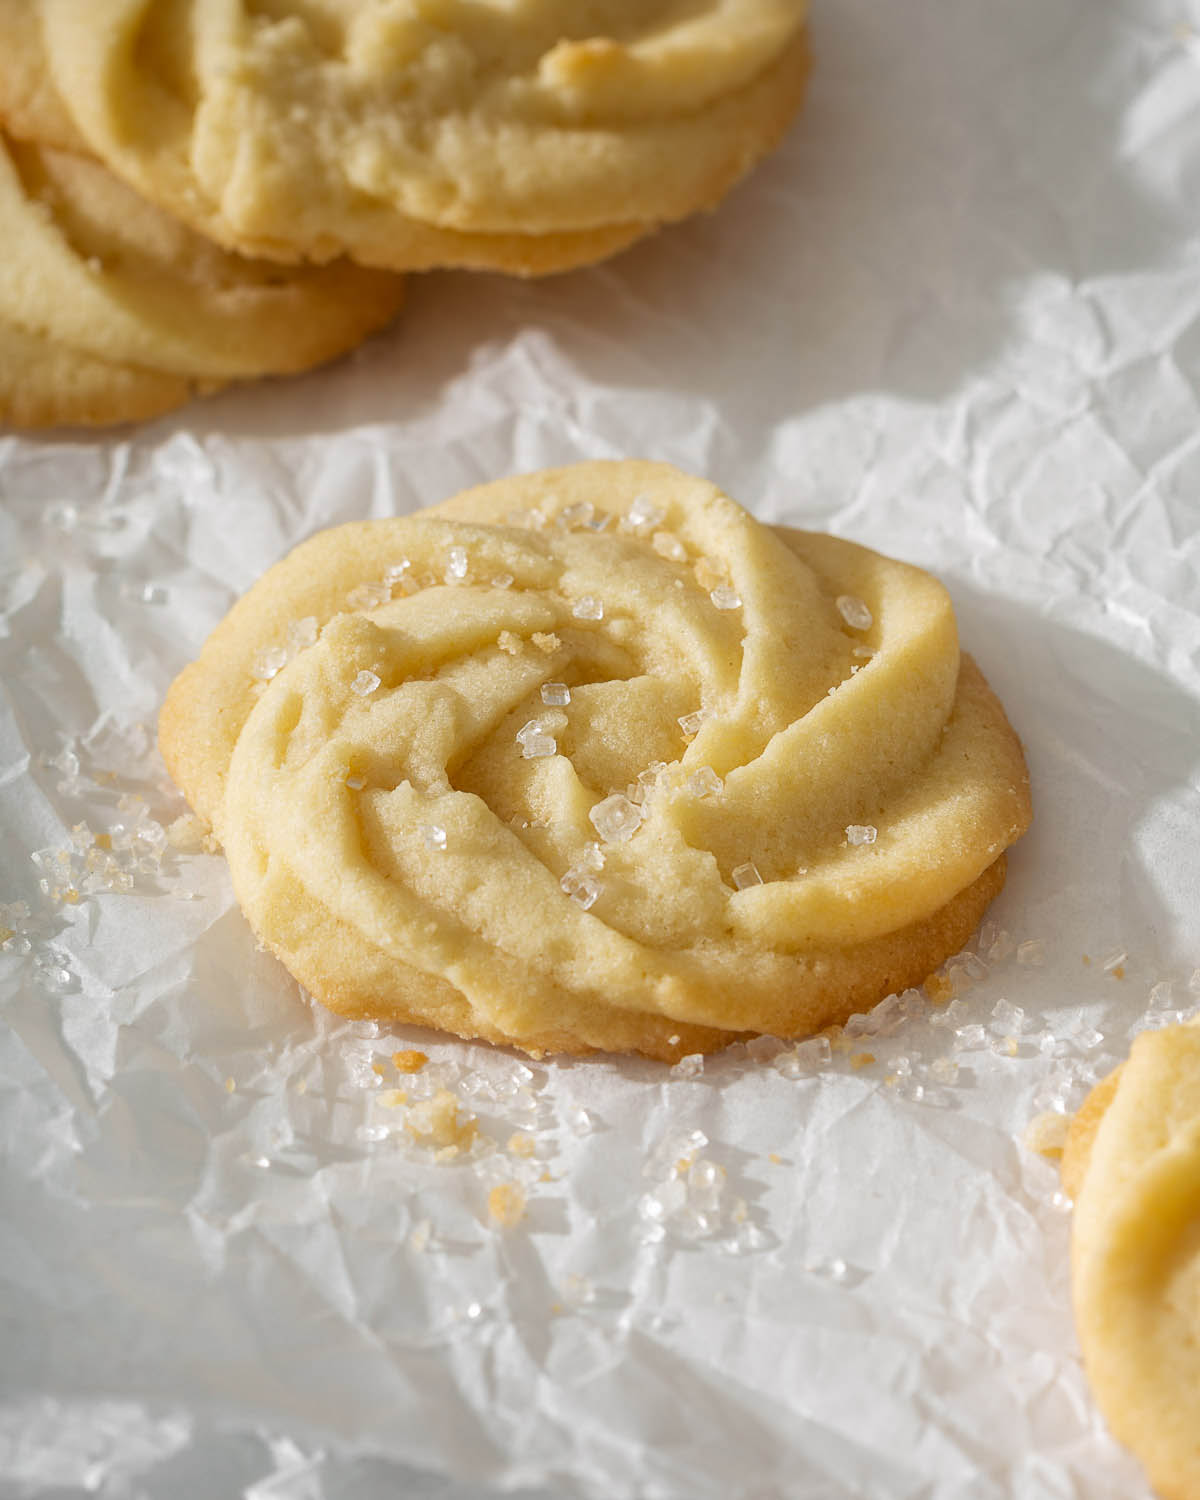
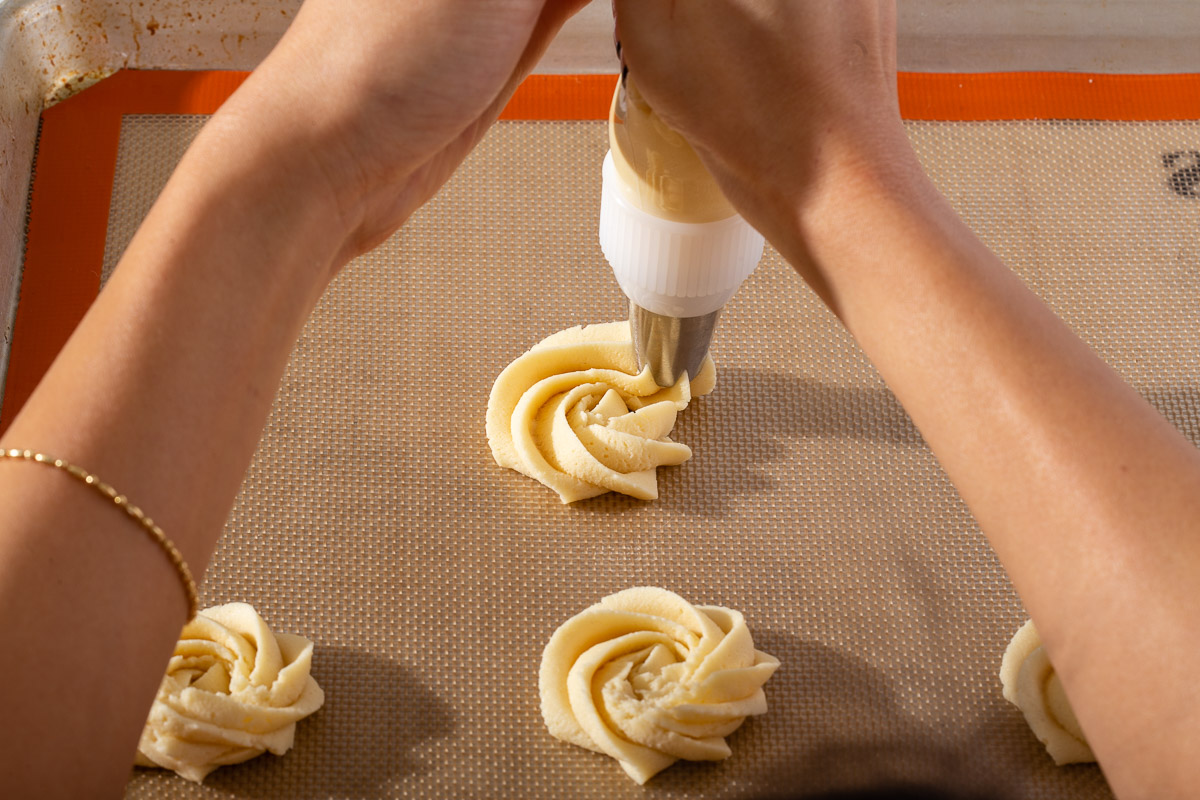
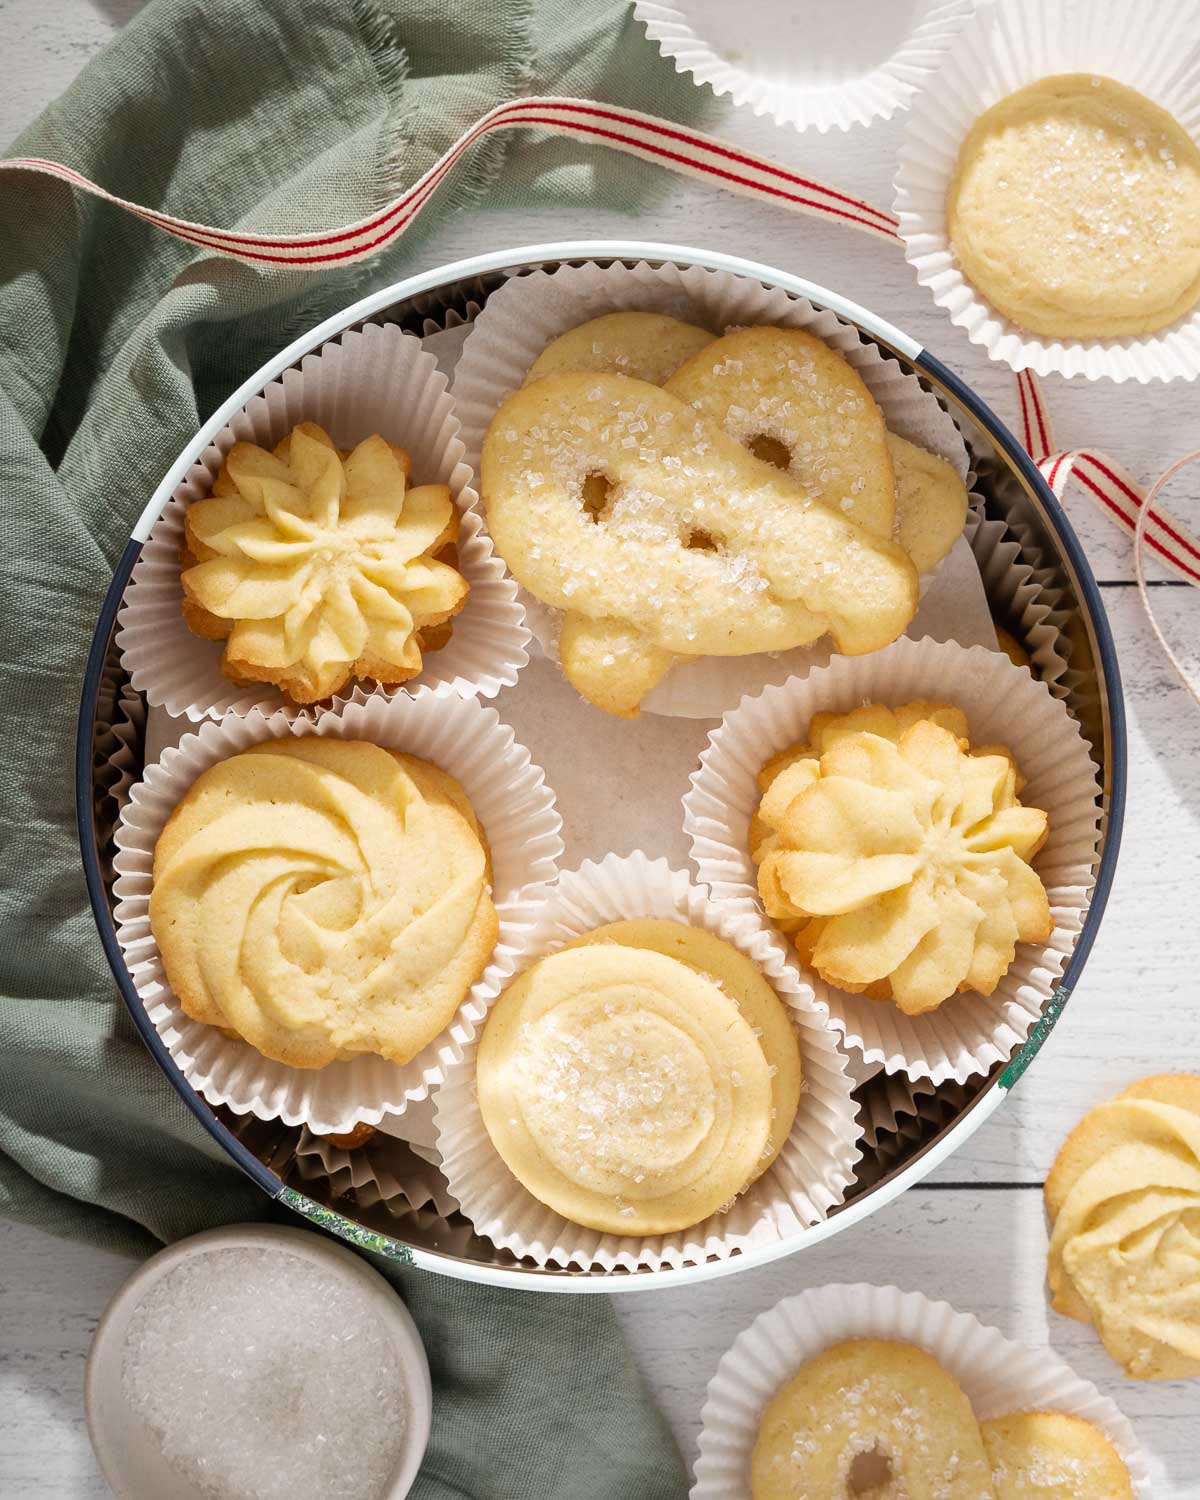
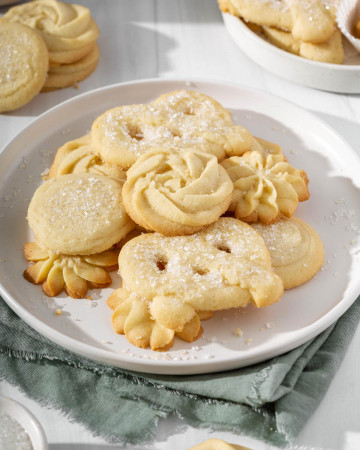
Pipe the cookies. Transfer cookie batter to large piping bag with fitted a ½-inch open star tip. Pipe 2-inch cookies (rosettes, pretzels, circles, squares) on prepared baking sheet. Space cookies at least 2-inches apart. If desired, sprinkle the dough with festive sprinkles and/or coarse sugar. Chill in the refrigerator for 20-30 minutes.
Prepare the oven. Preheat oven to 350°F. Make sure the baking rack is in the middle of the oven.
Bake. Bake for 10-15 minutes or until edges are JUST lightly golden brown. Let cookies cool in baking sheet for about 5 minutes before transferring to wire rack to cool to room temperature.
Expert Tips
Use room-temperature butter. Leave your butter out of the refrigerator for about 45 minutes. Having room-temperature butter allows for easy mixing and allows all the ingredients to be incorporated seamlessly. The butter should be slightly cool (about 67°F or 19°C), but your finger should leave an indentation when you press the butter.
Use room-temperature eggs. You want the eggs to be at room temperature so that the cookies will bake evenly. To quickly bring cold eggs to room temperature, place eggs in slightly warm water for 5 minutes.
Don’t over-mix the batter. The more you mix the more gluten develops in the batter. It will cause the batter to toughen up and be difficult to manage.
Watch your cookies in the oven! The baking times will vary depending on the sizes and shapes of the cookies.
You can alternatively just use all-purpose flour. The combination of all-purpose flour and cake flour provides a nice crisp yet melt-in-your-mouth consistency. However, you can always omit the cake flour and use 260 grams of all-purpose flour instead.
Measure your flour correctly! I like to use a kitchen scale for the most accurate measurements. Adding too much flour to the recipe is the most common mistake. If you don’t have one then fluff the flour with a spoon lightly sprinkle it into your measuring cup, and use a knife to level it off.
If you use unsalted butter, add 1/4 teaspoon kosher salt.
Storage Instructions
You can store these Danish butter cookies in an airtight container at room temperature for up to 5 days. Alternatively, you can store these cookies in the freezer in an airtight container for up to 3 months.
Make Ahead Instructions
You can chill the shaped cookies on the baking sheet in the refrigerator for up to 2 days before baking. Cover with plastic wrap or aluminum foil if chilling for longer than 30 minutes.
You can also freeze the un-baked-shaped dough for up to 2-3 months. Bake the frozen-shaped dough for an extra couple of minutes. You do not need to thaw the dough.
FAQ
What’s the best butter to use for butter cookies?
I recommend using European salted butter at room temperature for butter cookies. European butter has a higher fat content which means more butter flavor. Since these cookies only have a few ingredients the quality of your ingredients matter for the final taste of the cookies. You can always opt for using unsalted butter and adding 1/4 teaspoon of salt.
Why do I need to chill my cookie dough before baking?
Chilling the cookie dough before baking amplifies the flavors, hardens the butter which will prevent overspreading, and allow the cookies to hold their shape in the oven.
These melt-in-your-mouth Danish butter cookies are synonymous with nostalgia and the holiday season. These simple and delicious butter cookies are perfect for gifting this year!
Make space in the refrigerator and prep the baking mats. Make room in your refrigerator for a baking sheet so the shaped cookies can chill for 20-30 minutes. Without chilling, the piped cookies may over-spread. Line two baking sheets with parchment paper or a silicone baking mat. Set aside.
Cream butter, sugar salt. In the bowl of a stand mixer fitted with a paddle attachment, cream butter on medium speed until smooth. With the mixer still running on low, slowly add in sugar and salt. Mix on medium speed until light and fluffy.
Incorporate egg yolks, vanilla, and milk. While mixing, add egg yolks, vanilla, and milk. Continue to mix on medium speed until well combined. Scrape down the sides of the bowl for thorough mixing.
Mix dry ingredients and add into mixture. In a medium-sized mixing bowl, whisk the flour, and cake flour. Add flour mixture to mixer in two additions, and scrape down the sides of the bowl. Mix on low speed until combined and no traces of flour. If the batter is too thick to pipe, add another tablespoon of milk to soften.
Pipe the cookies. Transfer cookie batter to a large piping bag with fitted a ½-inch open star tip. Pipe 2-inch cookies (rosettes, pretzels, circles, squares) on a prepared baking sheet. Space cookies at least 2-inches apart. If desired, sprinkle the dough with festive sprinkles and/or coarse sugar. Chill in the refrigerator for 20-30 minutes.
Prepare the oven. Preheat oven to 350°F. Make sure the baking rack is in the middle of the oven.
Bake. Bake for 10-15 minutes or until the edges are JUST lightly golden brown. Let cookies cool on the baking sheet for about 5 minutes before transferring to a wire rack to cool to room temperature.
Notes
Use room temperature butter. Leave your butter out of the refrigerator for about 45 minutes. Having room temperature butter allows for easy mixing and allows all the ingredients to incorporate seamlessly. The butter should be slightly cool (about 67°F or 19°C), but your finger should leave an indentation when you press the butter.
Use room temperature eggs. You want the eggs to be at room temperature so that the cookies will bake evenly. To quickly bring cold eggs to room temperature, place eggs in slightly warm water for 5 minutes.
Don’t over mix the batter. The more you mix the more gluten develops in the batter. It will cause the batter to toughen up and be difficult to manage.
Watch your cookies in the oven! The baking times will vary depending on the sizes and shapes of the cookies.
You can alternatively just use all-purpose flour. The combination of all-purpose flour and cake flour provides a nice crisp yet melt in your mouth consistency. However, you can always omit the cake flour and use 260 grams of all-purpose flour instead.
Measure your flour correctly! I like to use a kitchen scale for the most accurate measurements. Adding too much flour to the recipe is the most common mistake. If you don’t have one then fluff the flour with a spoon and lightly sprinkle it into your measuring cup, and use a knife to level it off.
If you use unsalted butter, add 1/4 teaspoon kosher salt.
Storage Instructions: You can store these butter cookies in an airtight container at room temperature for up to 5 days. Alternatively, you can store these cookies in the freezer in an airtight container for up to 3 months.
Make-Ahead Instructions: You can chill the shaped cookies on the baking sheet in the refrigerator for up to 2 days before baking. Cover with plastic wrap or aluminum foil if chilling for longer than 30 minutes. OR You can also freeze the un-baked-shaped dough for up to 2-3 months. Bake the frozen-shaped dough for an extra couple of minutes. You do not need to thaw the dough.
first of all, i am a rookie in this field, but I see a deep knowledge about cookies process, and a high professional level in the description, the presentation is absolutely amazing, with many details from the ingredients to the bakery process, thank you
Apps can be tricky. I’m American but always bake in grams, so I was excited at a recipe that had those measurements. Also love when I can double it triple a recipe without having to do the math. However, every you click on the “2” for doubling the recipe, the grams didn’t update. Luckily I spotted this before baking. All this being said, great recipe. Lovely flavor and texture.
Using homemade butter sounds delicious! The consistency might be different so you may need to adjust the flour content based on the texture of the butter.
I have not tried making this with gluten free flour before. But I’ve heard that you can substitute one cup of all-purpose flour with one cup of gluten-free flour. If your gluten-free flour contains xantham gum it should retain the structure. You may also need to adjust the amount of milk to be able to pipe these cookies.
Hi Jodi,
It sounds like your cookie batter may have been too dry. This could mean a variety of different things. There may have been too much flour, not enough butter/milk, or the butter was not completely at room temperature when mixed. I recommend using a kitchen scale to measure out the ingredients so you’ll have perfect ratios if you haven’t done so already. Or if the batter is still to stiff after measuring with a scale, I’d recommend adding more milk 1 tablespoon at a time until the cookie dough is pipable.
I have not tried using a cookie press for this recipe. The cookie dough is very soft and sticky and I think a cookie press should work, but I am uncertain about how well the details would turn out. If you try it, please let me know!
I made these cookies last night. They are so buttery, crispy cookies and absolutely melt-in-your-mouth!!! This recipe is very simple ingredients and easy method but really great outcome. I put some cashew nut on top of cookies, so I can’t stop to eat them up. I have to say I love this recipe.


first of all, i am a rookie in this field, but I see a deep knowledge about cookies process, and a high professional level in the description, the presentation is absolutely amazing, with many details from the ingredients to the bakery process, thank you
Thank you for the kind words!
Apps can be tricky. I’m American but always bake in grams, so I was excited at a recipe that had those measurements. Also love when I can double it triple a recipe without having to do the math. However, every you click on the “2” for doubling the recipe, the grams didn’t update. Luckily I spotted this before baking. All this being said, great recipe. Lovely flavor and texture.
I wonder how they would come out if I use homemade butter.
Using homemade butter sounds delicious! The consistency might be different so you may need to adjust the flour content based on the texture of the butter.
Has this been tried with gluten free flour?
I have not tried making this with gluten free flour before. But I’ve heard that you can substitute one cup of all-purpose flour with one cup of gluten-free flour. If your gluten-free flour contains xantham gum it should retain the structure. You may also need to adjust the amount of milk to be able to pipe these cookies.
I want to make these but I can’t find European butter at my market. Am I able to use a different better? Thanks!
Yes! You can use any butter that you can find. I recommend using European butter for the best flavor but any other butter will work just as well.
Beautiful recipe. Thank you!
I am wondering if the dough can be put in a cookie press and then “shaped out.” What are your thoughts regarding this
I couldn’t get these to pipe, what did I do wrong? Lol I squeezed the bag so hard my tip popped out.
Hi Jodi,
It sounds like your cookie batter may have been too dry. This could mean a variety of different things. There may have been too much flour, not enough butter/milk, or the butter was not completely at room temperature when mixed. I recommend using a kitchen scale to measure out the ingredients so you’ll have perfect ratios if you haven’t done so already. Or if the batter is still to stiff after measuring with a scale, I’d recommend adding more milk 1 tablespoon at a time until the cookie dough is pipable.
Hi Colleen,
I have not tried using a cookie press for this recipe. The cookie dough is very soft and sticky and I think a cookie press should work, but I am uncertain about how well the details would turn out. If you try it, please let me know!
I just made these cookies they are so good and I used a cookie press and they turn out good for me
We’re so happy you enjoyed them and the cookie press is an excellent hack! 🙂
I made these cookies last night. They are so buttery, crispy cookies and absolutely melt-in-your-mouth!!! This recipe is very simple ingredients and easy method but really great outcome. I put some cashew nut on top of cookies, so I can’t stop to eat them up. I have to say I love this recipe.
Your welcome! I’m glad you enjoyed them!