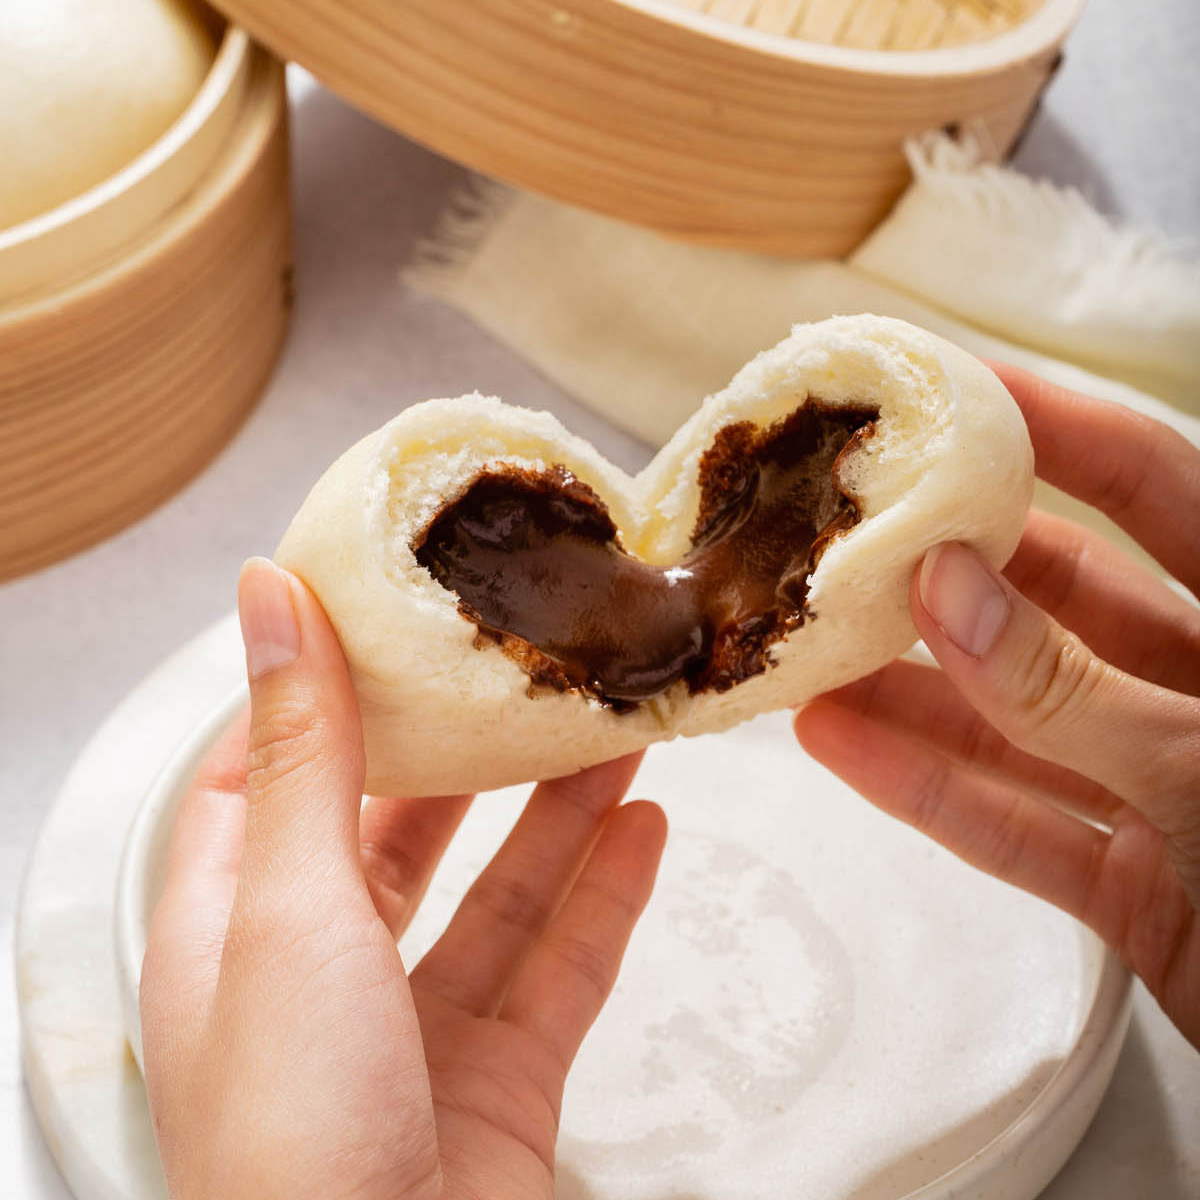
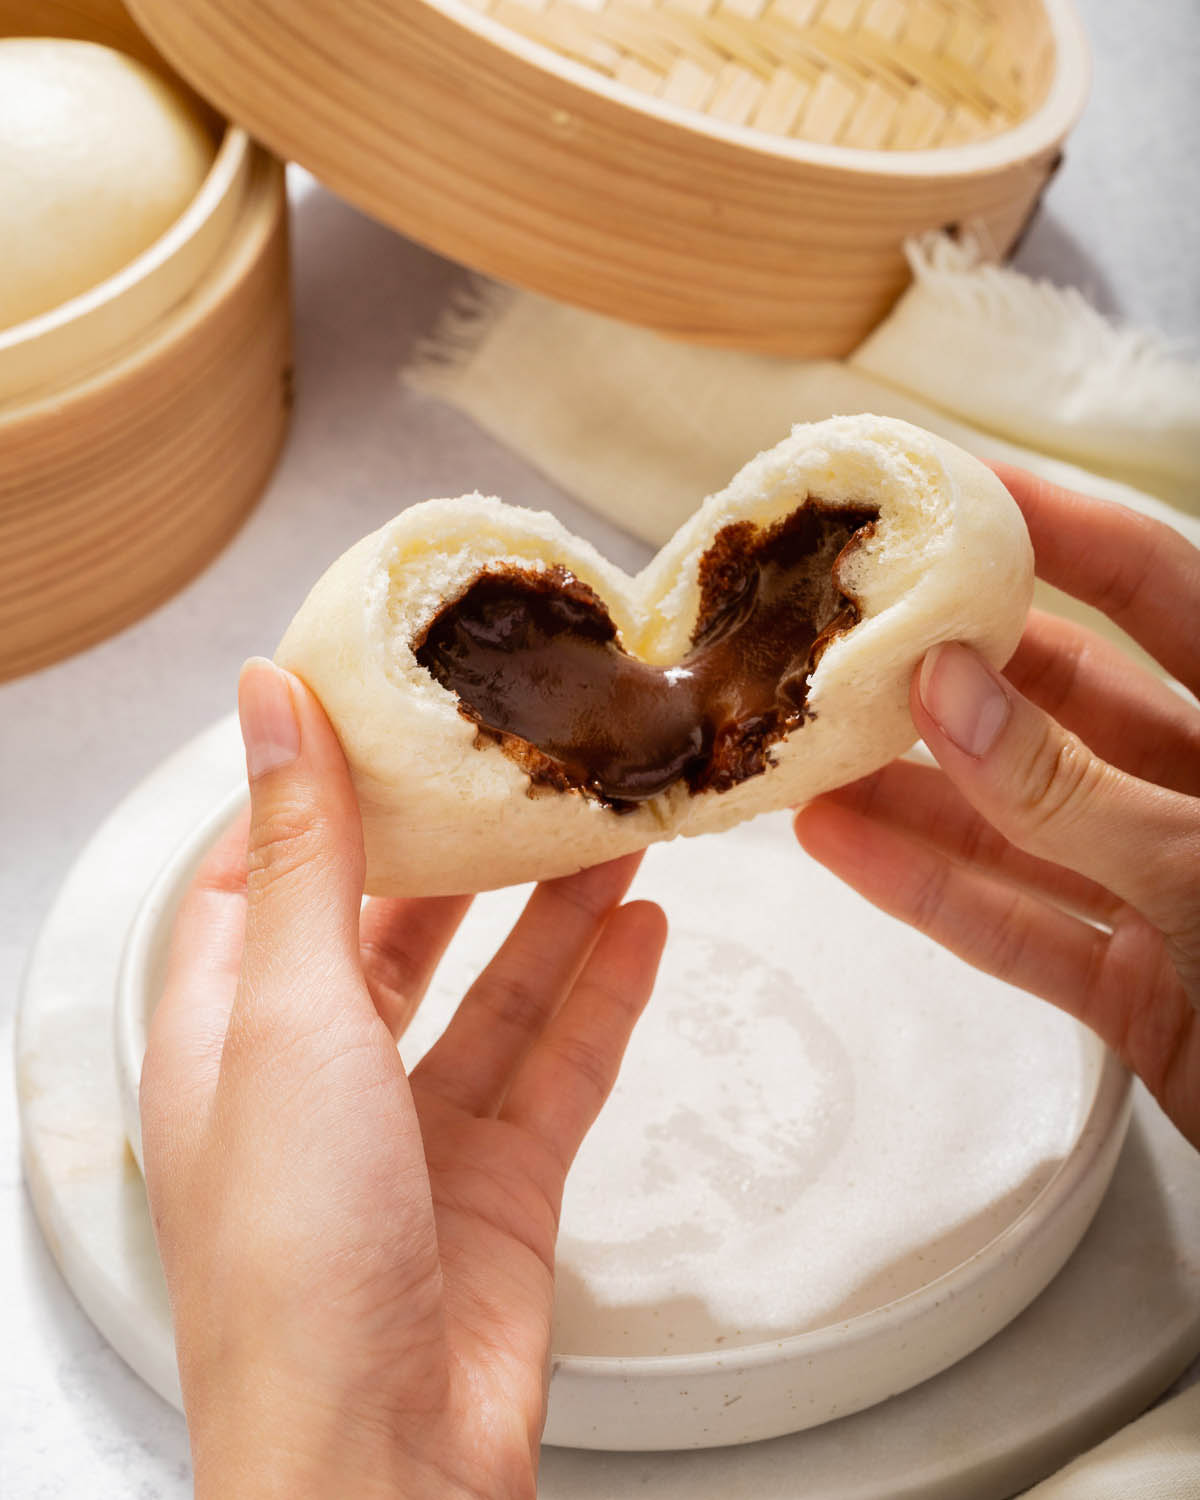
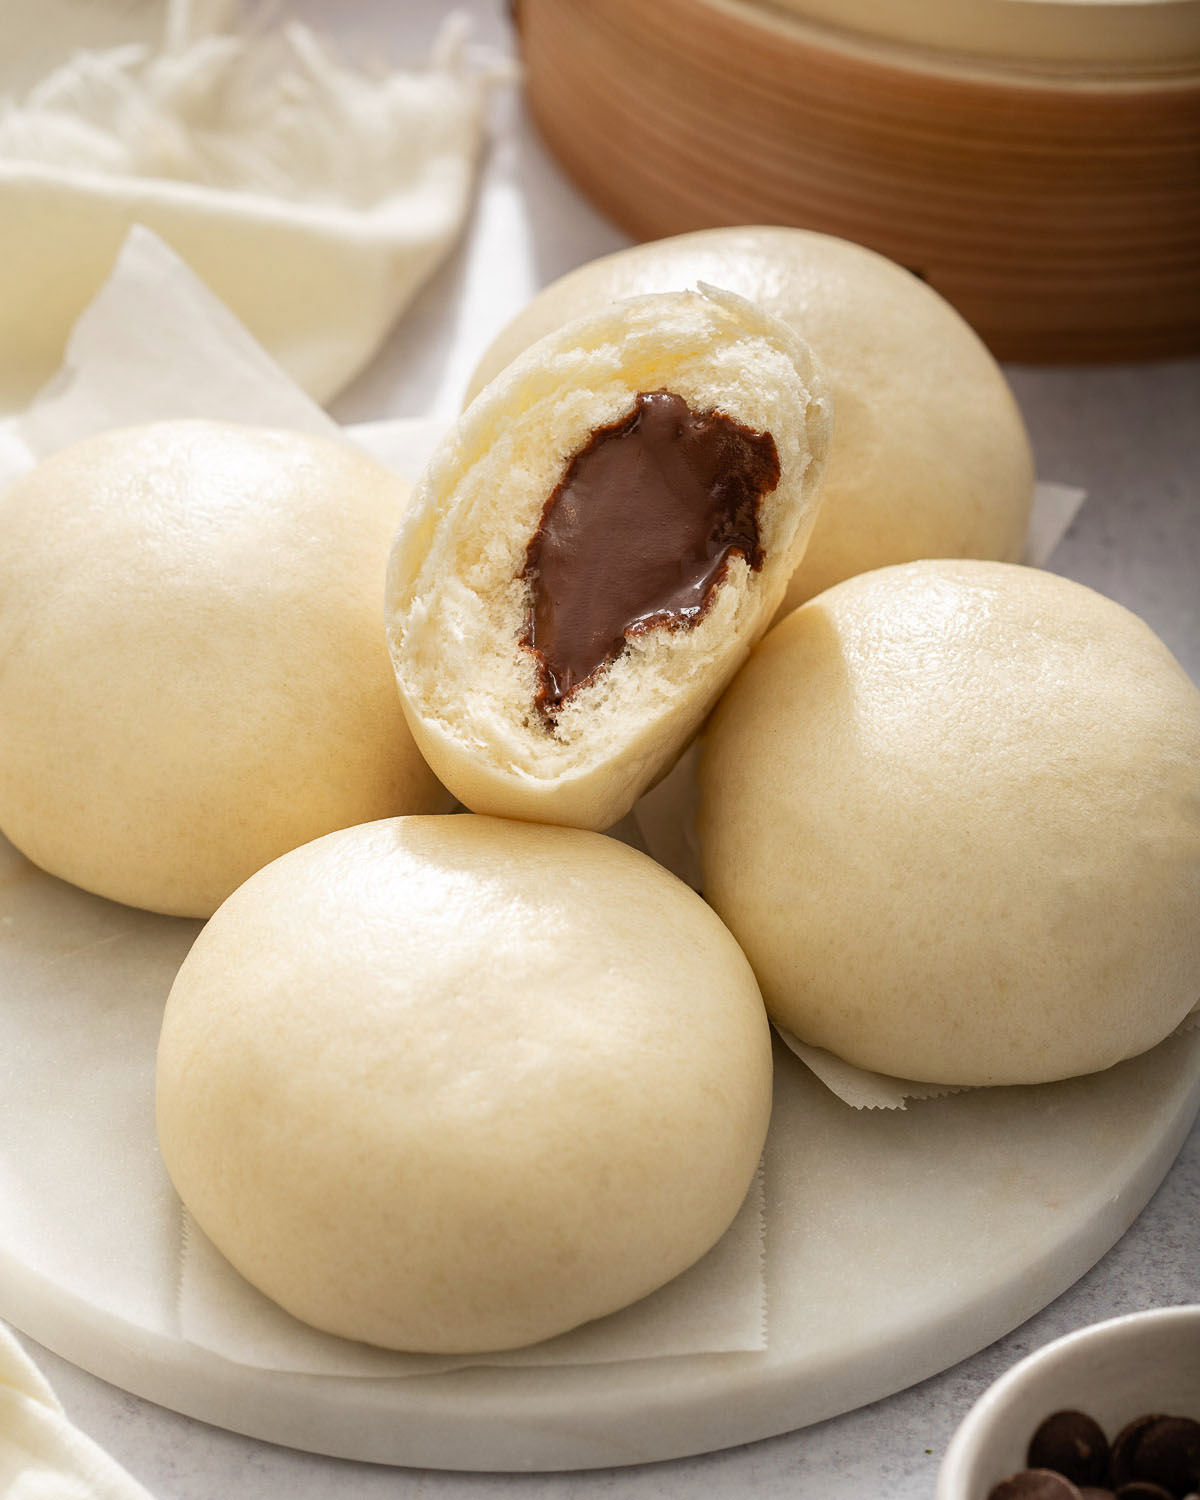
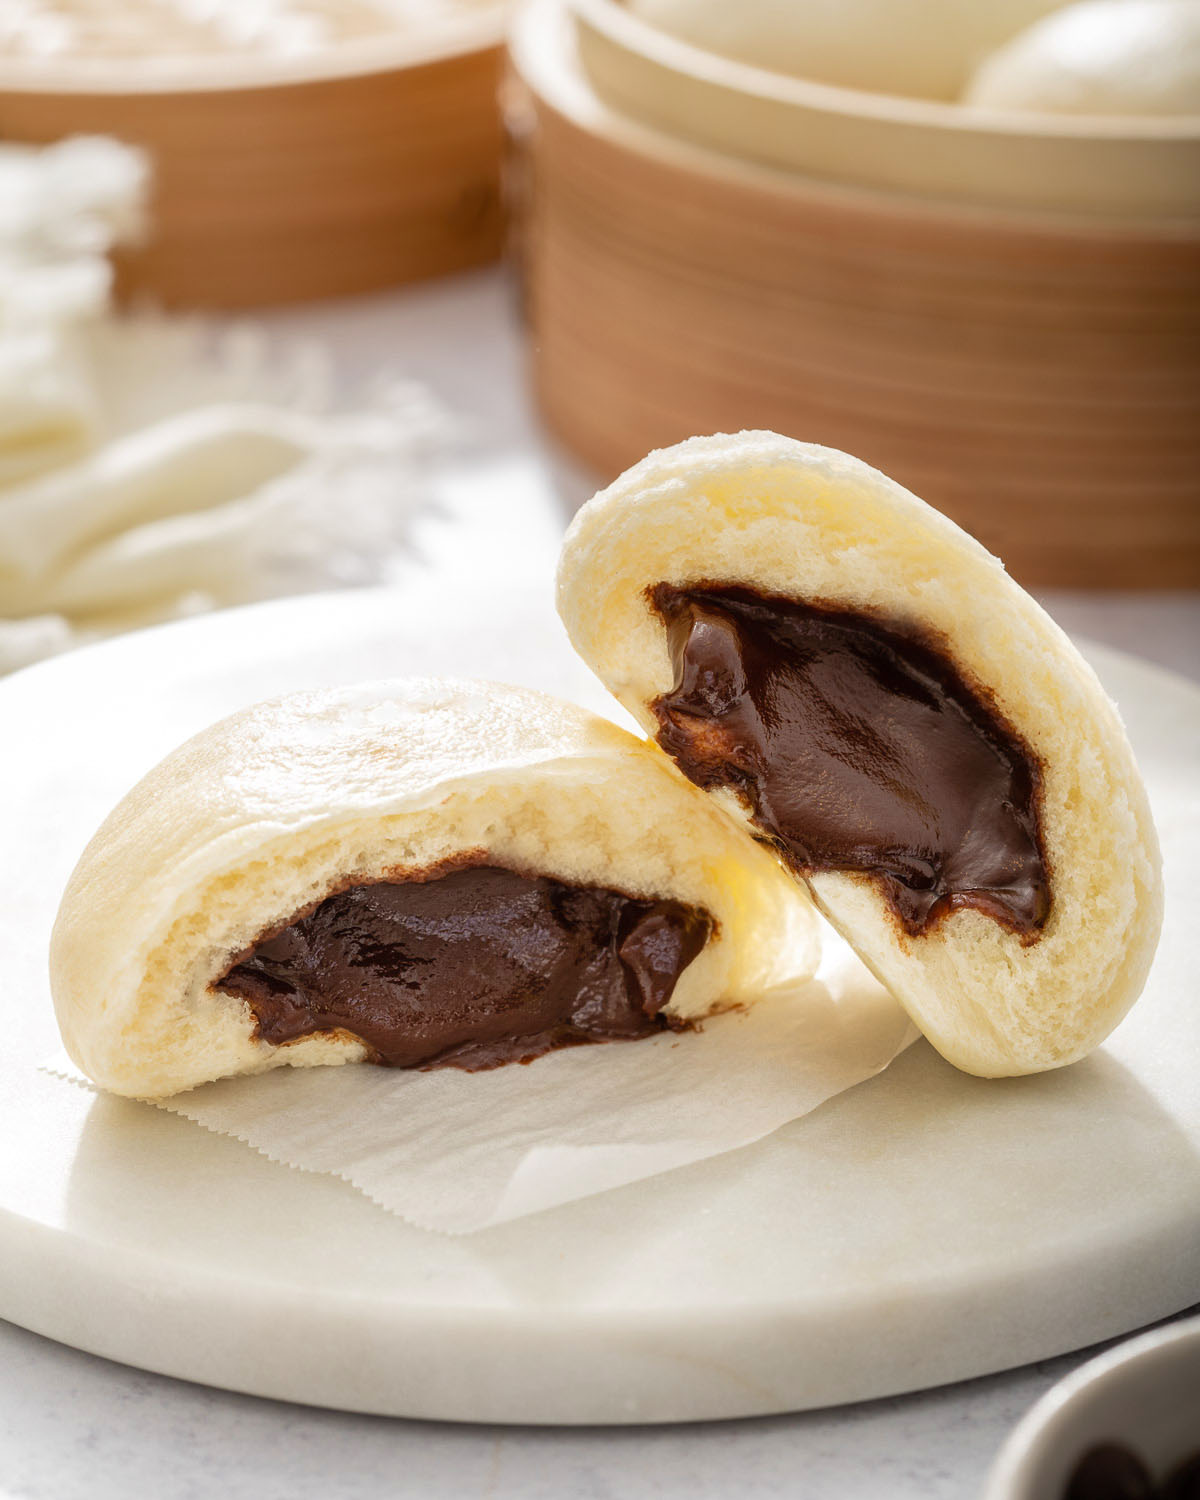
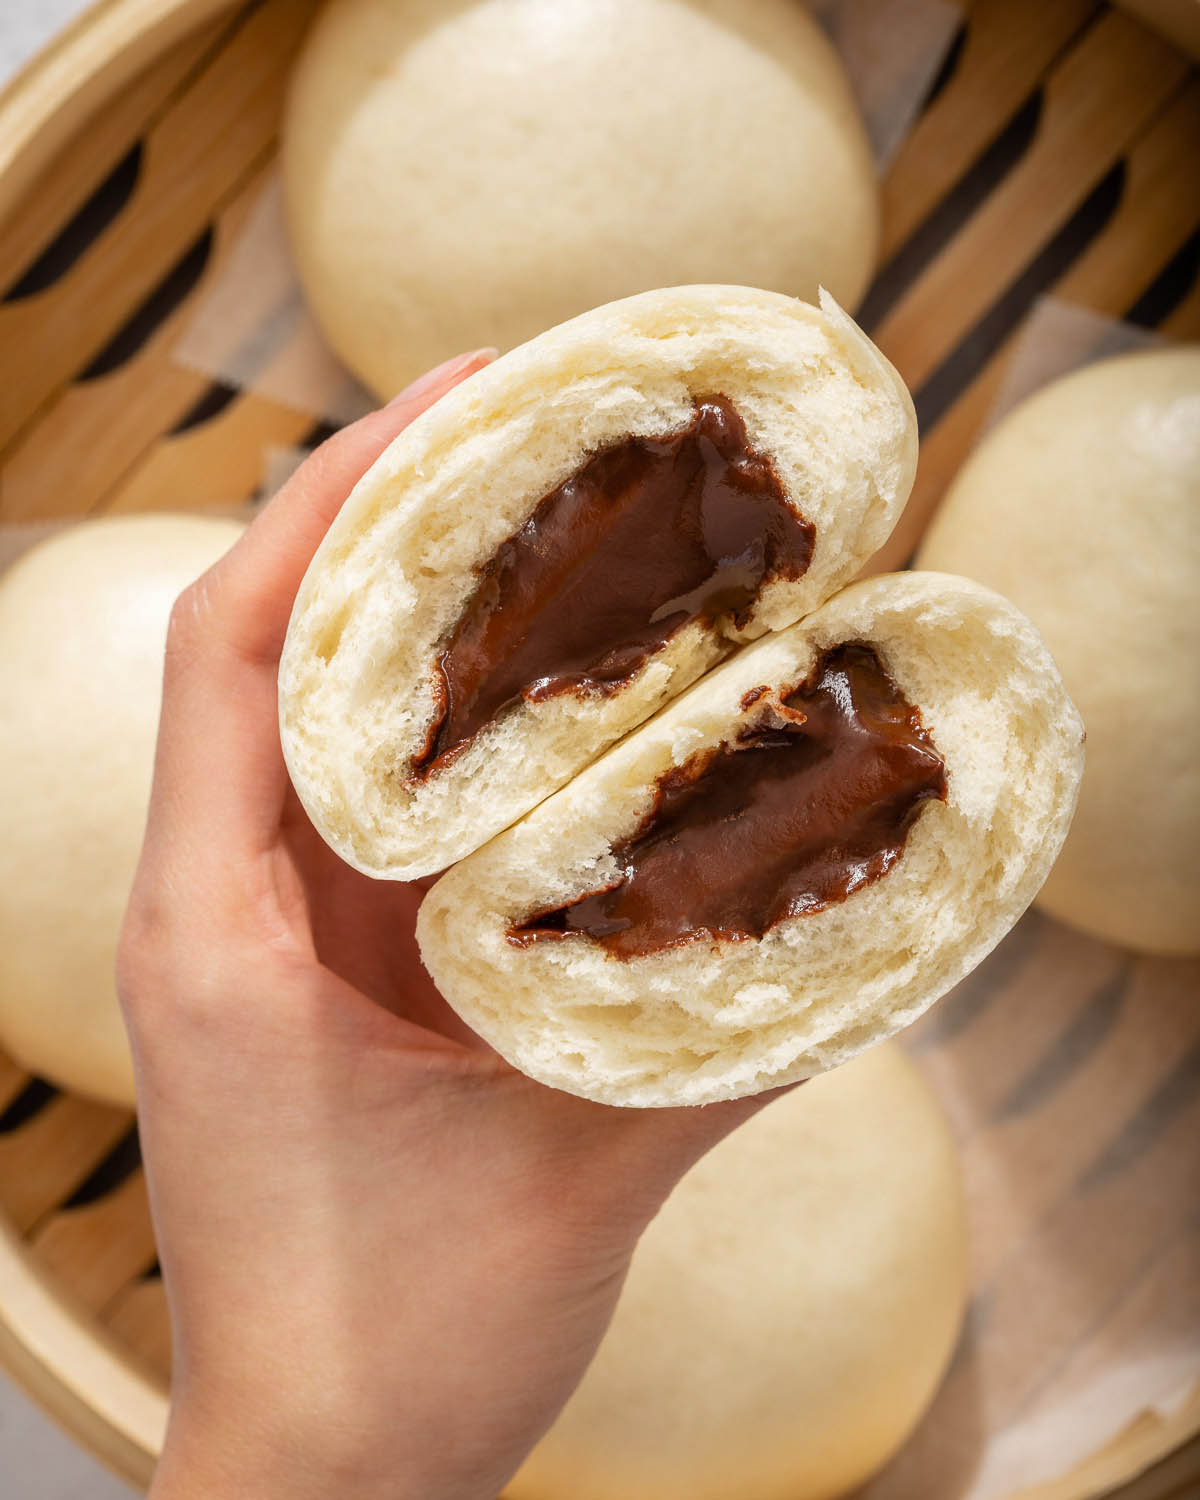
These chocolate steamed buns made with the softest, pillowy bao dough and filled with a semi-sweet chocolate lava filling are the ideal dessert for you to treat yourself with. Take one bite and you are greeted with a beautifully soft bao bun oozing with gooey melted chocolate.
These chocolate steamed buns made with the softest, pillowy bao dough and filled with a semi-sweet chocolate lava filling are the ideal dessert for you to treat yourself with. Take one bite and you are greeted with a beautifully soft bao bun oozing with gooey melted chocolate.
If you love melted gooey chocolate and extremely soft bao buns, these chocolate steamed buns will be your next favorite dessert. From the extremely tender and fluffy bao dough to the warm gooey chocolate filling, these chocolate buns are dangerously addicting. I must confess, that I got this idea for chocolate steamed buns on my last visit to Din Tai Fung. They had it on their dessert menu and I had to try it. It was heaven wrapped in a small cotton white, pillowy soft steamed bun. So this Din Tai Fung copycat chocolate steamed buns pays homage to honestly the best soup dumpling restaurant I have ever eaten at.
Stand Mixer with Dough Attachment: you will need to use a stand mixer to knead the dough together. You can alternatively do this by hand but it will take you about 2x-3x as long depending on how strong you are.
Kitchen Scale: this recipe is very precise and requires the correct ratio of ingredients for the perfect rise and taste. A kitchen scale will ensure you have the exact measurements for each ingredient. My little pink kitchen scale is both aesthetic and precise.
Mixing Bowls: you will need to organize all of the ingredients for this recipe. I love my Duralex nesting glass bowls for all my recipes. They come in a set of 9 and are very durable and dishwasher safe.
Parchment Paper: you will need small 3×3 inch squares of parchment paper to place the bao buns on to steam.
Steamer: you will need a steamer to steam the buns. You can either use a bamboo steamer or a stainless steel steamer. I used my all-clad stainless steel steamer for this recipe.
Ingredients
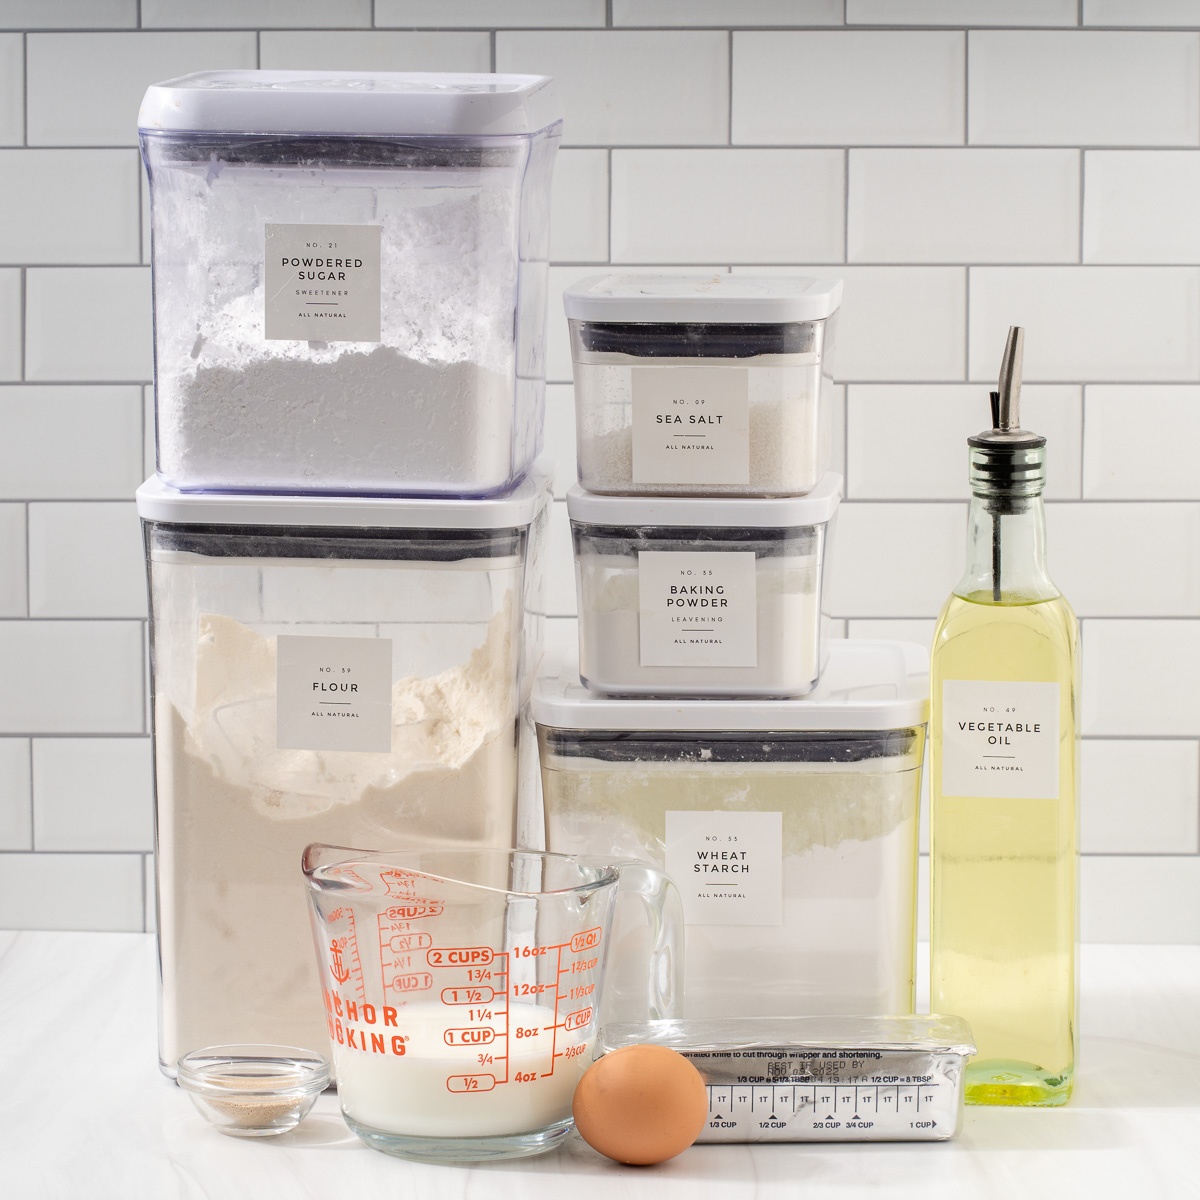
You can find all of the ingredients for this steamed bao dough recipe at your local grocery store and Asian grocery store.
Chocolate Filling
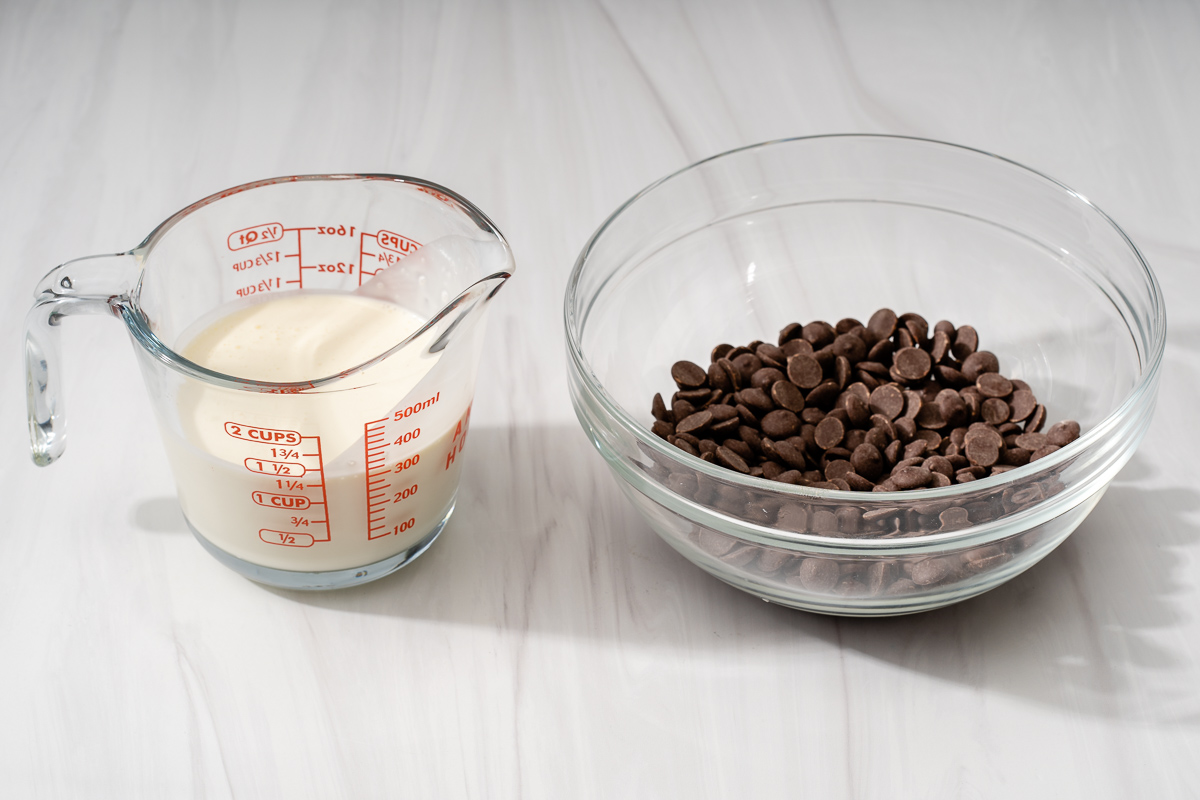
Heavy Cream: the heavy cream softens the chocolate giving it the chocolate the smooth instant melt-in-your-mouth feel.
Semisweet Chocolate Melting Chips: since the filling only calls for 2 ingredients it is CRUCIAL that you use the best quality melting chocolate for the best taste. I highly recommend using Callebaut Semi-Sweet Melting Chips. They are delicious high quality chocolate chips that melt like butter. You can alternatively substitute for milk, white or dark chocolate but the heavy cream ratio will be different. More about that below.
Bao Dough
Whole fat milk: Using full fat whole milk is key activate the yeast as well as moisturizing and binding the dough together.
Instant or Active dry yeast: I normally use instant yeast but active dry yeast works just as well to leaven the dough. For this recipe, I explained how to activate either instant or active dry yeast in the warmed milk and sugar.
All-purpose flour: combining all-purpose flour and wheat starch together forms that beautifully soft and pillow dough.
Wheat starch: wheat starch is NOT the same as wheat flour. Wheat starch is what makes the dough soft. You can find wheat starch online here or at any local Asian grocery market.
Powdered sugar: flavors the dough by adding a subtle sweetness to the bao dough.
Baking powder: gives the dough its soft rise which creates tiny air bubbles inside the dough.
Salt: flavors the dough and balances out the sugar.
Vegetable shortening: is another fat agent used to moisturize and tenderize the dough without too much moisture.
Large egg white: the egg white binds the dough together aids in the rise of the dough.
Vegetable oil: helps liquify the egg and also keeps the dough soft and prevents it from drying.
How to Make Chocolate Steamed Buns
This chocolate steamed buns recipe may be a labor of love but the results are so worth it. So treat yourself to these pillowy-soft, luxurious gooey chocolate buns!
Chocolate Ganache
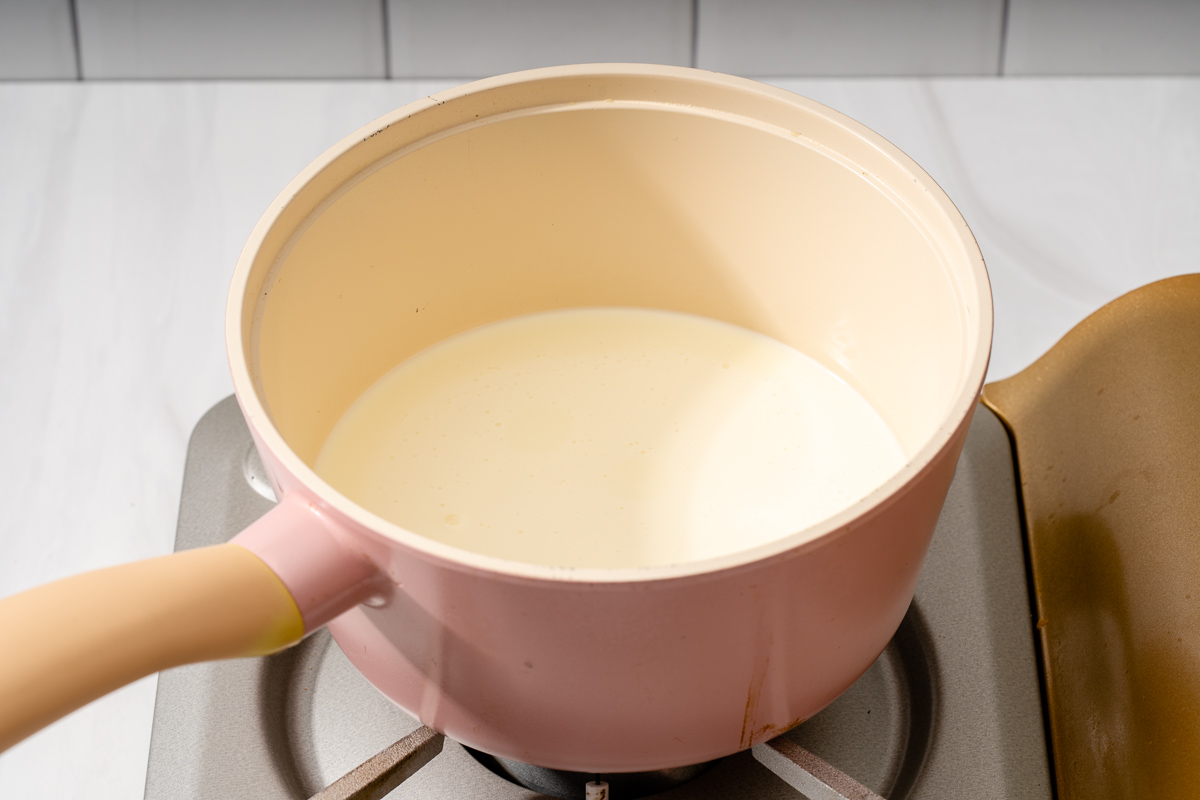
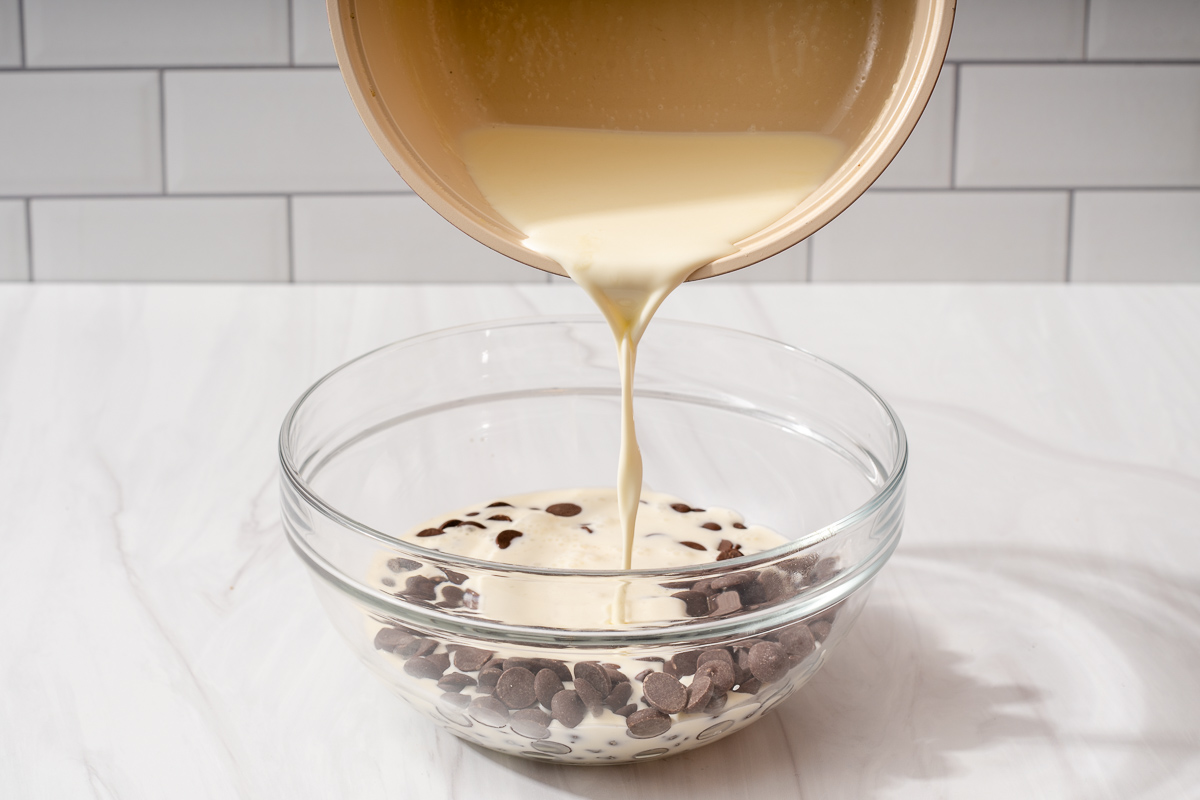
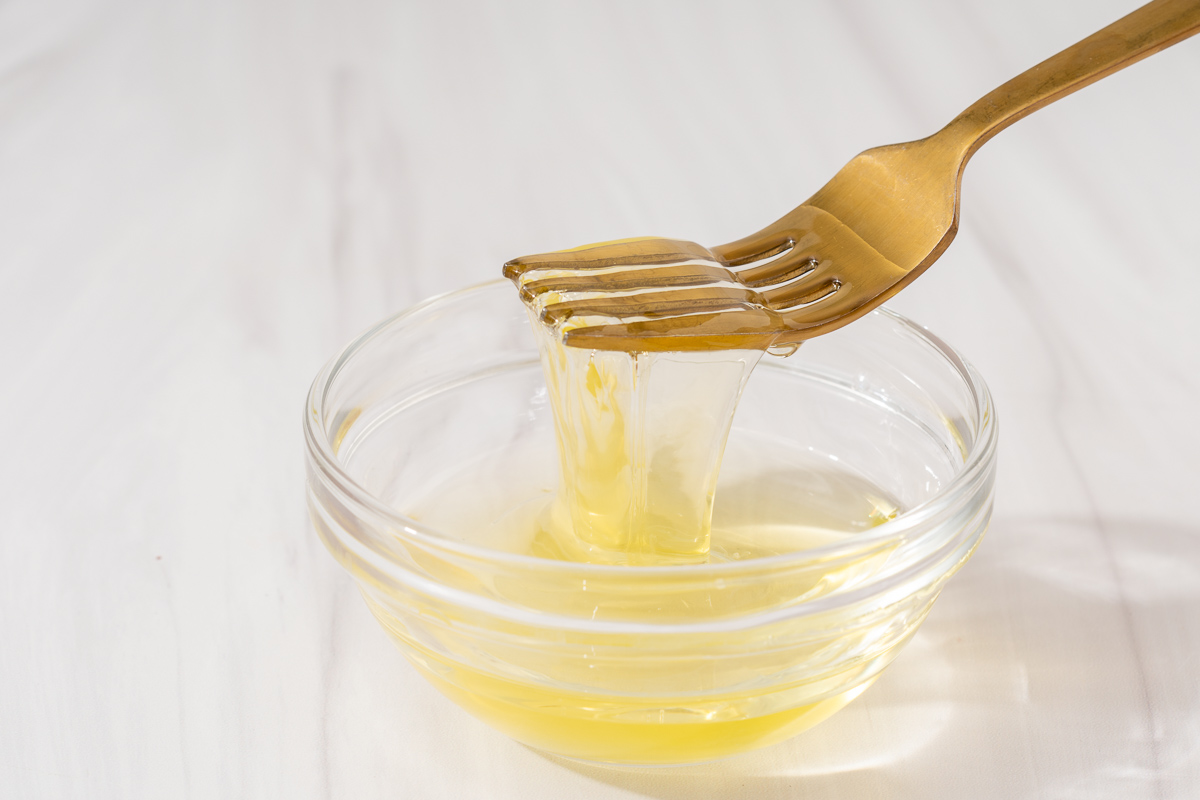
Heat the heavy cream. In a small saucepan, add the heavy cream and heat until hot and lightly simmering around the edges. Make sure to NOT boil the heavy cream.
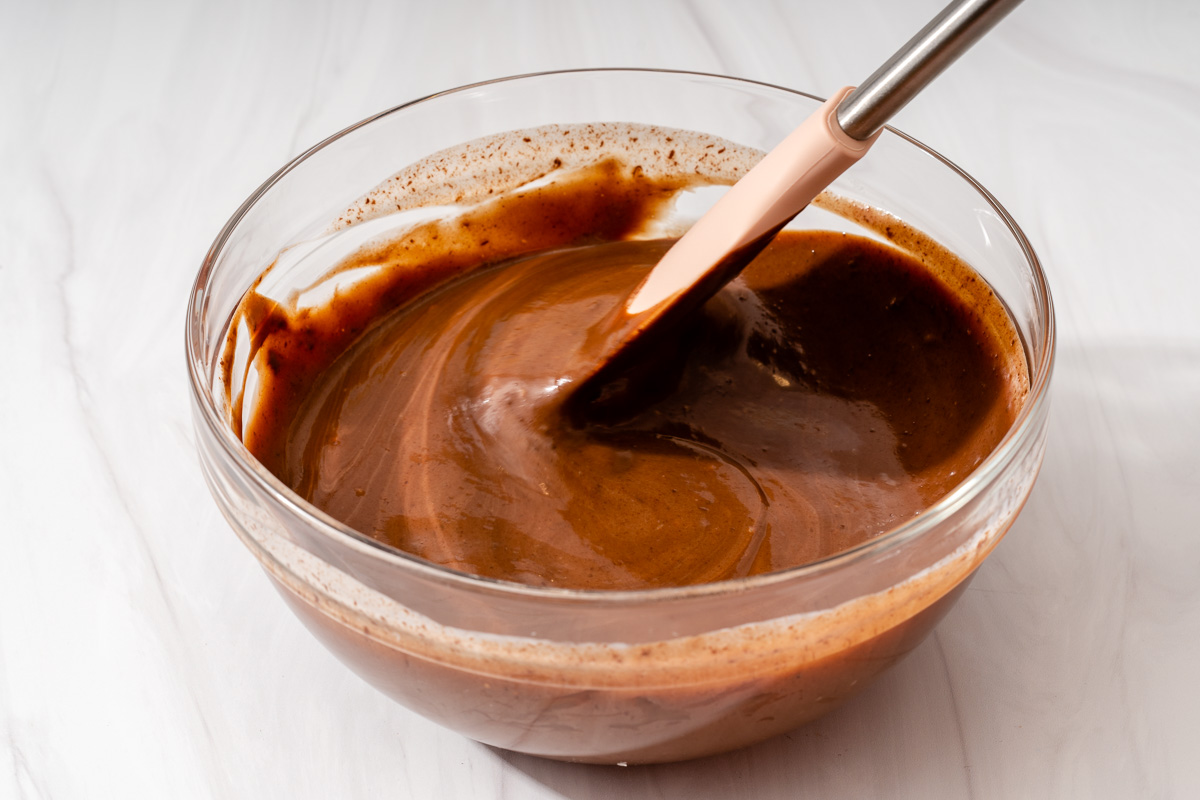
Pour heavy cream over chocolate. In a heat proof bowl, pour the heavy cream over the chocolate chips making sure the cream covers the chocolate chips completely. Leave for 10 minutes. After the 10 minutes, stir with a rubber spatula until creamy and silky.
Chill. Cool the chocolate ganache uncovered for 30 minutes in the refrigerator. Then cover with cling wrap and press the plastic so it contacts the surface and continue to cool for an additional 1 hour.
Bao Dough
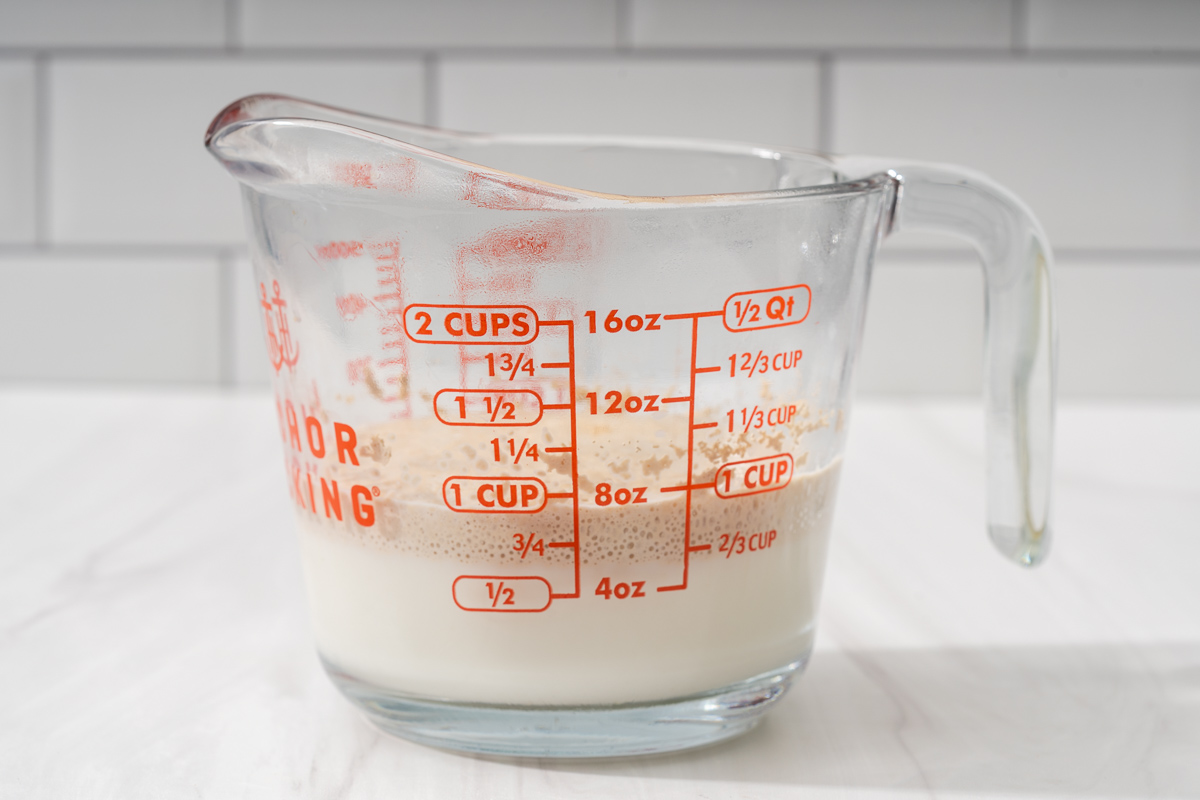
Prepare the yeast. Warm the milk to 110F degrees. Add active dry yeast. Cover with plastic wrap and let sit for 10 min. If using instant yeast, let sit for 2-3 minutes to double check if the yeast is active. The yeast will create a frothy, 1/4 inch foam layer at the top if it is active.
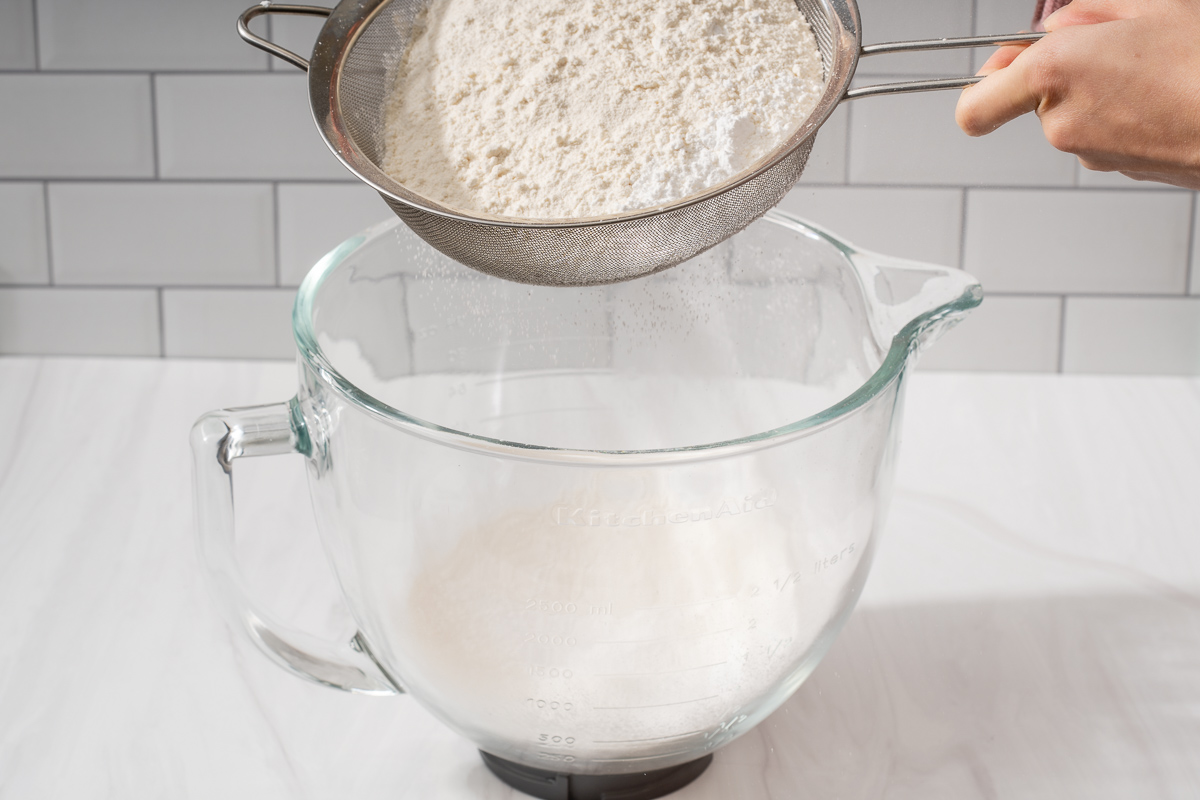
Sift the dry ingredients. Sift flour, wheat starch, powdered sugar, baking powder and salt into the bowl of your stand mixer with a dough attachment. Mix together on low.
Add in the shortening while mixer is mixing on low. Make sure the shortening is broken up into small pieces by feeling it with your hand.
Liquify the egg in oil. In separate bowl, combine the room temperature egg white with vegetable oil. Liquify the egg by pulling up the egg yolk with a fork a few times until combined.
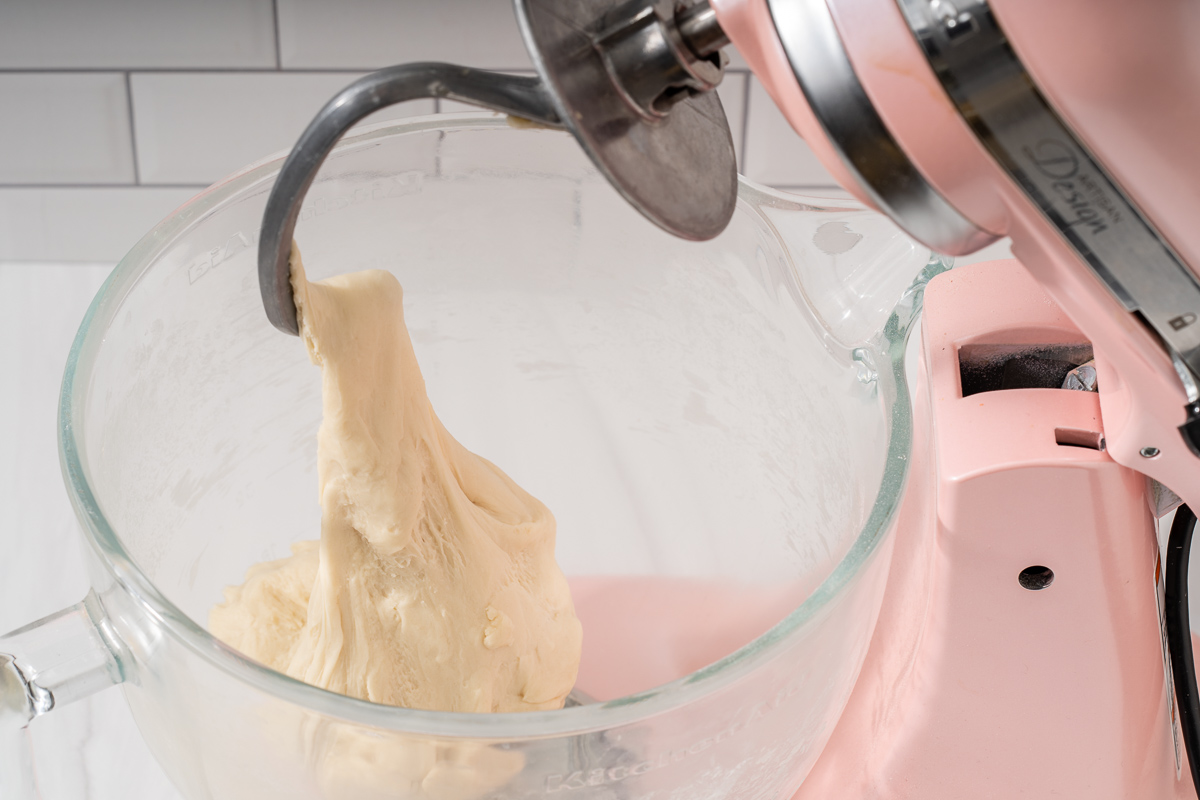
Knead all the mixtures together. In the stand mixer on low, mix the yeast milk mixture and then add the egg and oil mix for 30 seconds. Once combined, increase the speed to medium and knead for 5 minutes or until it forms into a ball in the mixer and is no longer sticking to the bowl. The dough should be tacky but not overly sticky.
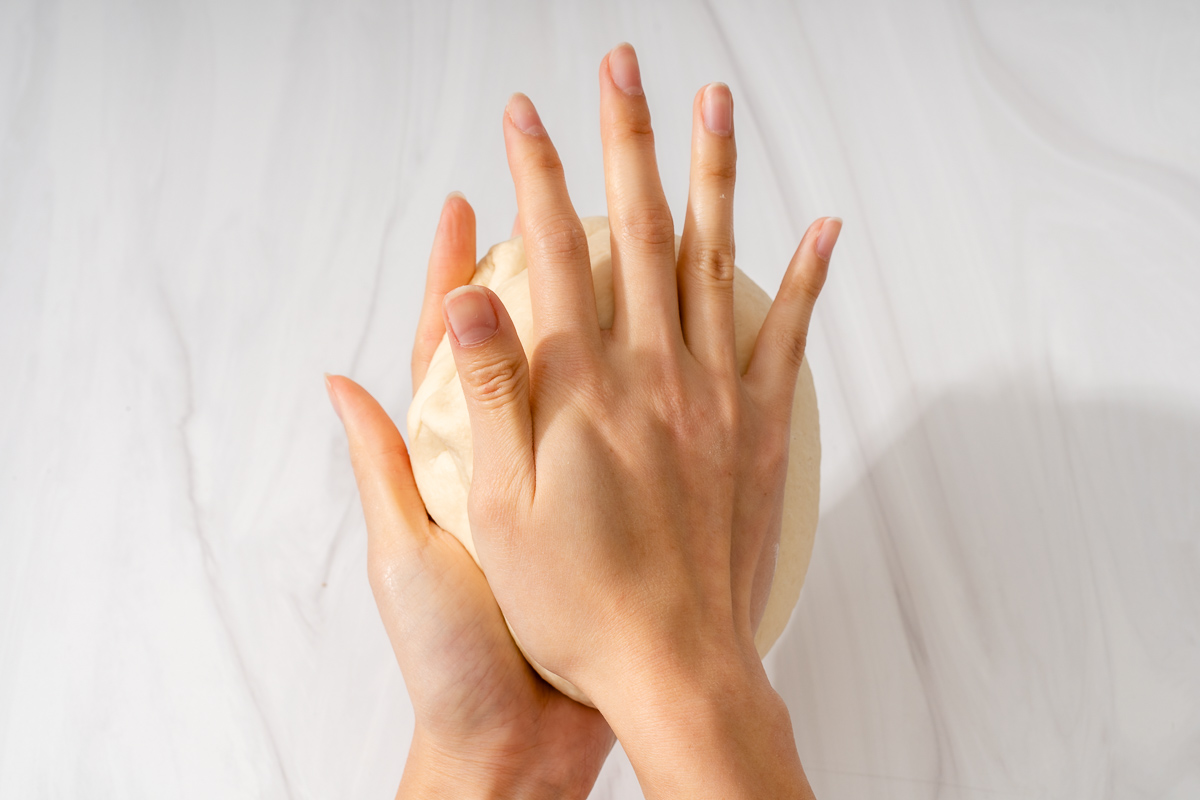
Knead the dough into a ball with your hands. Knead the dough into a smooth ball with your hands for about 1 minute and transfer it into a lightly greased large bowl.
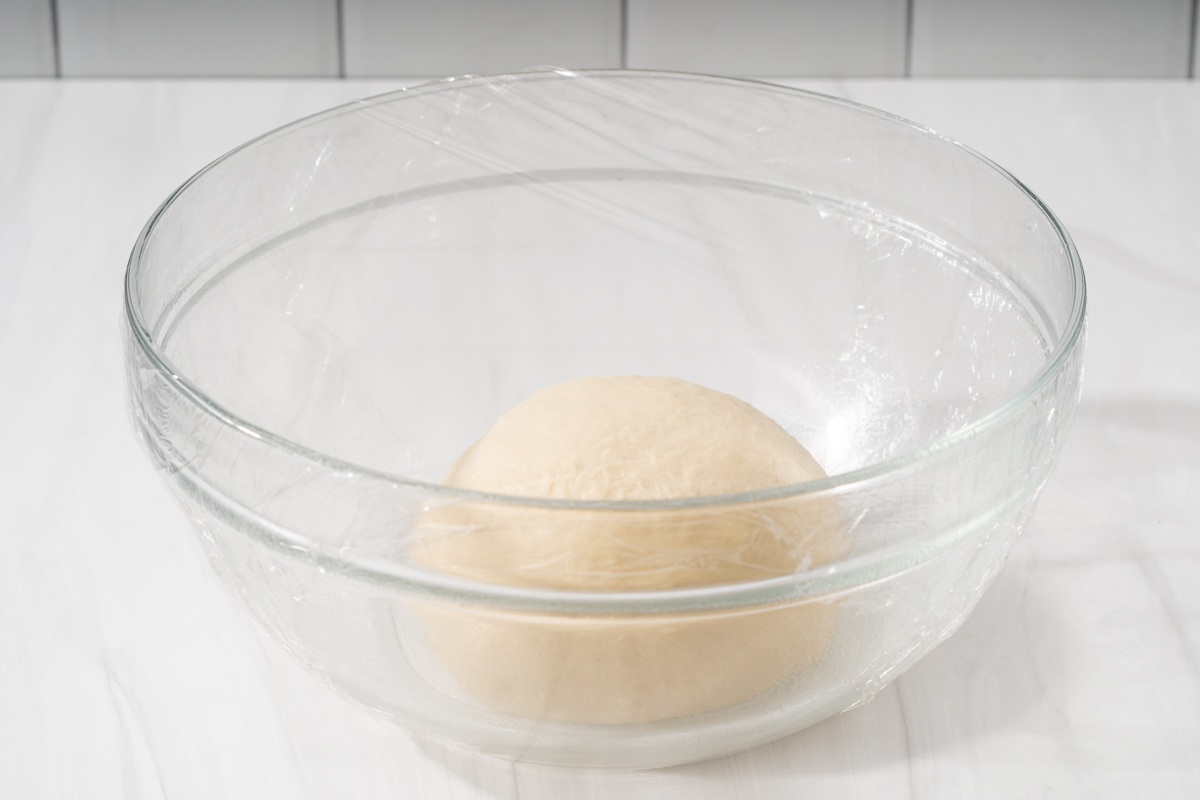
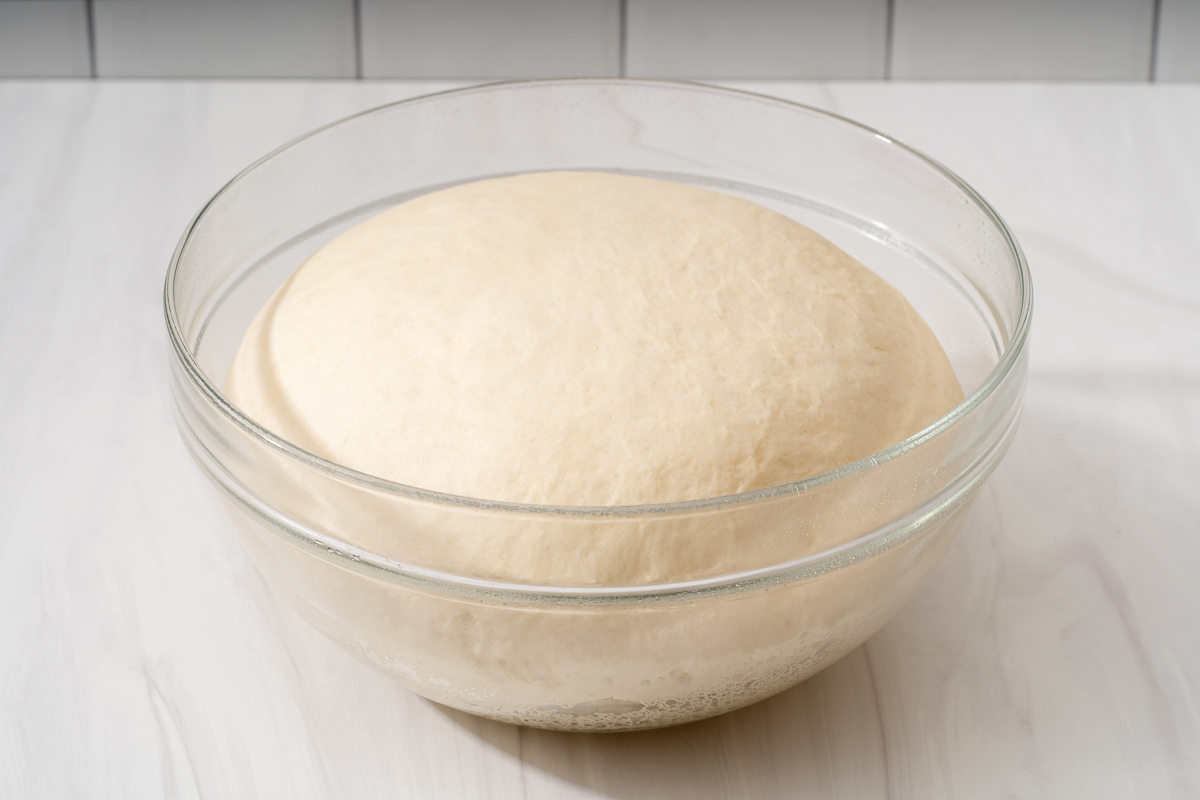
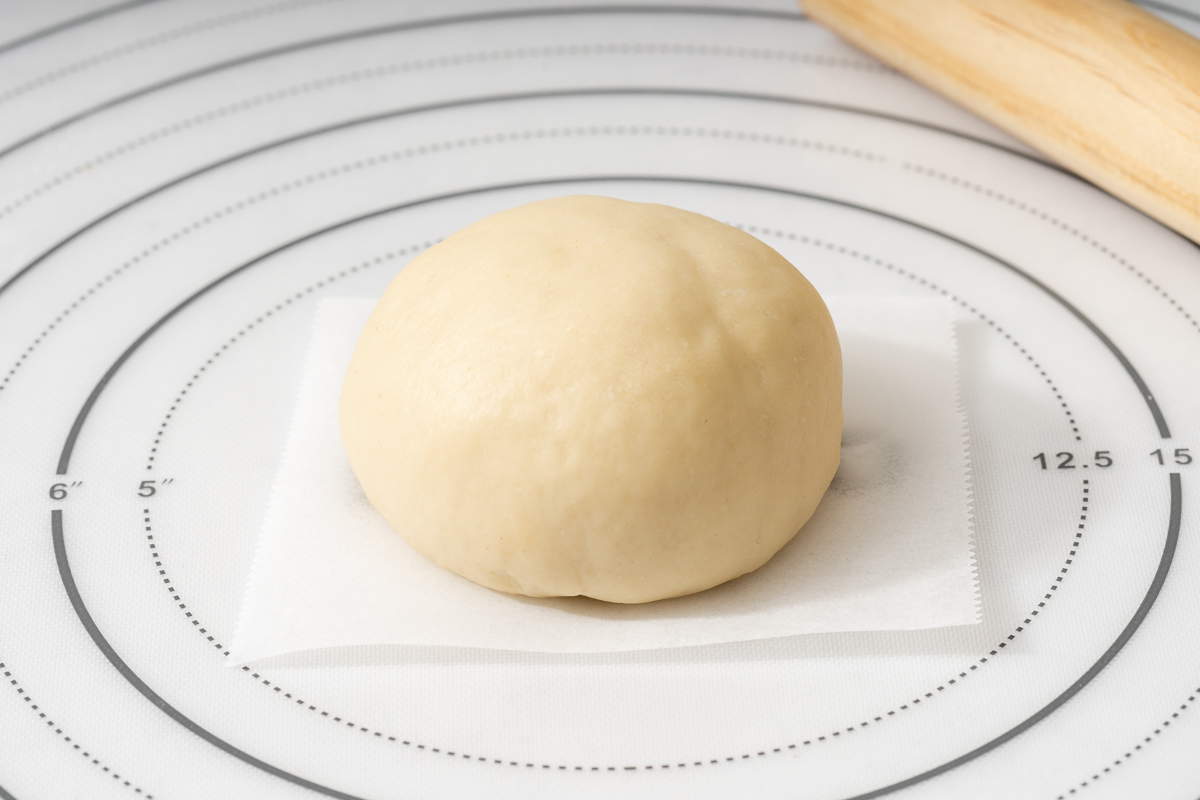
Proof the dough. Cover with plastic wrap and place in warm area (100F) for about 1-2 hours or until double in size. This dough has more moisture from the fat in it so it may take awhile to rise.
Assemble and Steam
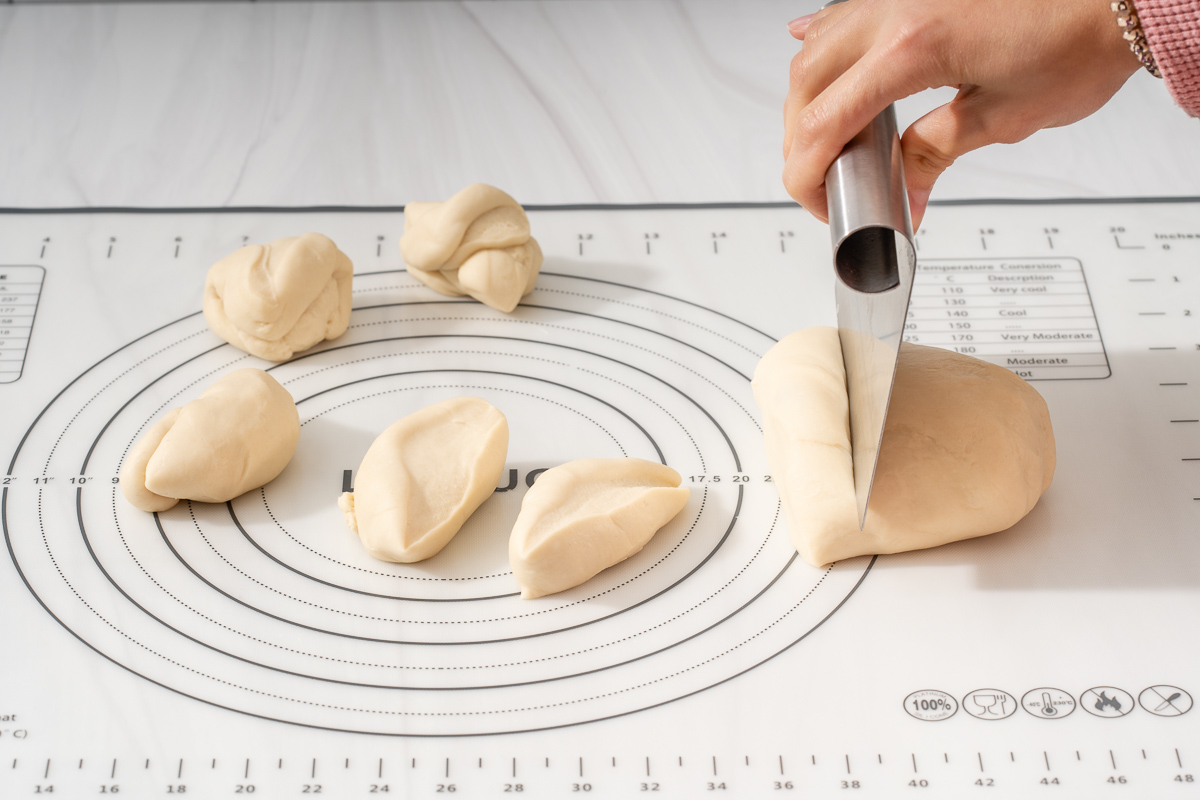
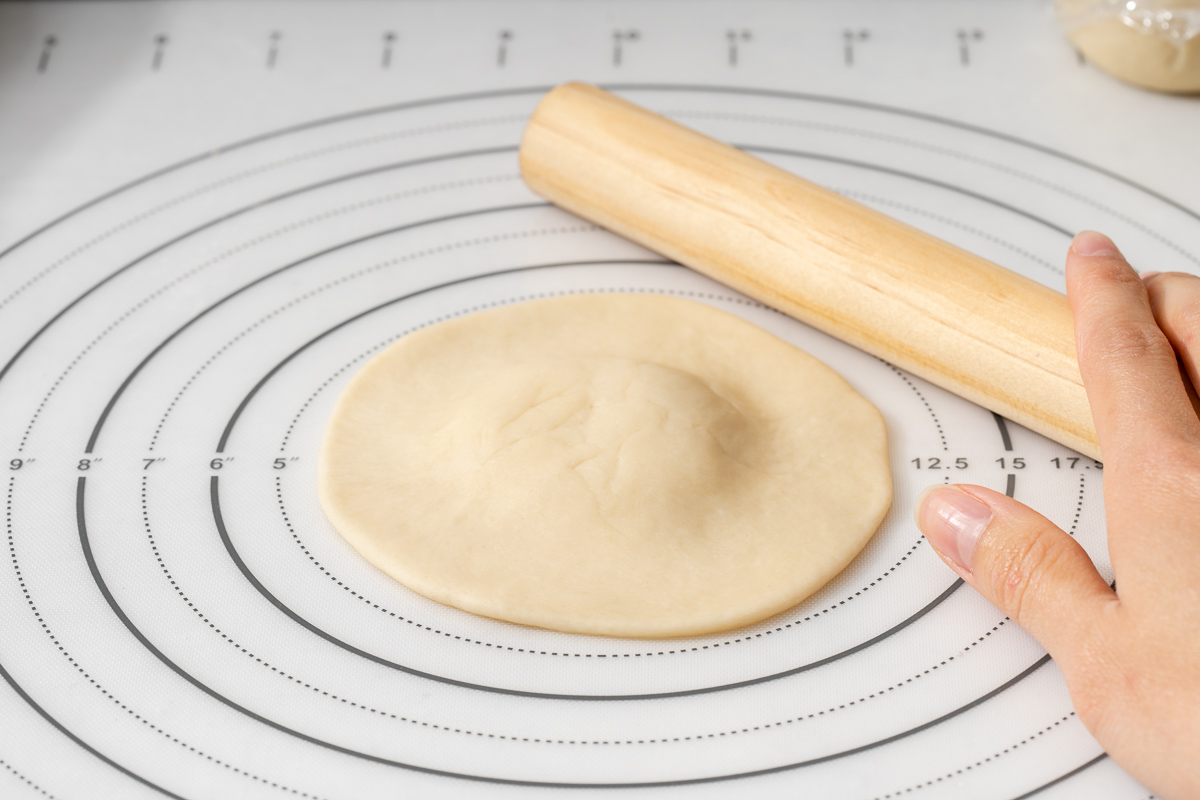
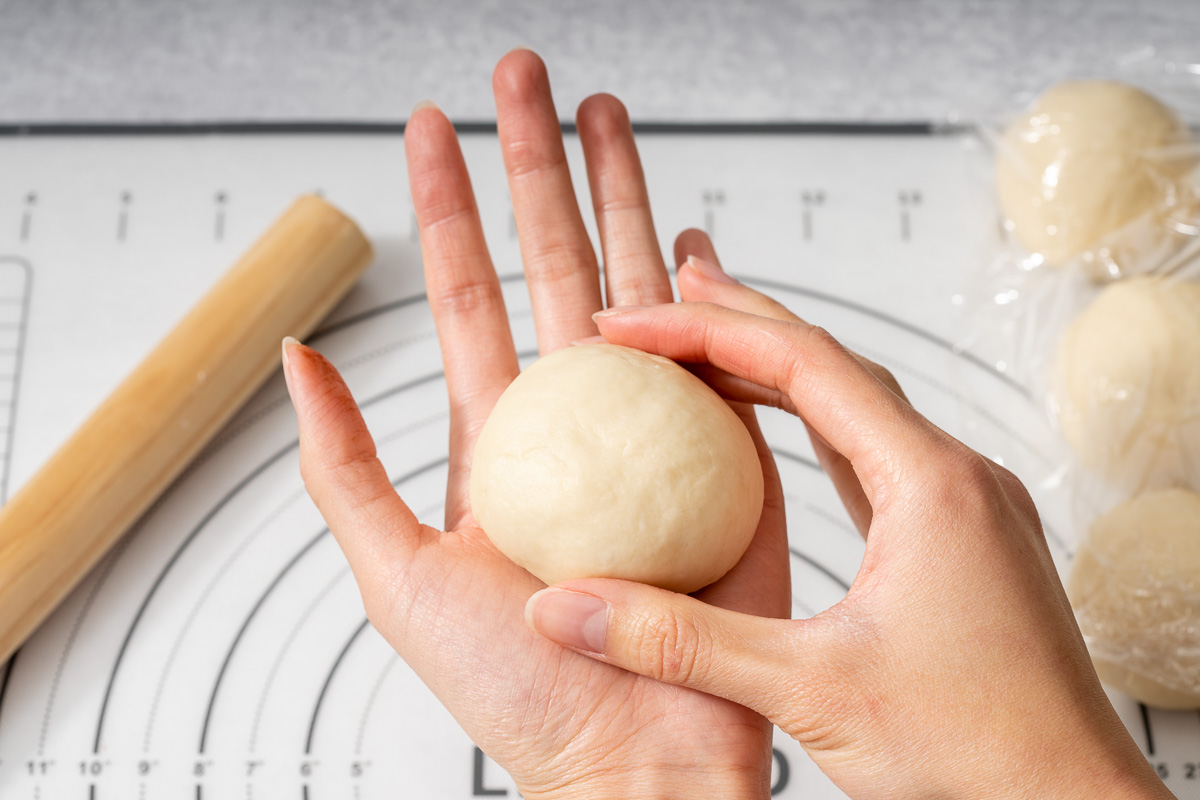
Divide and roll out the dough. Divide into 12 equal pieces and quickly roll them into smooth balls. Cover with a sheet of plastic wrap to prevent them from drying. Then, use a rolling pin and roll out the edges leaving a thicker center. Approximately 4-inches.
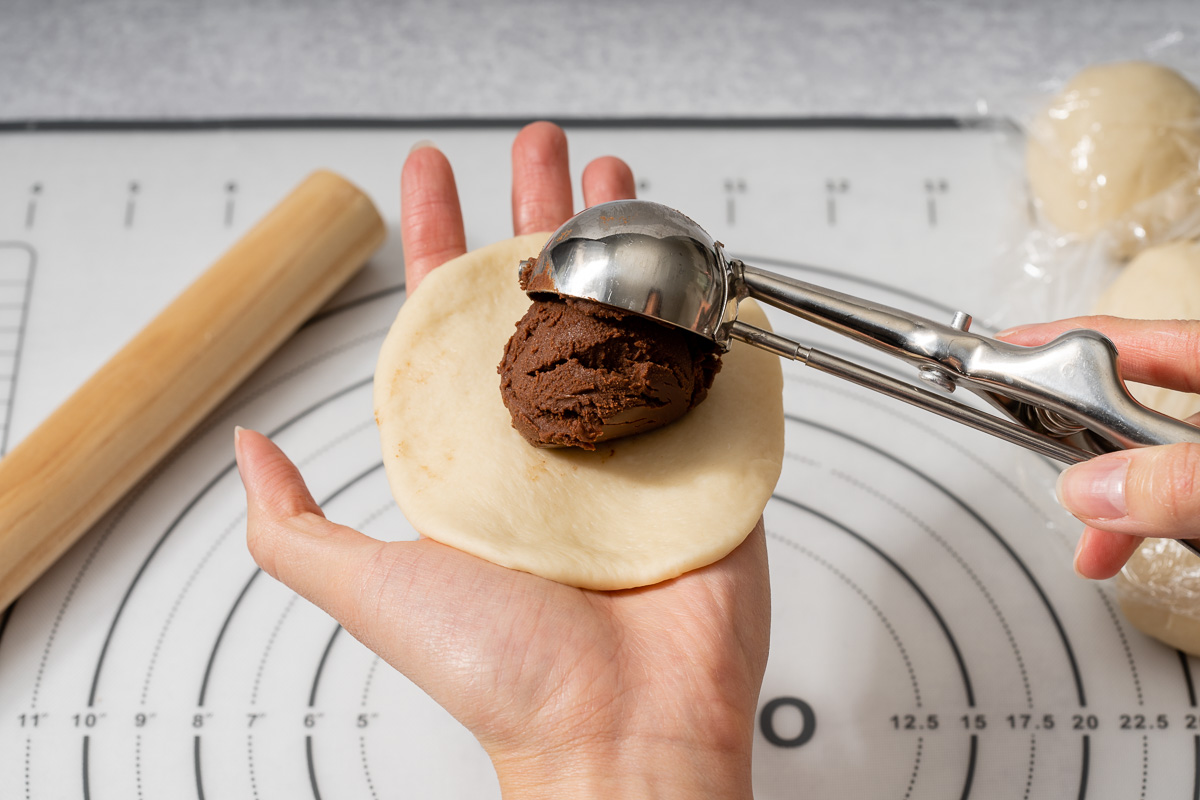
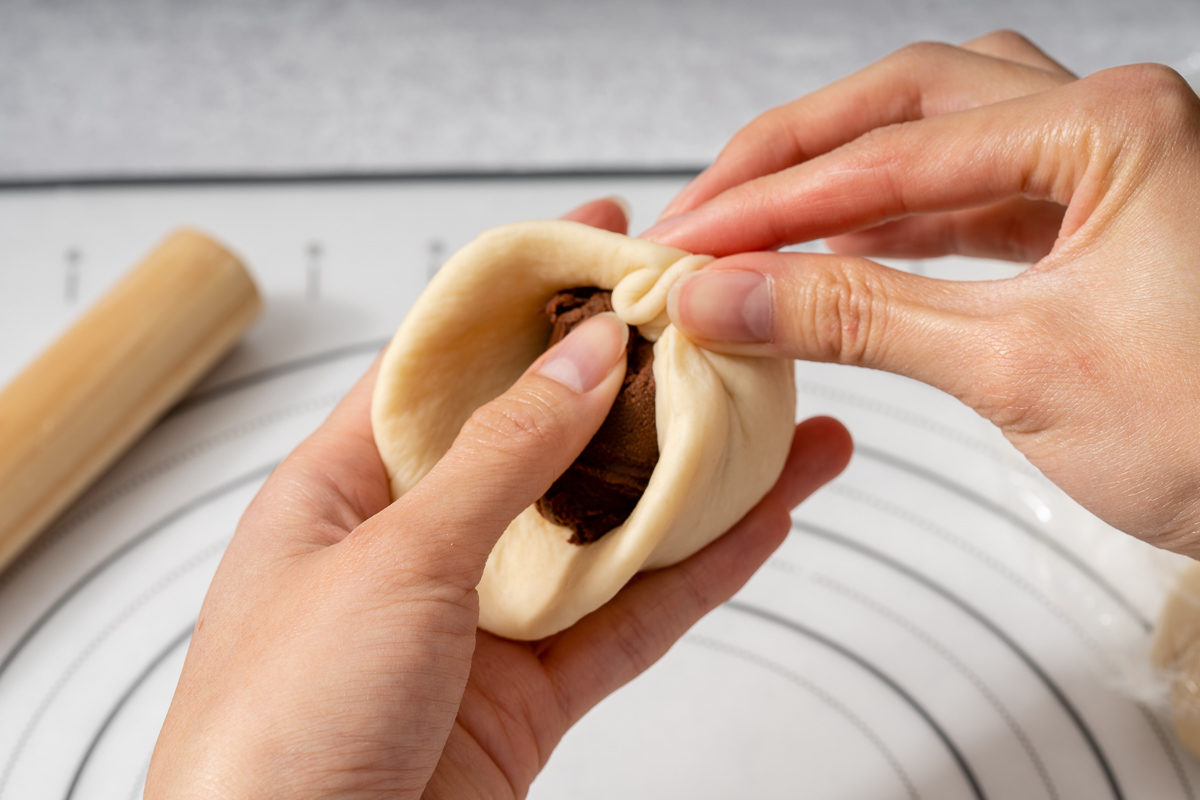
Add the filling and form the bun. Add 1 tablespoon of filling and wrap the dough around the filling to form a ball. Then pinch tightly to seal. You may need to remove the excess dough at the end.
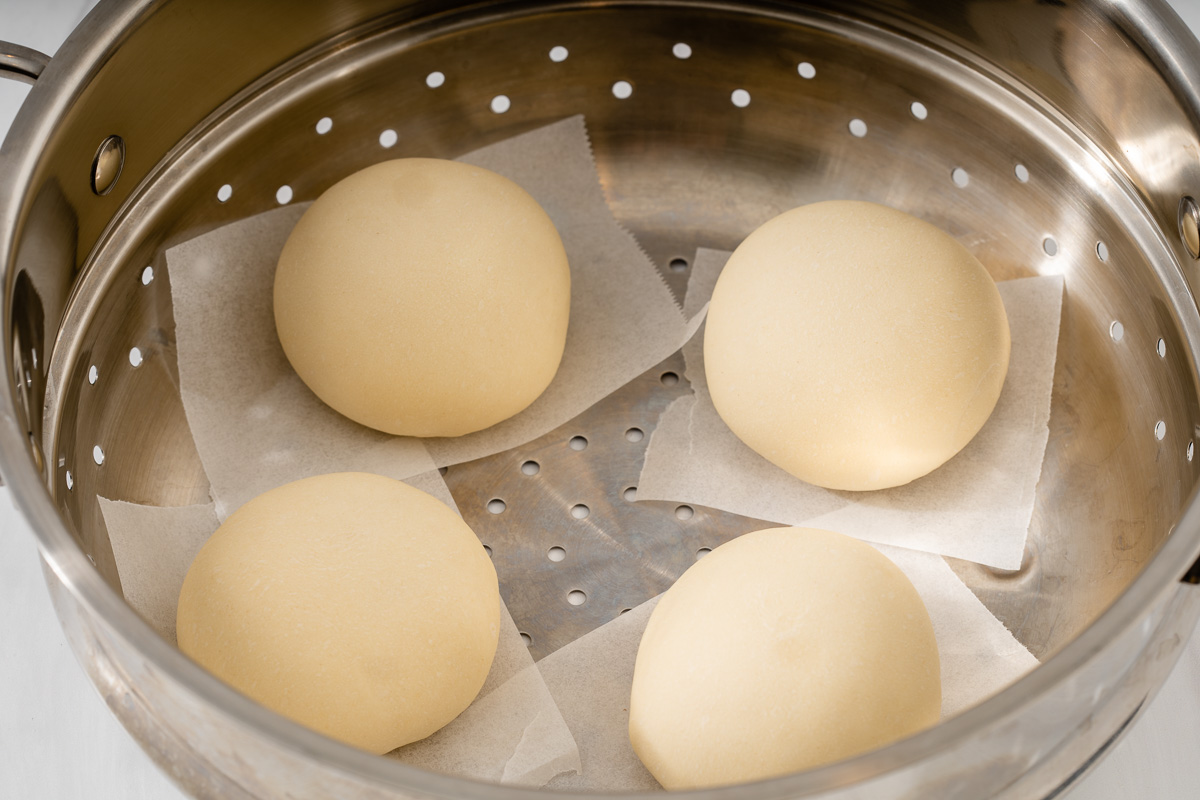
Let the buns rest. Place parchment squares or cupcake liners underneath each bun. Cover with a dish towel and let the buns rest for 15 minutes.
Steam the buns. Wrap the lid of your steamer with a dish cloth to prevent the condensation from falling into your steamer. Add water to your steamer and bring the water to a boil. Place the buns 2 inches apart of your steamer, cover and steam on medium heat for 10-12 minutes. After steaming, leave the buns to sit in the steamer for 1 minute to prevent them from wrinkling from the temperature shock.
Storage Instructions
You can individually wrap each steamed chocolate bun in plastic wrap and store them in the refrigerator for up to 3 days. To reheat, leave them in the plastic wrap or wrap the bao in a wet paper towel and microwave until warm.
Tips for the Best Chocolate Steamed Buns
If the dough is too sticky, add 1 tablespoon of flour at a time until it becomes tacky and doesn’t stick to the bowl.
Chocolate notes: The lighter the chocolate (white>milk> semi-sweet>dark) the softer it is, so the less cream you need. This recipe is meant for semi-sweet chocolate chips so adjust the cream ratio accordingly. You MUST use cooking chocolate, or chocolate purchased from the baking aisle, NOT regular eating chocolate it won’t melt as smoothly.
If the dough is too dry, add 1 tablespoon of warm water at a time until it reaches a tacky consistency. You don’t want the dough to be too dry, the seam will not properly seal when you pinch if it is and the filling will ooze out during the steaming process.
Make sure to rest the bao dough for 15 minutes after shaping. This is crucial for that slight rise and fluffiness in the bao. Be careful not to wait too long because the yeast will over rise and create a gap between the dough and the filling.
Wrap the lid of your steamer with a dishcloth. This step is so important to prevent the condensation from dripping down into your bun and making it wrinkly!
If your steamed bao bun is wrinkly after steaming, it probably means that either your steam was too hot or you steamed it for too long.
Frequently Asked Q’s and A’s
Can I substitute the chocolate with white, milk, or dark chocolate?
Yes! These are your chocolate buns so you can alter them how you want. Please note that different chocolates will require different amounts of heavy cream. For dark chocolate, use 1 cup heavy cream, for milk chocolate, use 1/2 cup heavy cream, and for white chocolate, use 1/3 cup + 1 tablespoon of heavy cream.
Can I make the chocolate filling in advance?
You can make the chocolate filling in advance and store it wrapped in the refrigerator for up to 1 week.
How do I know when the dough is done proofing?
Reference the photo above to see how large the proofed dough is in comparison to the original dough. The dough should be double in size and feel really light and airy to the touch. When you gently push on the dough, it will leave an indentation and spring back slowly. If it springs back right away, it needs to be proofed a bit longer. If it never springs back, then you have over-proofed the dough.
Why are my steamed buns wrinkly and/or collapsed?
There are a few reasons why your buns came out like this.
– You could have over-proofed the dough. Over-proofing the dough weakens the dough structure and so when you steam it may collapse.
– Air bubbles when shaping the dough. When shaping the dough make sure you squeeze out all the air bubbles before you rest the dough for 15 minutes. If you leave the air bubbles in the dough they will yield weird indents in the bun.
– Steaming too hot. When you steam the buns over high heat, the steam makes the buns grow too quickly and so when you take them out of the steamer they immediately shrink and become wrinkly.
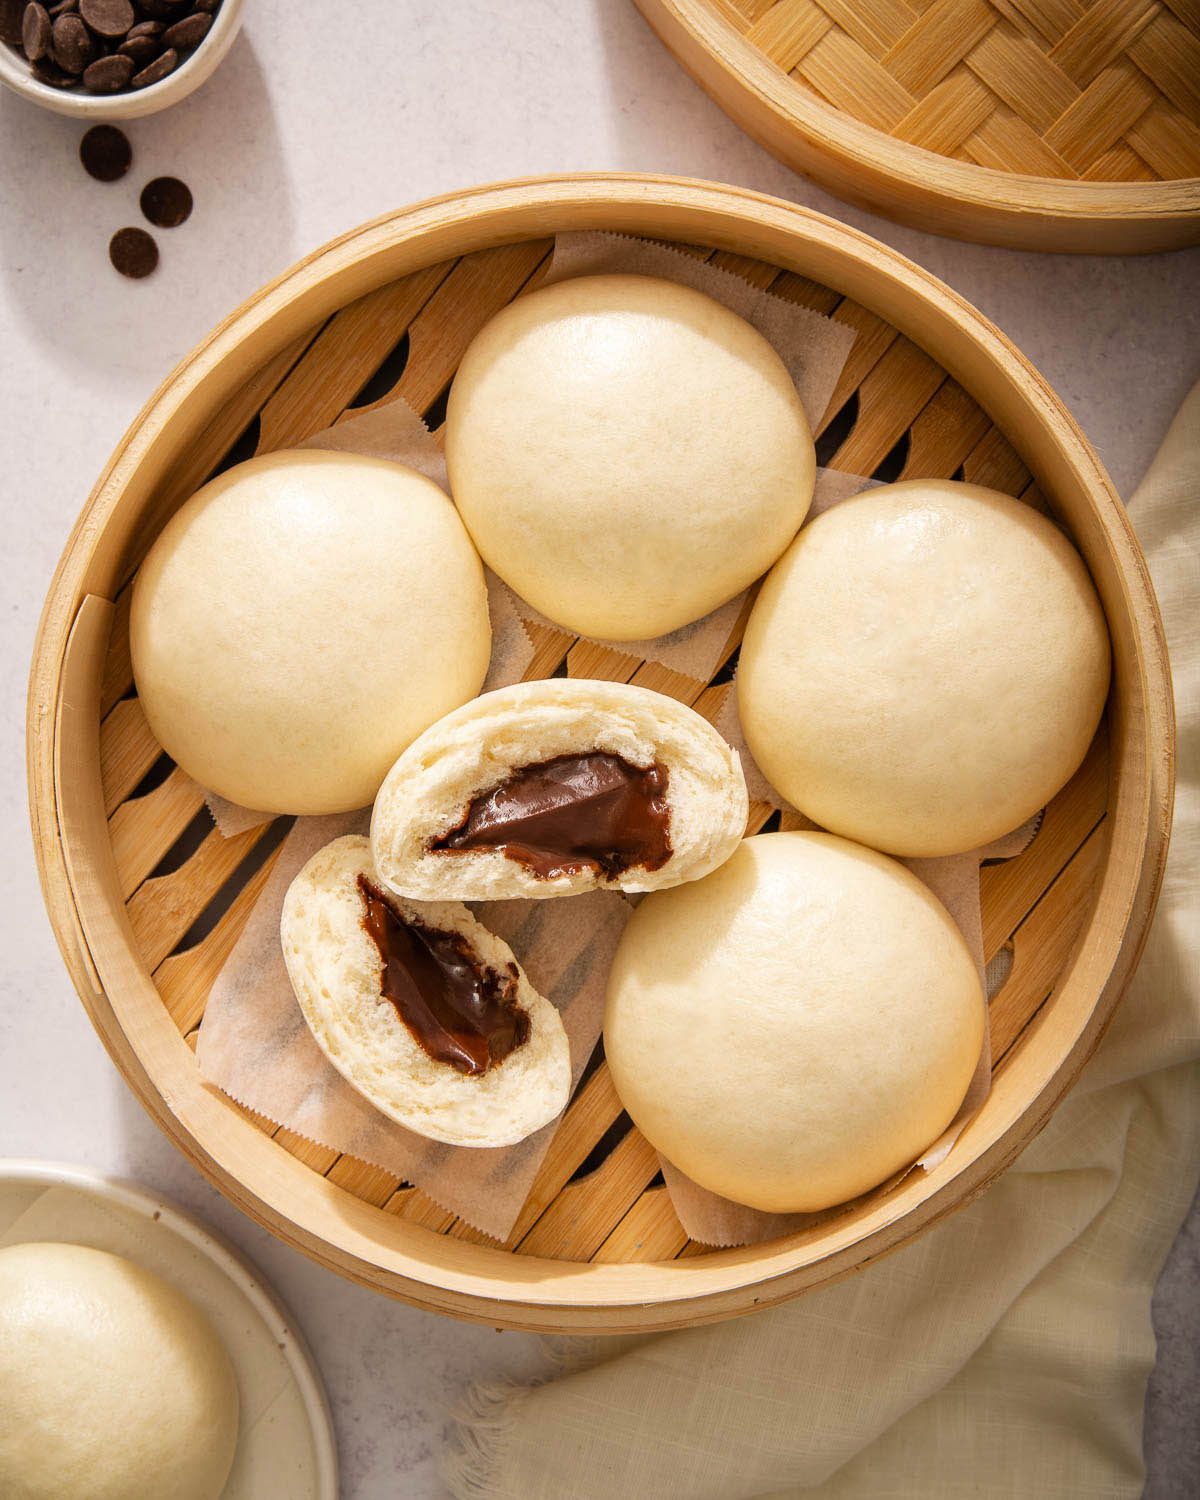
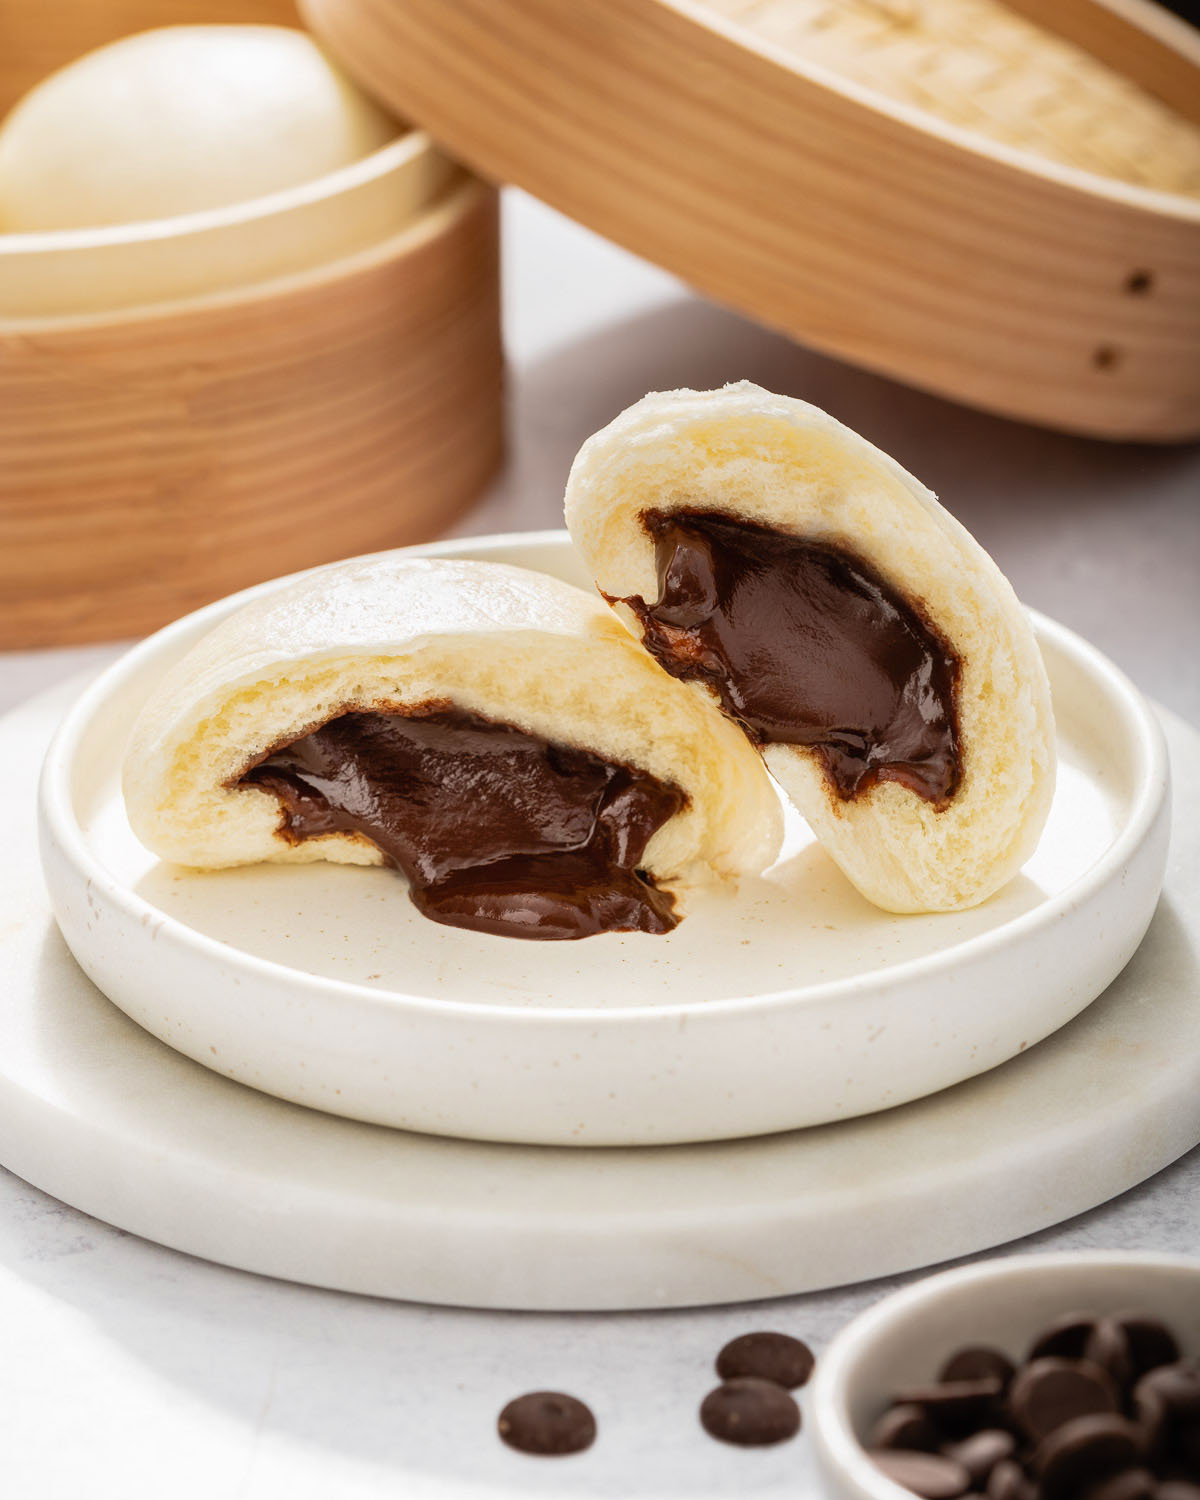
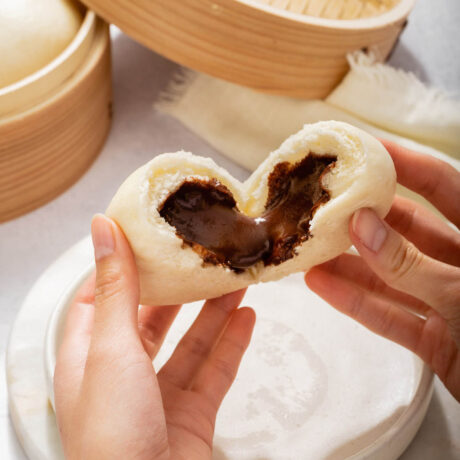
These chocolate buns made with the softest, pillowy bao dough and filled with a semi-sweet chocolate lava filling are the ideal dessert for you to treat yourself with. Take one bite and you are greeted with a beautifully soft bao bun oozing with gooey melted chocolate.
Heat the heavy cream. In a small saucepan, add the heavy cream and heat until hot and lightly simmering around the edges. Make sure to NOT boil the heavy cream.
Pour heavy cream over chocolate. In a heat proof bowl, pour the heavy cream over the chocolate chips making sure the cream covers the chocolate chips completely. Leave for 10 minutes. After the 10 minutes, stir with a rubber spatula until creamy and silky.
Chill. Cool the chocolate ganache uncovered for 30 minutes in the refrigerator. Then cover with cling wrap and press so it contacts the surface (so you don't form a skin) and cool for an additional 1 hour.
Bao Dough
Prepare the yeast. Warm the milk to 110°F (43°C) degrees. Add active dry yeast. Cover with plastic wrap and let sit for 10 min. If using instant yeast, let sit for 2-3 minutes to double check if the yeast is active. The yeast will create a frothy, 1/4 inch foam layer at the top if it is active.
Sift the dry ingredients. Sift together the flour, wheat starch, powdered sugar, baking powder and salt into the bowl of your stand mixer with a dough attachment. Mix together on low.
Add the shortening. While mixer is mixing on low, add the shortening. Make sure the shortening is broken up into small pieces by feeling it with your hand.
Liquify the egg in oil. In another separate bowl, combine the room temperature egg white with vegetable oil. Liquify the egg by pulling up the egg yolk with a fork a few times until combined.
Knead all the mixtures together. In the stand mixer on low, mix the yeast milk mixture and then add the egg and oil mix for 30 seconds. Once combined, increase the speed to medium (level 4) and knead for 5 minutes or until it forms into a ball in the mixer and is no longer sticking to the bowl. The dough should be tacky but not overly sticky. If it is too dry, add 1 tablespoon of water and combine. If the dough is too sticky, add 1 tablespoon of flour and combine.
Knead the dough into a ball with your hands. Knead the dough into a smooth ball with your hands for about 1 minute and transfer it into a lightly greased large bowl.
Proof the dough. Cover with plastic wrap and place in warm area (100°F) for about 1-2 hours or until double in size. This dough has more moisture from the fat in it so it may take awhile to rise.
Divide and roll out the dough. Divide into 12 equal pieces and quickly roll them into smooth balls. Cover with a sheet of plastic wrap to prevent them from drying. Then, use a rolling pin and roll out the edges leaving a thicker center. Approximately 4-inches.
Add the filling and form the bun. Add 1 tablespoon of filling and wrap the dough around the filling to form a ball. Then pinch tightly to seal. You may need to remove the excess dough at the end.
Let the buns rest. Place parchment squares or cupcake liners underneath each bun. Cover with a dish towel and let the buns rest for 15 minutes.
Steam the buns. Wrap the lid of your steamer with a dish cloth to prevent the condensation from falling into your steamer. Add water to your steamer and bring the water to a boil. Place the buns 2 inches apart in your steamer, cover and steam on medium heat for 10-12 minutes. After steaming, leave the buns to sit in the steamer for 1 minute to prevent them from wrinkling from the temperature shock. You will have to steam the buns in 2-3 batches depending on the size of your steamer. Cover the uncooked buns with plastic wrap and place them in the refrigerator to slow down the yeast activity until they are ready to be steamed.
Serve immediately when hot.
Notes
If the dough is too sticky, add 1 tablespoon of flour at a time until it becomes tacky and doesn’t stick to the bowl.
If the dough is too dry, add 1 tablespoon of warm water at a time until it reaches the tacky consistency. You don’t want the dough to be too dry, the seam will not properly seal when you pinch if it is and the filling will ooze out during the steaming process.
Chocolate notes: The lighter the chocolate (white>milk> semi-sweet>dark) the softer it is, so the less cream you need. This recipe is meant for semi-sweet chocolate chips so adjust the cream ratio accordingly. You MUST use cooking chocolate, or chocolate purchased from the baking aisle, NOT regular eating chocolate it won’t melt as smoothly.
Make sure to rest the bao dough for 15 minutes after shaping. This is crucial for that slight rise and fluffiness in the bao. Careful not to wait too long because the yeast will over rise and create a gap between the dough and the filling.
Wrap the lid of your steamer with a dishcloth. This step is so important to prevent the condensation from dripping down into your bun and making them wrinkly!
If your steamed bao bun is wrinkly after steaming, it probably means that either your steam was too hot or you steamed them for too long.


Love this recipe
Let me know which one you try next 🙂